[Deprecated] LBL Simulator
The implementation of the LBL actors has been moved to the Order Manager simulator.
Click to here to enter the LBL Simulator
Introduction
The LBL Simulator emulates the actors involved in the Laboratory Specimen Barcode Labeling (LBL) integration profile. The simulator can be used to simulate the missing partner when testing that profiles :
| Integration Profile | Actor | Options |
|---|---|---|
| LBL | Label Broker |
Query for labeling instruction Labels and Containers Delivered |
| LBL | Label Information Provider | Labels and Containers Delivered |
The LBL simulator can help testing applications implementing the Label Broker and/or the Label Information Provider actor.
Thanks to a mechanism which enables Gazelle TestManagement to communicate with the simulator, this one can also be picked as a test partner during a connectathon if no another system supports this actor.
For more details about the various functionnalities of the HMW Simulator, visit the following links.
- LBL Simulator : User Manual Introduction
- LBL Simulator : How to get started
- LBL Simulator : Label Broker
- LBL Simulator : Label Information Provider
Roadmap
LBL Simulator : User Manual Introduction
Click here to access the LBL Simulator.
Introduction
This simulator can be an Initiator and a Responder.
As an initiator, this simulator is aimed to send messages to a responder. So, if your system is ready to listen and accessible from the Internet, you will be able to send some messages to it.
As a Responder, this simulator is aimed to listen messages from an initiator.
By now, this simulator can act as two different actors:
- LB (Label Broker)
- LIP (Label Information Provider)
The table below gathers the supported affinity domains, transactions and SUT actors.
| Integration Profile | Actor | Affinity Domain | Transaction | System Under Test |
|---|---|---|---|---|
|
LBL |
Label Broker |
IHE |
LAB-61 LAB-62 LAB-63 |
Label Information Provider |
|
LBL |
Label Information Provider |
IHE |
LAB-61 LAB-62 LAB-63 |
Label Broker |
What is this simulator able to do ?
This simulator has been developed with the purpose of helping the developers of actors, such as Label Broker and Label Information Provider, to communicate with the SUT actor. We have tried to manage most of the cases, that means that, all (or almost) message types defined in the technical framework of the various supported affinity domains and transactions are offered. For each message type, we have tried to distinguish the required parameters from the optional ones, in order to help you with building the request or the query. Formatting of each field is not checked, so that you can test the robustness of your system by feeding it some with exotic values.
LBL Simulator has two differents options depending on Label Broker or Label Information Provider Actor. For each actors, you can send messages (when actors are initiators) to your SUT Responder. To do that, you must created your configuration (See the section below) on the System Configuration menu. All details concerning the LIP and LB simulators behaviours are given below.
- Log in to post comments
LBL Simulator : How to get started
Get a Gazelle account
First of all, note that, like the other applications from Gazelle testing platform, the HMW Simulator is linked to our CAS service. That means that, if you have an account created in Gazelle, you can use it, if you do not have one, you can create one now by filling the form here. Create an account in Gazelle is free. The login link ("cas login") is located in the top right corner of the page.
Registration of Systems Under Test (SUT) acting as HL7 responders
If your system acts as an HL7 responder in one of the transactions offered by the simulator (for example your system is Label Broker and supports LAB-61 transaction), you will have to enter its configuration in the application. (No need to enter one configuration per transaction for your SUT. For example, the Label Inormation Provider acts as a responder for the transaction LAB-62 and LAB-63. Just need to enter one configuration for your Pharmaceutical Adviser SUT.)
In order to proceed, go to "System Configurations" and hit the "Create a Configuration" button. You can also copy ![]() or Edit
or Edit ![]() an existing configuration (one of yours !).
an existing configuration (one of yours !).
In both cases, the simulator needs to know:
- A name for your configuration (displayed in the drop-down list menus)
- The actor played by your system under test
- The receiving facility/application
- The IP address
- The port the system is listening on
- The charset expected by your SUT
If you are logged in when creating the configuration, you will be set as the owner of the configuration. If you do not want other testers to send messages to your SUT you can uncheck the box "Do you want this configuration to be public?" and you will be the only one to be able to select your system in the drop-down list and to edit it (if logged in!).
Before sending messages to your system under test, ensure that your firewall options give to LBL Simulator the access to your system.
- Log in to post comments
LBL Simulator : Label Broker
In order to access to the Label Broker simulator, go to the "Simulators" menu and hit "LB".

Once on the LB Simulator page, the user will choose wich transaction to test, LAB-61, LAB-62 and LAB-63.
LAB-61 : Label Delivery Request.
To get more information about the role of the LB and LIP actors in this transaction, see the IHE Laboratory Technical Framework, Volume 2.
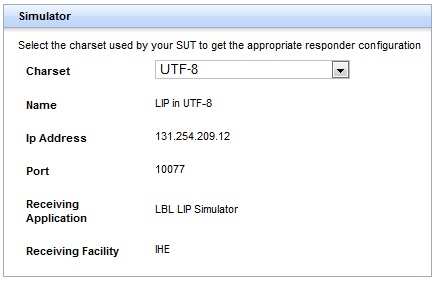
In the LAB-61 tab, the user will find a sequence diagram which resume the interaction of the transaction. At the right of this diagram, a panel shows all information about the configuration of the LB Simulator. The configuration is linked to a charset. Change the charset to get the appropriate configuration, using the charset list. See the example below, for the selected UTF-8 charset.

The LB Simulator is a responder and is able to respond to the LIP SUT with the appropriate Acknowledgment message. If the message receives by the LB Simulator is not consistent with the IHE technical framework, the LB Simulator will respond with an error Acknowledgment.
Once the LIP SUT has sent the labeling instructions to the LB Simulator, the user must hit the ![]() button in order to refresh the HL7 messages table. This table shows all HL7 messages received by the LB Simulator. See the last section of this tutorial for further information on the HL7 message validation.
button in order to refresh the HL7 messages table. This table shows all HL7 messages received by the LB Simulator. See the last section of this tutorial for further information on the HL7 message validation.
LAB-62 : Query for labeling instruction
To send a query to the LIP SUT with the LB Simulator, go to the LAB-62 tab. First at all, choose the LIP SUT Configuration to use. (Please go to the LBL Simulator : How to get started section for more information about the SUT configuration.)
Once the user has choosen the SUT configuration, a summary of the configuration will be appear on the top of the page.
To send the query, the user must fill the Request Parameters section. A table gathers the fields of the request and the values they will be filled with. At least one of the fields must be valued! (The user will find the information necessary to fill the request parameter panel in the SUT system.) Then hit the Send button to send the query to the LIP SUT.

At the bottom of the page, an HL7 message table will show all HL7 messages send by the LB Simulator to the selected LIP SUT. See the last section of this tutorial for further information on the HL7 message validation.
LAB-63 : Labels and Containers Delivered
To send a notification message to the LIP SUT with the LB Simulator, go to the LAB-63 tab. First at all, choose the LIP SUT Configuration to use. (Please go to the LBL Simulator : How to get started section for more information about the SUT configuration.)
Once the user has choosen the SUT configuration, a summary of the configuration will be appear on the top of the page.
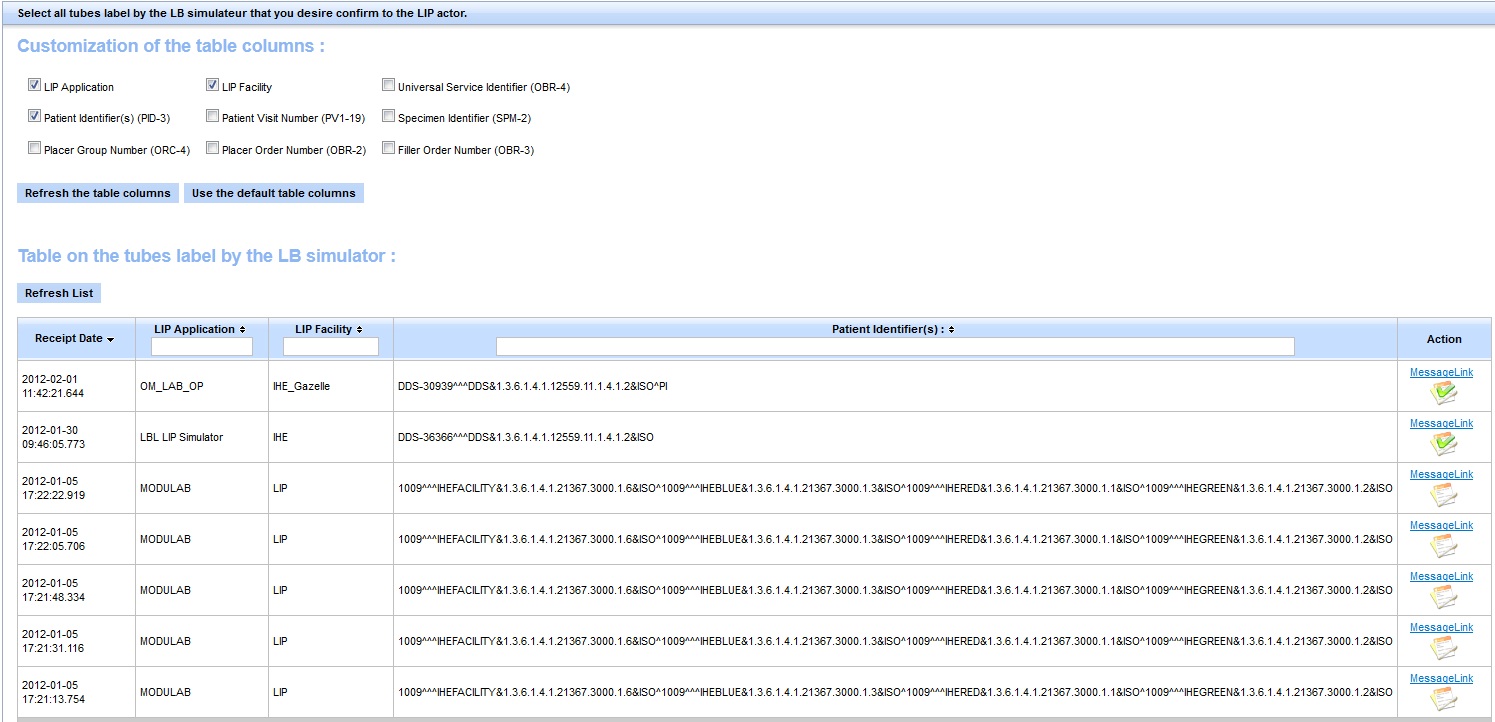
Then, the user must select for which labeled tube information send the notification message. To do that, hit the ![]() button in the Action column. The user can select severals labeled tubes information at the same time. It is also possible to choose which columns will compose the table, in order to customize the information to display. For that, tick the desire checkbox, and hit the
button in the Action column. The user can select severals labeled tubes information at the same time. It is also possible to choose which columns will compose the table, in order to customize the information to display. For that, tick the desire checkbox, and hit the ![]() button. See the example below. (The Receipt Date column can't be remoove.)
button. See the example below. (The Receipt Date column can't be remoove.)

- Log in to post comments
LBL Simulator : Label Information Provider
In order to access to the Label Information Provider simulator, go to the "Simulators" menu and hit "LIP".

Once on the LIP Simulator page, the user will choose wich transaction to test, LAB-61, LAB-62 and LAB-63.
LAB-61 : Label Delivery Request.
To get more information about the role of the LB and LIP actors in this transaction, see the IHE Laboratory Technical Framework, Volume 2.
To send a request to the LB SUT with the LIP Simulator, go to the LAB-61 tab. First at all, choose the LB SUT Configuration to use. (Please go to the LBL Simulator : How to get started section for more information about the SUT configuration.)
Once the user has choosen the SUT configuration, a summary of the configuration will be appear on the top of the page.
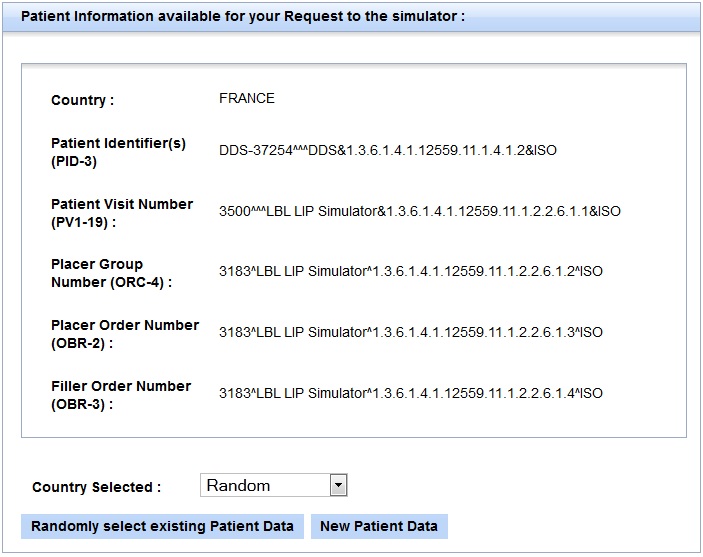
Then, in the Request Parameters panel, the user can see the Patient Information to use for the request. This is the only information to choose, the labelling information will be automatically generated by the LIP Simulator.
In the Patient Information table, the user can find information about the patient data saved in the LBL Simulator data base. To get new patient data, select the country of the patient in the country list, then hit the ![]() button. The
button. The![]() button can be used to get the existing patient data. All data about the patient are generated with the DDS (Demographic Data Server) project. See this link for further information : DDS.
button can be used to get the existing patient data. All data about the patient are generated with the DDS (Demographic Data Server) project. See this link for further information : DDS.

Finally, hit the Send button to send the request to the LB SUT.
At the bottom of the page, an HL7 message table will show all HL7 messages send by the LB Simulator to the selected LIP SUT. See the last section of this tutorial for further information on the HL7 message validation.
LAB-62 : Query for labeling instruction
To get more information about the role of the LB and LIP actors in this transaction, see the IHE Laboratory Technical Framework, Volume 2.
In the LAB-62 tab, the user will find a sequence diagram which resume the interaction of the transaction. At the left of this diagram, a panel shows all information about the configuration of the LIP Simulator. The configuration is linked to a charset. Change the charset to get the appropriate configuration, using the charset list. See the example below, for the selected UTF-8 charset.

In the Patient Information table, the user can find information about the patient data saved in the LBL Simulator data base. Patient information are essential to query the LIP Simulator. To get new patient data, select the country of the patient in the country list, then hit the  button. The
 ![]() button can be used to get the existing patient data. All data about the patient are generated with the DDS (Demographic Data Server) project. See this link for further information : DDS.
button can be used to get the existing patient data. All data about the patient are generated with the DDS (Demographic Data Server) project. See this link for further information : DDS.

The LIP Simulator is a responder and is able to respond to the LB SUT with the appropriate Acknowledgment message. If the message receives by the LIP Simulator is not consistent with the IHE technical framework, the LIP Simulator will respond with an error Acknowledgment.
Once the LB SUT has sent the labeling instructions to the LIP Simulator, the user must hit the ![]() button in order to refresh the HL7 messages table. This table shows all HL7 messages received by the LIP Simulator. See the last section of this tutorial for further information on the HL7 message validation.
button in order to refresh the HL7 messages table. This table shows all HL7 messages received by the LIP Simulator. See the last section of this tutorial for further information on the HL7 message validation.
LAB-63 : Labels and Containers Delivered
To get more information about the role of the LB and LIP actors in this transaction, see the IHE Laboratory Technical Framework, Volume 2.
In the LAB-63 tab, the user will find a sequence diagram which resume the interaction of the transaction. At the left of this diagram, a panel shows all information about the configuration of the LIP Simulator. The configuration is linked to a charset. Change the charset to get the appropriate configuration, using the charset list. See the example below, for the selected UTF-8 charset.

The LIP Simulator is a responder and is able to respond to the LB SUT with the appropriate Acknowledgment message. If the message receives by the LIP Simulator is not consistent with the IHE technical framework, the LIP Simulator will respond with an error Acknowledgment.
Once the LB SUT has sent the labeling instructions to the LIP Simulator, the user must hit the ![]() button in order to refresh the HL7 messages table. This table shows all HL7 messages received by the LIP Simulator. See the last section of this tutorial for further information on the HL7 message validation.
button in order to refresh the HL7 messages table. This table shows all HL7 messages received by the LIP Simulator. See the last section of this tutorial for further information on the HL7 message validation.
- Log in to post comments