[Deprecated] Patient Manager - User Manual
Warning: This documentation is out-dated, newest version of the documentation is available at https://gazelle.ihe.net/gazelle-documentation
Click here to access the Patient Manager tool
- Introduction
- What is this simulator able to do?
- How to add your system as a receiver
- How to do HL7 validation
- How to create a patient & share it with the Order Manager tool
- Log in to get more features
Introduction
The Patient Manager tool is developed in conformance with the IHE Technical Framework. This tool is also conformant with the French national extension for the PAM profile. This simulator is expected to act as an initiator or as a responder depending on the emulated actors.
As an initiator, this simulator is aimed to send messages to a responder. Consequently, if your system (named SUT or System Under Test) is ready to listen to an HL7 initiator and reachable from the Internet, you will be able to receive messages from the simulator.
The table below gathers the supported transactions and SUT actors.
| Simulated actor | Transaction | Option | Affinity Domain | System Under Test |
|---|---|---|---|---|
|
Patient Demographic Supplier |
ITI-30 |
Merge |
IHE |
Patient Demographic Consumer |
|
Patient Demographic Supplier |
ITI-30 |
Link/Unlink |
IHE |
Patient Demographic Consumer |
|
Patient Demographic Supplier |
ITI-47 |
Continuation Pointer Pediatric demographics |
IHE |
Patient Demographic Consumer |
|
Patient Demographic Consumer |
ITI-30 |
Merge |
IHE |
Patient Demographic Supplier |
|
Patient Demographic Consumer |
ITI-30 |
Link/Unlink |
IHE |
Patient Demographic Supplier |
| Patient Demographic Consumer | ITI-21 | Pediatric demographics | IHE | Patient Demographic Supplier |
| Patient Demographic Consumer | ITI-22 | Pediatric demographics | IHE | Patient Demographic Supplier |
| Patient Demographic Consumer | ITI-47 | Continuation pointer Pediatric demographics |
IHE | Patient Demographic Supplier |
|
Patient Encounter Supplier |
ITI-31 |
Basic subset |
IHE |
Patient Encounter Consumer |
|
Patient Encounter Consumer |
ITI-31 |
Basic subset |
IHE |
Patient Encounter Supplier |
| Patient Encounter Supplier | ITI-31 | Inpatient/Outpatient encounter management | IHE | Patient Encounter Consumer |
| Patient Encounter Consumer | ITI-31 | Inpatient/Outpatient encounter management | IHE | Patient Encounter Supplier |
| Patient Encounter Consumer | ITI-31 FR | All | IHE-FR | Patient Encounter Supplier |
| Patient Identity Source | ITI-30 / ITI-8 / ITI-44 | IHE | Patient Identifier Cross-reference manager | |
| Patient Identity Cross-Reference Consumer | ITI-10 / ITI-9 / ITI-46 / ITI-45 | PIX Update Notification | IHE | Patient Identifier Cross-reference manager |
| Patient Identity Cross-Reference Manager | ITI-8 / ITI-30 /ITI-44 | IHE | Patient Identity Source | |
| Patient Identifier Cross-Reference Manager | ITI-10 / ITI-9 / ITI-46 / ITI-45 | IHE | Patient Identitfier Cross-Reference Consumer | |
| ADT | RAD-1 / RAD-12 | IHE | ADT Client (MPI, OF/DSS, OP ...) |
What is this simulator able to do?
This simulator has been developed with the purpose of helping developers of IHE systems to test their systems with another IHE compliant system for pre-Connectathon testing or during off-connectathon periods. We try to manage most of the cases, that means that, step by step, we planned to offer you all the events defined in the Technical Framework. We also plan to implement national extensions if requested by the different organizations.
For more details regarding an actor in particular, follow one of the links below:
- PAM Patient Demographic Supplier
- PAM Patient Demographic Consumer
- PAM Patient Encounter Supplier
- PAM Patient Encounter Consumer
- PDQ Patient Demographic Consumer
- PDQ Patient Demographic Supplier
- PIX Patient Identity Source
- PIX Patient Identifier Consumer
- PIX Patient Identifier Cross-Reference Manager
- PDQv3 Patient Demographic Consumer
- PDQv3 Patient Demographic Supplier
- SWF ADT
- PIXV3 Patient Identity Source
- PIXV3 Patient Identifier Cross-Reference Manager
- PIXV3 Patient Identifier Cross-Reference Consumer
- PAM Automation
How to add your system as a receiver
The Patient Manager has been designed to send HL7V2/HL7V3 messages to your system under test (eg if you are testing PAM/PDC, PIX Manager, Order Placer, Order Filler, or others).
In order to send messages to your system under test, the Patient Manager tool needs the configuration (IP address/listening port, endpoint, receiving facility/application and no on) of your receiving system. This configuration has to be stored in the database of the application, so that you can re-use this configuration without creating it each time you need to perform a test. The procedure is different depending on the version of HL7 your system is implementing.
In both cases, if you are logged in when creating the configuration, you will be set as the owner of the configuration. If you do not want other testers to send messages to your SUT you can uncheck the box "Do you want this configuration to be public?" and you will be the only one to be able to select your system in the drop-down list (if logged in !).
HL7V2 Systems Under Test
Go to "System Configurations-->HL7 Responders" and hit the "Create a Configuration" button. You can also copy ![]() or Edit
or Edit ![]() an existing configuration.
an existing configuration.
In both cases, the simulator needs to know:
- A name for your configuration (displayed in the drop-down list menus)
- The actor played by your system under test
- The receiving facility/application
- The IP address
- The port the system is listening on
- The charset expected by your SUT
If you are logged in when creating the configuration, you will be set as the owner of the configuration. If you do not want other testers to send messages to your SUT you can uncheck the box "Do you want this configuration to be public?" and you will be the only one to be able to select your system in the drop-down list (if logged in !).
If your system implements several actors, you are expected to create a configuration for each of them.
HL7V3 Systems Under Test
Go to "System Configurations-->HL7V3 Responders" and hit the "Create a Configuration" button. You can also copy ![]() or Edit
or Edit ![]() an existing configuration.
an existing configuration.
In both cases, the simulator needs to know:
- A name for your configuration
- The name of the tested system
- Its endpoint location
- Its device id root OID
- Its organization OID
- The list of transactions which are supported by your system
If the same endpoint is used by several actor, you only need to register your system once with the supported transaction correctly set.
How to do HL7 validation
The simulator communicates with our HL7 validator which performs validation of HL7V2.x messages (based on HL7 message profiles developed by the Gazelle team and the NIST) and validation of HL7V3 messages (model-based engine developed by Gazelle team). For each received and sent messages, you can ask the simulator to validate the messages. Below is the meaning of the different icons you can meet in the Test Report section of each page or under the HL7 messages menu (gathers all the messages received and sent by the simulator).
|
Open the pop-up containing the received and sent messages beside their validation results. The validation service is automatically called each time you hit this button. Consequently, the validation result you see is always the one matching the newest version of the message profile. |
|
|
The message has not been validated yet. Hitting this button leads to the same action as the previous icon (magnifying glass). |
|
|
The message has been successfully validated. Hitting this button leads to the same action as the previous ones. |
|
|
The message has been validated but the message contains errors. |
|
|
Open a pop-up containing the list of SUT which can received this message. Enables the user to send again a specific message. Be aware that the simulator can only be asked to replay a message sent by it (not received from another SUT) |
How to create a patient & share it with the Order Manager tool
Patients created within the Patient Manager can be sent to an external SUT. These patients can also be used with the Order Manager tool, so that a patient in the Patient Manager database can be used by the Order Manager to create HL7 orders and DICOM Modality Worlist.
Here's how:
- Create a new patient in the Patient Manager (eg in the "ADT" or "PAM-->Patient Demographics Supplier" menu)
- Then, select menu "All patients"
- Use the filters and column headings on that page to find your patient.
- In the "Action" column for that patient, select the
 icon to 'Create a worklist or order for an existing patient'. This button will launch the Order Manager application, and you can proceed to create an Order or Worklist.
Logging in to get more features
The login link ("cas login") is located in the top right corner of the page.
Note that, like the other applications from Gazelle testing platform, PatientManager is linked to our CAS service. That means that, if you have an account created in the European instance of Gazelle Test Management, you can use it, if you do not have one, you can create one now by filling the form here. Note that if you only have an account for the North Americal instance of Gazelle, it will not work with the PaatientManager; you will need to create a new account.
Once you are logged in, you are set as the "creator" of all the patients you create or modify and then (still logged in) you can choose to see only those patients. Another important feature is that you can decide to be the only one to be allowed to send messages to the SUT you have configure in the application (see next section).
- Log in to post comments
[Deprecated] PAM Test Automation
Warning: This documentation is out-dated, newest version of the documentation is available at https://gazelle.ihe.net/gazelle-documentation
The Patient Manager tool has an automation feature named PAM Test Automation. It is available through the PAM section, under the Automation menu. This automaton aims to handle all events of the ITI-31 transaction, sequentially following an order described by a state diagram. The accepted diagram must be in the graphml format and edited with the yEd software.

3 pages are defined in this tool:
-
Execution logs: Display logs results of a graph execution
-
Available automated tests: graphs that are used in an automaton execution
-
Run automaton: Graph execution
-
Execution logs

The logs page displays the results of the various executions done with the automaton. You can filter with the search criteria on the top of the page.
To display a graph execution, click on the corresponding view icon.
From this page, you can visualize the HL7 message request and response in different views (XML, Tree, ER7, RAW) and display the validation details.

-
Available automated tests
This page is dedicated to the display and edit of graph. In the list page, you can see all the graphs. You can create a new graph by clicking on the “Create new graph” button or edit an existing one by clicking on the pencil icon.
As an admin, if you click on the green circle, the graph will be disabled, that means that you can’t use it in a new graph execution. If the disabled graph is never used, he can also be deleted by clicking on the trash icon. A disabled graph which has already be used can’t be deleted. If you want to do it, you first need to delete execution logs related to this graph.

When you create a new graph, you need to import a graphml file describing the PAM events you want to support from a list of authorized events which is displayed at the top of the page; basically, they are those supported by the Patient Encounter Supplier section of the tool.
The graph needs to be edited with the yEd software, otherwise it’s not guaranteed that the imported file will work properly.
Moreover, the patients statuses must be named from the following list :
-
No_Encounter
-
Outpatient
-
Inpatient
-
Preadmit
-
Preadmit_R
-
Preadmit_I
-
Preadmit_O
-
Temporary_Leave
-
Emergency
The easiest way to create your own working graph is to download an already working one, and edit it with yEd by changing the events.
You also have to add a image to help people with understanding how the state diagram is done. One solution is to take a screenshot of the diagram from the yEd software.
-
Run automaton
The last page is devoted to the execution of the automaton. You need to complete these differents steps to run the automaton properly :
-
Select a graph under the Workflow panel. It defines which events will be executed and from which patient’s statuses they can be processed. When selected, a preview of the automaton is available in the right-sided panel. You can zoom on the preview by clicking on the full-screen icon, By default, the automaton stops running when all the patients statuses are reached at least once. However, you can tick the Full movements coverage checkbox to ensure the automaton only stops when all events are processed.

-
The second step is to select the System Under Test (SUT). You can refer to the section 2.3 to configure a SUT.

-
You then need to generate a new patient with the DDS tool. You can select information or let the automaton randomly fill patient data. If you are not satisfied with some information generated by the automaton, you can still click on the “Edit Patient Informations” button to manually change patient data.

-
Select the encounter associated with the patient, as for the patient information, you can either manually fill the encounter or click on the “Fill the encounter with random data” to let the automaton fills the encounter.
-
Click on the Run automaton button

The tests results are displayed in real time. When the automaton is processing, you don’t have to stay on the page, you can leave it, the tests results will appear on the “Execution logs” page when the process will be over. This process can be quite long and obviously depends on how many messages are needed to stop the automaton. Moreover, if you use the full movements coverage mode, it is even longer.
For example, this graph above with 9 patient statused and 38 movements needs an average of 400 messages for the automaton to stop with the Full movements coverage mode. The time between 2 messages being process being approximately of 1,75s, you need to wait 12 minutes for the process to be done, in average.
-
Editing graph with YED Software
To generate a valid graphml file you need to use Yed. It’s quite simple to edit it. You can add edges from a state to another state. The labels must be named with the event name (ex : A21). The initial event which link the start state to another state must be called “ini”.
 As stated before, the easiest way to make a valid graph is to edit a valid one and change the edges, then save the graph.
Your graph can be oriented with what are called “guards”. Guards are parameters which can be set or evaluated when passing into an edge.
Here is the way of affecting a value to a variable when passing through an edge :

Here is the way of saying that the A11 edge can be reached only under conditions :

If your graph is not valid because of unsupported events, a message will be displayed when you try to upload it in Patient manager. However, be careful, it’s not impossible that your graph is invalid for another reason but is accepted by Patient manager and still can be uploaded.
[Deprecated] Patient Manager - ITI-30 initiator
Warning: This documentation is out-dated, newest version of the documentation is available at https://gazelle.ihe.net/gazelle-documentation
The Patient Manager tool implements the Patient Demographic Supplier actor of the PAM integration profile as well as the Patient identity Source actor of the PIX integration profile. Both actors are involved in the ITI-30 transaction. This page of the documentation explains how to send demographics information to your system under test which acts either as a PAM Patient Demographics Consumer or either as a PIX Patient Identity Source.
This simulated actor implements both the Merge and Link/Unlink options. Consequently, the application is able to send the following events for the ITI-30 transaction:
- Create new patient (ADT^A28^ADT_A05)
- Update patient information (ADT^A31^ADT_A05)
- Change Patient Identifier List (ADT^A47^ADT_A30)
- Merge two patients (ADT^A40^ADT_A39)
- Link Patient Information (ADT^A24^ADT_A24)
- Unlink Patient Information (ADT^A37^ADT_A37)
Two starting points
![]()
We try, at the most as we can, to keep a consistency between the different sections. As a consequence, the way you select the system under test and the patient to send is almost the same for each event, as well as the display of the test result, although some specifities can appear.
PAM Patient Demographics Supplier
To access the page dedicated to the PAM Patient Demographic Supplier actor, go to Patient Administration Management --> Patient Demographic Supplier; then you will be able to select which event you want to send to your system under test.
PIX Patient Identity Source
To access the page dedicated to the PAM Patient Demographic Supplier actor, go to PIX/PIXV3 --> Patient Identity Source --> [ITI-30] Patient Identity Management; then you will be able to select which event you want to send to your system under test.
Select the system under test
If your system under test has been properly created in the "System Configuration" section, that means that you have associated it to the right actor (Patient Demographic Consumer or Patient identity Source), you should be able to see it in the drop-down menu. As soon as you have selected it, check that it is the right configuration that is displayed in the panel beside the sequence diagram.
Select the patient
If you are not logged in, the application offer you two way to choose a patient:
"all patients" will display all the patients created in the context of the PAM/PDS or PIX/PAT_IDENTITY_SRC and still active*. You can apply a filter if you want to restrain the search to a certain period.
"generate patient" will display a panel which will enable you to create a patient using our DDS application. You are expected to select at least a country from the drop-down list before hitting the "Generate patient" button.
Note that in some instance of the tool which are not linked to the Demographics Data Server, it is not possible to generate new patients. If you have the administration rights, consult the administration section to read how to import patients from a CSV file.
If you are logged in, a third option is displayed entitled "my patients". By picking this choice, only the active* patient you have created (you were logged in when you create them) are displayed. You can apply a filter if you need to restrain the search to a certain period.
* A patient is active until he/she is merged with or update to another one.
Patient history
All the actions performed on a patient are logged into the application. Consequently, for each patient we can say who has created it, to which systems it has been sent (enclosing in which message), whose patient is updated from he/she and so one. To retrieve all the patients created by the simulator or received from a system under test, go to the All patients menu and filter on the simulated actor.
Configure the message to be sent to your system
 Create a new patient
In this section of the simulator, you can send a message to your system under test to create a patient. This message can contain a patient you have just created using the DDS generation option or an existing patient.
In the first case, several options are offered for the patient generation; you can modify the generated data of the patient, just hit the "Modify patient data" to edit them. If you need specific patient identifiers, go to the "Patient 'sIdentifiers" tab and edit, add or remove identifiers.
In the second case, you only have to select your system configuration and hit the ![]() button on the line of the patient you want. The message is automatically sent and the result of the test is displayed at the bottom of the page.
button on the line of the patient you want. The message is automatically sent and the result of the test is displayed at the bottom of the page.
To send another message, only hit the "select another patient" button.
 Update patient information
In this section of the simulator, you can send a message to your system under test to update a patient. You can either create a new patient using the "generate new patient" option or use an existing one by hitting the ![]() button on the line of the patient you want. In the second case, you will be able to change the information of the patient before sending the update message. Internally, the application create a new patient with the new values and deactive the selected patient.
button on the line of the patient you want. In the second case, you will be able to change the information of the patient before sending the update message. Internally, the application create a new patient with the new values and deactive the selected patient.
Change patient identifier list
This part of the tool enables you to send a message to your system under test to change the value of one of the identifiers of a patient. You can choose to create a new patient and to change his/her identifiers before sending it or to select an existing one. When you choose the second option, a new patient with the new identifier list is created and the "old" one is deactivated. Note that, according to the IHE technical framework, you can change only one identifier at a time. That means that as soon as you validate the new identifier, you cannot change it again or change another one. If you did a mistake, hit the "select another patient" button.
 Merge patients
In this part of the simulator you can send a message to your system under test to notify it about the merging of two patients. In order to create this message, you need to select two patients. The one called "incorrect patient" is used to populate the MRG segment (this patient will be deactivated in the simulator); the other one, called "correct patient" is the patient who remains and is used to populate the PID segment of the message.
Patients can be dragged from the table (using the green frame containing the id) and dropped to the appropriate panel or you can choose to generate one or both patient(s) using DDS.
The message can be sent (button is available) only if two patients are selected.
 Link/Unlink patients
The "link/unlink patients" part of the simulator is used to send unlink/unlink messages to your system under test. As for the "merge patients" section, you can drag and drop patients and/or generate them using DDS. Once you have selected two patients, choose if you want to link them or unlink them. The selected option is highlighted in orange and the sequence diagram at the top of the page is updated according this option, as well as the label of the button you have to hit to send the message.
- Log in to post comments
[Deprecated] Patient Manager - PAM Patient Encounter Consumer
Warning: This documentation is out-dated, newest version of the documentation is available at https://gazelle.ihe.net/gazelle-documentation
The Patient Manager tool implements the Patient Encounter Consumer actor of the PAM profile defined by the IHE technical framework. Currently, this simulator only supports the basic subset of messages and the Inpatient/Outpatient encounter management option. The supported trigger events are:
- Admit patient (ADT^A01^ADT_A01)
- Register patient (ADT^A04^ADT_A01)
- Cancel admit/register patient (ADT^A11^ADT_A09)
- Discharge patient (ADT^A03^ADT_A03)
- Cancel discharge (ADT^A13^ADT_A01)
- Merge patient identifier list (ADT^A40^ADT_39)
- Update patient information (ADT^A08^ADT_A01)
- Pre-admit patient (ADT^A05^ADT_A05)
- Cancel pre-admit (ADT^A38^ADT_A38)
- Change Patient class to inpatient (ADT^A06^ADT_A06)
- Change Patient class to outpatient (ADT^A07^ADT_A06)
- Transfer patient (ADT^A02^ADT_A02)
Two sections (pages) of the Patient Manager application are dedicated to the use of the Patient Encounter Consumer actor. You can reach them going to Patient Administration Management --> Patient Encounter Consumer.

Configuration and messages
When the simulator acts as a PEC, it is only a responder; that means that it is listening on a specific port and sends acknowledgements for the messages it receives. As a consequence, you are not expected to give to the simulator the configuration of the PDC part of your SUT. At the contrary, your SUT needs the configuration of the simulator in order to send it messages. When you go to the page "Configuration and Messages" you can see that various configurations are offered. Actually, in order to be able to properly understand the messages it receives, the simulator needs to open a socket using the appropriate encoding character set. The IP address and the receiving application and facility do not differ from a configuration to another, only the port number should change. Note that if the Character set given in the message (MSH-18) is not the one expected, the message is application rejecting. In the same way that if the receiving application or receiving facility does not match the expected one, the message will be reject with an AR acknowledgment.
In this same page, you can see the list of messages received by the PEC actor. The more recent ones are at the top of the list.
Received Patients
When the simulator receives a message, it tries to integrate it, if it is not able to do it, it sends back an error message. It means that each time it can, it performs the appropriate action on the patient and its encounter. The resolution of patients is done on their identifiers, the resolution of encounters is done using the visit number (PV1-19). For each patient, the list of encounters and movements received are available under the "Patient's encounter" tab.
- Log in to post comments
[Deprecated] Patient Manager - PAM Patient Encounter Supplier
Warning: This documentation is out-dated, newest version of the documentation is available at https://gazelle.ihe.net/gazelle-documentation
The Patient Manager tool implements the Patient Encounter Supplier actor of the PAM profile defined by the IHE technical framework. Currently, the following options are available:
-
Basic subset of messages
-
Inpatient/outpatient encounter management
-
Advanced encounter
-
Historic movement
Moreover, the French extension is supported, so the specific French events are included in Patient Manager and the user can choose to send messages compliant with this national extension.
That means that the events listed below are available:
-
Admit patient (ADT^A01^ADT_A01)
-
Register patient (ADT^A04^ADT_A01)
-
Cancel admit/register patient (ADT^A11^ADT_A09)
-
Discharge patient (ADT^A03^ADT_A03)
-
Cancel discharge (ADT^A13^ADT_A01)
-
Merge patient identifier list (ADT^A40^ADT_39)
-
Update patient information (ADT^A08^ADT_A01)
-
Pre-admit patient (ADT^A05^ADT_A05)
-
Cancel pre-admit (ADT^A38^ADT_A38)
-
Change Patient class to inpatient (ADT^A06^ADT_A06)
-
Change Patient class to outpatient (ADT^A07^ADT_A06)
-
Transfer patient (ADT^A02^ADT_A02)
-
Cancel transfert patient (ADT^A12^ADT_A12)
-
Cancel register patient (ADT^A11^ADT_A11)
-
Change attending doctor (ADT^A54^ADT_A54)
-
Cancel Change of attending doctor (ADT^A55^ADT_A55)
-
Change of conditions of the medico-administrative management (ADT^Z88^ADT_Z88)
-
Cancel change of conditions of the medico-administrative management (ADT^Z89^ADT_Z89)
-
Change of medical ward (ADT^Z80^ADT_Z80)
-
Cancel change of medical ward (ADT^Z81^ADT_Z81)
-
Change of nursing war (ADT^Z84^ADT_Z84)
-
Cancel change of nursing war (ADT^Z85^ADT_Z85)
-
Leave of absence (ADT^A21^ADT_A21)
-
Cancel leave of absence (ADT^A52^ADT_A52)
-
Return from leave of absence (ADT^A22^ADT_A22)
-
Cancel return from leave of absence (ADT^A53^ADT_A53)
-
Move account information (ADT^A44^ADT_A44)
A section (page) of the application is dedicated to this actor, to access it go to Patient Administration Management --> Patient Encounter Supplier.

We have chosen to gather all the events in a same page. In that way, the selection of your SUT, the creation of a new event, its update or its cancellation works in the same way. As soon as a new event is implemented by the simulator it will appear in the drop-down box "Category of event".
-
Select the system under test
If your system under test has been properly created in the "System Configuration" section, which means that you have associated it to the right actor (Patient Encounter Consumer), you should be able to see it and select it in the drop-down menu. As soon as you have selected it, check that it is the right configuration that is displayed in the panel beside the sequence diagram.
Note that if you are logged in, you are set has the "creator" of the patients you create and in that way, by default, the owner filter will be set with your username to see your patients.
-
Sending a message for notifying a new event
In order to set the appropriate action you want to perform, you have to select first the "Category of event" and then the "Action to perform". In the case of the notification of a new event, the action to perform is "INSERT"; make sure the trigger event mentioned between brackets is the one you want.
The following steps differ depending on the category of event you have chosen.
-
Admit/Register a patient
The next step is the selection of the patient:
-
By picking up a patient from the displayed list (this list gathered the patients sent by the PES part of the simulator and ones received by the PDC part of the simulator)
-
Create a patient with random demographics (select the "generate a patient" option.
As described in the Technical Framework, a patient can have only one Inpatient encounter at a time; as a consequence, you will not be able to create a second Inpatient encounter for a given patient until the first encounter is closed (sending of discharge event).
Once the patient is selected, you are asked to fill out the form about the encounter. If you want the application to fill out this form for you, click the "Fill the encounter with random data" button. As soon as you are happy with the values, click on the "Send" button at the bottom of the page to send the message to your SUT.
-
Update patient information
According the Technical Framework, this event is only allowed for a patient with an open encounter.
-
Select the patient for which you want to update the patient demographics
-
Update the fields you want
-
Click on the "Send" button at the bottom of the page.
-
Merge patient identifier list
This event requires two patients, the one with incorrect identifiers and a second one which will be the "good" one, this second one will remain.
-
Drag and drop the ID (in the green box) of the incorrect patient to the "Patient with incorrect identifiers" box.
-
Drag and drop the ID (in the green box) of the correct patient to the "Target patient" box.
-
Click on the "Send" button at the bottom of the page.
-
Other events
Depending of the event you want to insert, you will be asked to fill out some fields, the ones differ from an event to the other but the main principle remains the same.
-
Select the patient for which you want to insert a new event. If the new event requires the patient to have an open encounter, you will not be able to select a patient which has no opened encounters.
-
The list of encounters relative to the patient is displayed; select the encounter for which you want to insert a new event. Note that if you are logged, you will be set as the creator of the encounter and by selecting the "My encounters" option, only "your" encounters will be displayed.
-
Fill out the form (if asked)
-
Click on the "Send" button at the bottom of the page.
-
Sending a message for notifying the cancellation of an event
According the Technical Framework, not all but some of the events can be cancelled. Only the current (last entered) event can be cancelled. To send a notification to cancel an event, follow the steps given below.
-
Select the category of event to cancel in the drop-down list.
-
Select "CANCEL" in the drop-down list entitled "action to perform". Check the trigger event given between brackets is the one you want to send.
-
Select the movement to cancel (only the current one can be cancelled according to the Technical Framework).
-
A pop-up raises, check the information given and click on the "Yes" button.
- Log in to post comments
[Deprecated] Patient Manager - PDQ Patient Demographics Supplier
Warning: This documentation is out-dated, newest version of the documentation is available at https://gazelle.ihe.net/gazelle-documentation
The PatientManager is able to act as a Patient Demographics Supplier for the Patient Demographic Query integration profile. Both the Pediatric Demographics and Patient Demographic and Visit Query options are implemented. As a consequence, the simulator can be used as a responder for the following transactions:
- ITI-21: Patient Demographics Query
- ITI-22: Patient Demographics and Visit Query
ITI-21: Patient Demographics Query
The table below gathers the parameters the simulator is able to map to its database to perform the query and send back the batch of corresponding patients. Note that when several parameters are provided, the AND operator is used to build the database query; the "*" wildcard is supported to substitute zero or more characters. The returned patients are those owned by the Patient Demographic Supplier actor. To consult the list of available patients, see http://gazelle.ihe.net/PatientManager/patient/allPatients.seam?actor=PDS . Note that only the subset of active patients is queried.
Table-1 : PQD-3 fields supported by the PDQ/PDS simulator for ITI-21 transaction
|
HL7 FIELD |
ELEMENT NAME |
JAVA OBJECT / ATTRIBUTE (indicative) |
SQL CLAUSE |
EXTRA INFO |
|
PID.3 |
Patient Identifier List | patient.patientIdentifiers | like (ignores case) | also filter according to QPD-8 |
| PID.3.1 | Patient Identifier List (ID Number) | patientIdentifer.fullPatientId | like (ignores case), MatchMode = START | |
| PID.3.4.1 | Patient Identifier List (Assigning Authority - namespace ID) | patientIdentifier.domain.namespaceID | domain namespaceID like (ignores case) | |
| PID.3.4.2 | Patient Identifier List (Assigning Authority - universal ID) | patientIdentifier.domain.universalID | domain universal ID like (ignores case) | |
| PID.3.4.3 | Patient Identifier List (Assigning Authority - universal ID Type) | patietnIdentifier.domain.universalIDType | domain universal ID type like (ignores case) | |
| PID.3.5 | Patient Identifier List (Identifier Type Code) | patientIdentifier.identifierTypeCode | like (ignores case) | |
| PID.5.1.1 | Patient Name (family name/surname) | patient.lastName | like (ignores case) | |
| PID.5.2 | Patient Name (given name) | patient.firstName | like (ignores case) | |
|
PID.7.1 |
Date/Time of Birth | patient.dateOfBirth | between 'date 0:00 am' to 'date 11:59 pm' | date format : yyyyMMddHHmmss |
|
PID.8 |
Administrative Sex | patient.genderCode | equals | Gender code (F, M ...) |
|
PID.11.1 |
Patient Address (Street) | patient.street | like (ignores case) | |
| PID.11.3 | Patient Address (City) | patient.city | like (ignores case) | |
| PID.11.4 | Patient Address (State) | patient.state | like (ignores case) | |
| PID.11.5 | Patient Address (Zip Code) | patient.zipCode | like (ignores case) | |
| PID.11.6 | Patient Address (Country Code) | patient.countryCode | like (ignores case) | iso3 |
|
PID.18 |
Patient Account Number | patient.accountNumber | like (ignores case) | |
| PID.18.1 | Patient Account Number (ID Number) | patient.accountNumber | like (ignores case), MatchMode = START | |
| PID.18.4.1 | Patient Account Number (Assigning Authority - namespace ID) | patient.accountNumber | like (ignores case) %^^^value, MatchMode = START | |
| PID.18.4.2 | Patient Account Number (Assigning Authority - universal ID) | patient.accountNumber | like (ignores case) %^^^%&value, MatchMode = START | |
| PID.18.4.3 | Patient Account Number (Assigning Authority - universal ID Type) | patient.accountNumber | like (ignores case) %^^^%&%&value, MatchMode = START | |
|
PID.6.1.1 |
Mother's maiden name (last name) | patient.mothersMaidenName | like (ignores case) | |
|
PID.13.9 |
Phone Number - Home (any text) | patient.phoneNumber | like (ignores case) |
ITI-22: Patient Demographics and Visit Query
The table below gathers the parameters the simulator is able to map to its database to perform the query and send back the batch of corresponding patients. Note that when several parameters are provided, the AND operator is used to build the database query; the "*" wildcard is supported to substitute zero or more characters. The returned patients are those owned by the Patient Encounter Supplier actor. To consult the list of available patients, see http://gazelle.ihe.net/PatientManager/patient/allPatients.seam?actor=PES. Note that only the subset of open encounters for active patients is queried.
The parameters gathered in table Table-1 are also supported for this transaction. In addition, you can provide the following parameters (see Table-2).
Table-2 : PQD-3 fields supported by the PDQ/PDS simulator for ITI-22 transaction
|
HL7 FIELD |
ELEMENT NAME |
JAVA OBJECT / ATTRIBUTE (indicative) |
SQL CLAUSE |
EXTRA INFO |
| PV1.2 | Patient class | encounter.patientClassCode | equals | Patient class code (I, O ...) |
| PV1.3.1 | Assigned Patient location (Point of care) | movement.assignedPatientLocation | like (ignores case), MatchMode = START | |
| PV1.3.2 | Assigned Patient location (Room) | movement.assignedPatientLocation | like (ignores case) %^value, MatchMode = START | |
| PV1.3.3 | Assigned Patient location (Bed) | movement.assignedPatientLocation | like (ignores case) %^%^value, MatchMode = START | |
| PV1.3.4 | Assigned Patient location (Facility) | movement.assignedPatientLocation | like (ignores case) %^%^%^value, MatchMode = START | |
| PV1.7 | Attending doctor | encounter.attendingDoctor | like (ignores case) | |
| PV1.8 | Referring doctor | encounter.referringDoctor | like (ignores case) | |
| PV1.10 | Hospital service | encounter.hospitalServiceCode | like (ignores case) | |
| PV1.17 | Admitting doctor | encounter.admittingDoctor | like (ignores case) | |
| PV1.19.1 | Visit number (ID number) | encounter.visitNumber | like (ignores case) | |
| PV1.19.4.1 | Visit number (Assigning authority namespaceID) | encounter.visitNumberDomain.namespaceID | like (ignores case) | |
| PV1.19.4.2 | Visit number (Assigning authority universalID) | encounter.visitNumberDomain.universalID | like (ignores case) | |
| PV1.19.4.3 | Visit number (Assigning authority universal ID Type) | encounter.visitNumberDomain.universalIDType | like (ignores case) |
QPD-8: What domains returned
The list of the domains known by the Patient Demographics Supplier actor is available under Patient Demographics Query / Patient Demographics Suppliers. It is built up from the list of different assigning authorities for which the simulator owned patient identifiers.
Continuation pointer persistence and Query Cancellation
As defined in the technical framework, the Patient Demographics Supplier is able to send results in a interactive mode using a continuation pointer. The list of pointers is regularly cleaned up, a pointer for which no request has been received within the previous hour is destroyed.
When querying the supplier in interactive mode, the Patient Demographics Consumer can send a cancel query message (QCN^J01^QCN_J01) to inform the supplier that no more result will be asked. At this point, the supplier destroys the pointer associated to the provided query tag.
- Log in to post comments
[Deprecated] Patient Manager - PDQ/PDQv3 Patient Demographic Consumer
Warning: This documentation is out-dated, newest version of the documentation is available at https://gazelle.ihe.net/gazelle-documentation
The Patient Manager tool implements the Patient Demographic Consumer for the Patient Demographics Query (PDQ) and Patient Demographics Query HL7V3 integration profiles.
That means that it can send
- the message defined by the ITI-21 and ITI-22 transactions
- QBP^Q22^QBP_Q21
- QBP^ZV1^QBP_Q21
- QCN^J01^QCN_J01
- the messages defined by the ITI-47 transaction
- PRPA_IN201305UV02
- QUQI_IN000003UV01
- QUQI_IN000003UV01_Cancel
Patient Demographics Query (PDQ)
Access the page to create the query to send to your system from menu PDQ/PDQv3 --> Patient Demographic Consumer --> [ITI-21/ITI-22] Patient Demographics (and visits) Query.
Patient Demographics Query HL7V3 (PDQV3)
Access the page to create the query to send to your system from menu PDQ/PDQv3 --> Patient Demographic Consumer --> [ITI-47] Patient Demographics Query HL7v3.
Step by Step
1. Select your system under test
From the drop-down list "System under test", select your system under test. The sequence diagram at the top of the page is updated with the connection information of your system at right, review them.
2. [PDQ only] Select the transaction
From the PDQ PDC page, you can select if you want to test the ITI-21 or ITI-22 transaction. Selected the "Patient demographics and visits query" option will add a panel to configure the query parameter specific to the visit.
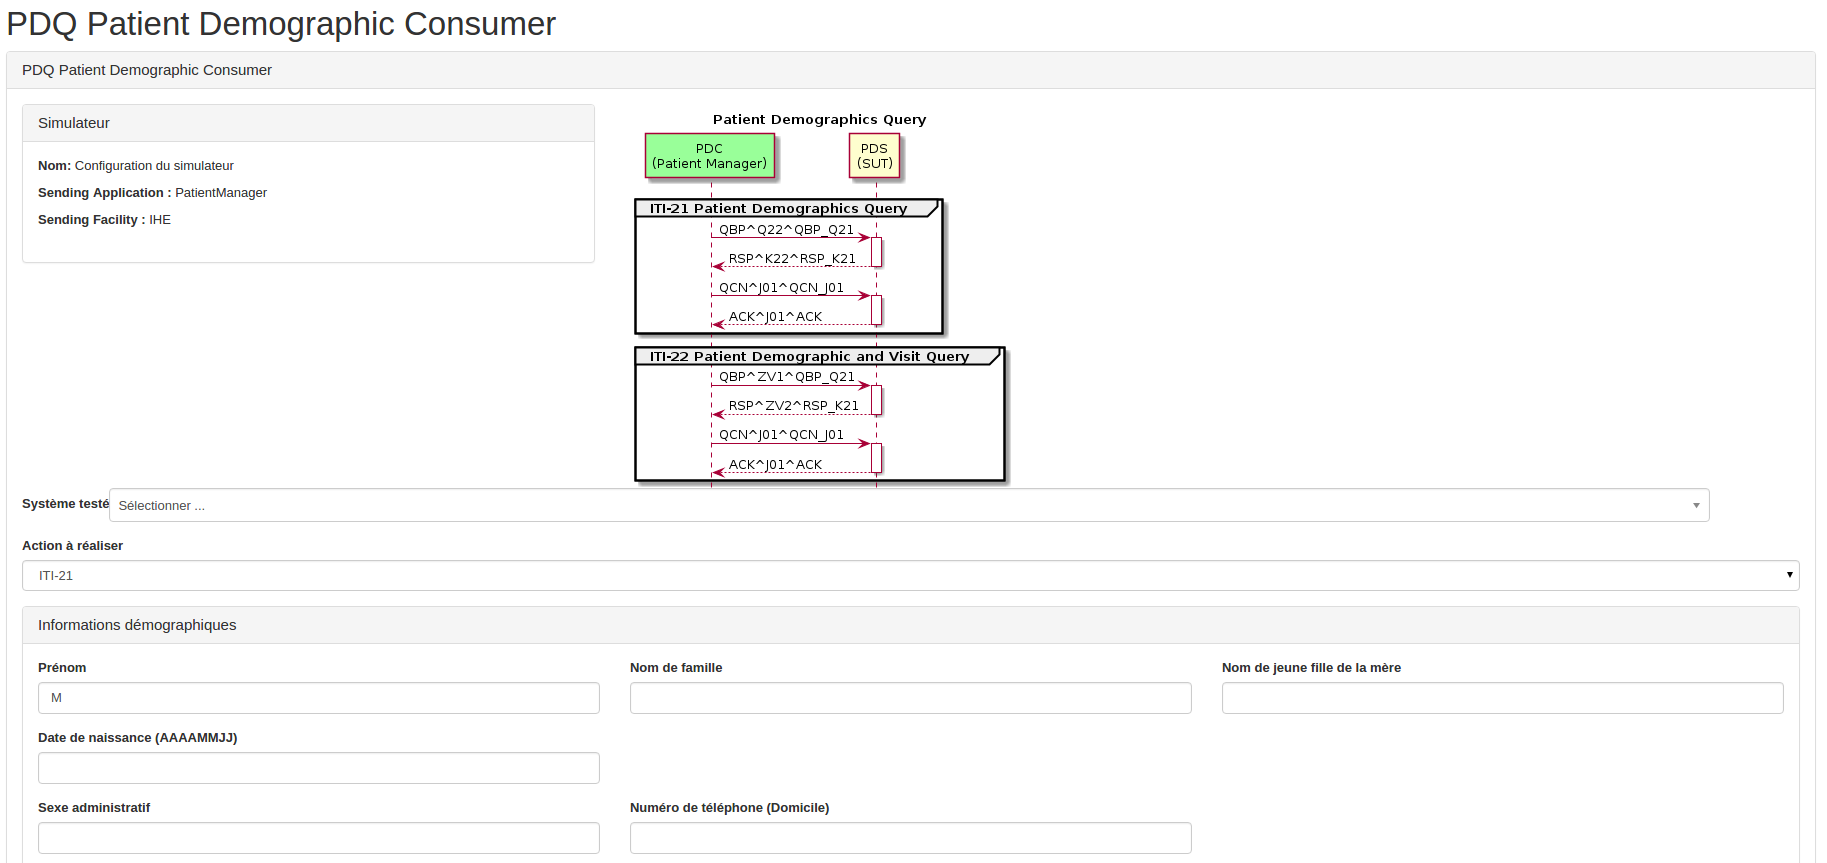
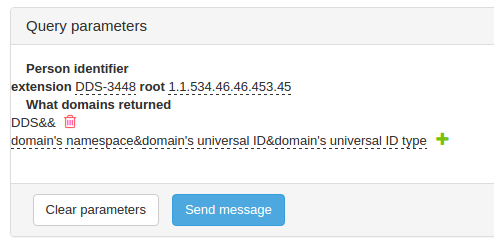
3. Configure the query
Both screens (PDQ/PDQV3) are similar. Only the way to enter the patient identifier is different.
As soon as your query is complete, push the "Send message" button. The query is sent to your system and the exchanged messages are then displayed at the bottom of the page. From there, you will be able to call the Gazelle HL7 validator tool to check the correctness of the response produced by your system.
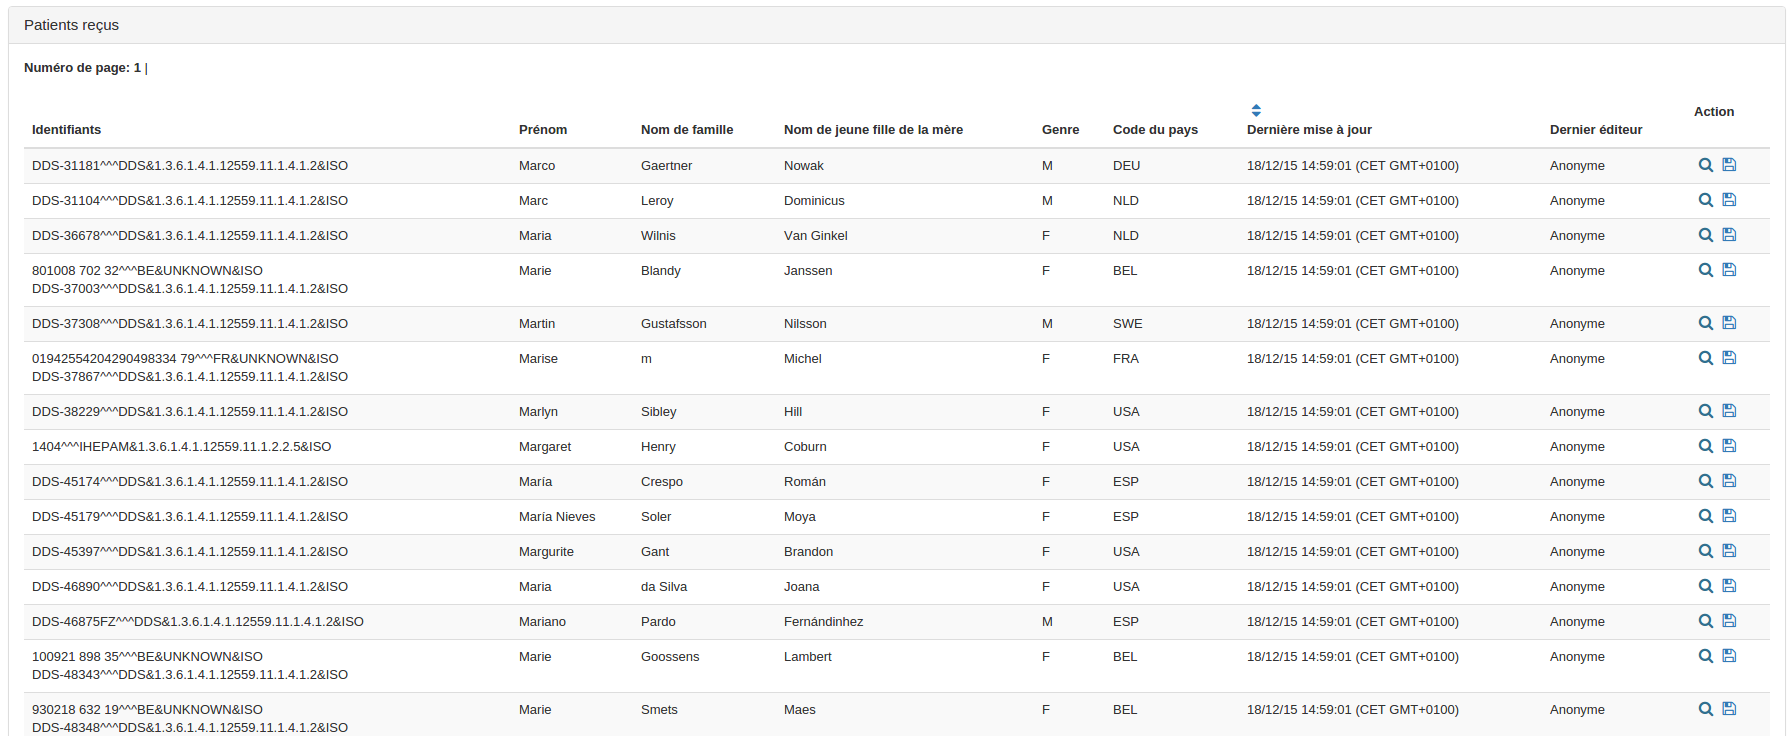
The response from the supplier is parsed and you are allowed to ask the tool to store the patients for future use (for instance of ITI-31 transaction), use the 'plus' button. To see the details of a given patient (or encounter in the context of ITI-22 transaction), use the magnifying-glass icon.
If you used the "limit value" option, the tool allows use to send the Query continuation message as well as the Query cancellation message.

First limit the number of hints to be returned by the supplier.
The first batch of patients/visits is parsed and displayed.

Then you can send the continuation pointer message (Get next results) and send the query cancellation message (Cancel query).
If you choose to cancel the query, the following message is displayed.
![]()
A new button appears which allows you to send the cancellation query again to make sure that your system took the message into account.
![]()
[Deprecated] Patient Manager - PDQv3 Patient Demographic Supplier
Warning: This documentation is out-dated, newest version of the documentation is available at https://gazelle.ihe.net/gazelle-documentation
The PatientManager is able to act as a Patient Demographics Supplier for the Patient Demographic Query HL7v3 integration profile.
- ITI-47: Patient Demographics Query HL7v3
ITI-47: Patient Demographics Query
The table below gathers the parameters the simulator is able to map to its database to perform the query and send back the batch of corresponding patients. Note that when several parameters are provided, the AND operator is used to build the database query; the "*" wildcard is supported to substitute zero or more characters. The returned patients are those owned by the Patient Demographic Supplier actor. To consult the list of available patients, see http://gazelle.ihe.net/PatientManager/patient/allPatients.seam?actor=PDS . Note that only the subset of active patients is queried.
Table-1 : Query parameters supported by the PDQv3/PDS simulator for ITI-47 transaction
|
Parameter |
JAVA OBJECT / ATTRIBUTE (indicative) |
SQL CLAUSE |
EXTRA INFO |
|
livingSubjectId (extension) |
patientIdentifer.fullPatientId |
like (ignores case), MatchMode = START |
|
|
livingSubjectId (root) |
patientIdentifier.domain.universalID |
domain universal ID like (ignores case) |
|
|
livingSubjectName (family) |
patient.lastName |
like (ignores case) |
by now, only the first occurence is used |
|
livingSubjectName (given) |
patient.firstName |
like (ignores case) |
by now, only the first occurence is used |
|
livingSubjectBirthTime |
patient.dateOfBirth |
between 'date 0:00 am' to 'date 11:59 pm' |
date format : yyyyMMddHHmmss |
|
livingSubjectAdministrativeGenderCode |
patient.genderCode |
equals |
Gender code (F, M ...) |
|
patientAddress (streetAddressLine) |
patient.street |
like (ignores case) |
|
|
patientAddress (city) |
patient.city |
like (ignores case) |
|
|
patientAddress (state) |
patient.state |
like (ignores case) |
|
|
patientAddress (postalCode) |
patient.zipCode |
like (ignores case) |
|
|
patientAddress (country) |
patient.countryCode |
like (ignores case) |
iso3 |
|
mothersMaidenName (family) |
patient.mothersMaidenName |
like (ignores case) |
|
|
patientTelecom |
patient.phoneNumber |
like (ignores case) |
|
Other IDs Scoping organizations
If the otherIDsScopingOrganization parameter is transmitted to the supplier, the simulator behaves as stated in the Technical Framework. To list the identifier domains known by the tool, go to PDQ/PDQV3 --> Patient Demographics Supplier --> HL7v3 Configuration.
Continuation pointer persistence and Query Cancellation
The simulator is able to handle the continuation pointer protocol. If no cancellation messages is received within the 24 hours, the pointer and the associated results are deleted from the system.
[Deprecated] Patient Manager - PIX/PIXV3 Identity Cross-Reference Consumer
Warning: This documentation is out-dated, newest version of the documentation is available at https://gazelle.ihe.net/gazelle-documentation
The PatientManager tool integrates the Patient Identifier Cross-Reference Consumer actor defined by the Patient Identifier Cross-Referencing (PIX) and Patient Identifier Cross-Referencing (PIXV3) integration profiles.
That means that it can
- send Q23 events in the context of the PIX Query (ITI-9) transaction
- receive A31 events in the context of the PIX Update Notification (ITI-10) transaction
- send PRPA_IN201309UV02 messages in the context of the PIXV3 Query (ITI-45) transaction
- receive PRPA_IN201302UV02 messages in the context of the PIXV3 Update Notification (ITI-46) transaction
PIX Update Notification
For this transaction, the Patient Identifier Cross-Reference Consumer actor plays the role of a responder. In this configuration we are not interested in testing the behaviour of the consumer but rather the conformance of the messages sent by the PIX Manager. As a consequence, the PIX Consumer will simply acknowledge the ADT^A31^ADT_A05 and PRPA_IN201302UV02 messages but no other action will be taken.
To send PIX Update Notification messages to our Patient Identifier Cross-Reference Consumer actor, review the configuration of this part of the tool.
This page is reachable from the following menus
- PIX/PIXV3 --> Patient Identity Consumer --> HL7V2 Configuration (for ITI-10/PIX)
- PIX/PIXV3 --> Patient Identity Consumer --> HL7V3 Configuration (for ITI-46/PIXV3)
PIX Query
The Patient Identifier Cross-Reference Consumer actor plays the role of the initiator in the PIX Query (ITI-9) and PIXV3 Query (ITI-45). In this configuration, the tool needs some information concerning your system under test in order to be able to send messages to it. If it is your first time in this application, do not forget to register your system under test as a PIX Manager or PIXV3 Manager, respectively under the SUT Configurations-->HL7 responders or SUT Configurations --> HL7V3 Responders menu.
Step by Step
1. Start your test
From menu
- PIX/PIXV3 --> Patient Identity Consumer --> [ITI-9] PIX Query
- PIX/PIXV3 --> Patient Identity Consumer --> [ITI-45] PIXV3 Query
2. Select your system under test
Select the system under test to query from the drop-down menu entitled "System under test". Look at the connection information displayed at right of the sequence diagram and make sure they meet your system configuration.
3. Configure the query parameters
PIX and PIXV3 screens slightly differs because of the format of the patient identifiers in HL7V2 and HL7V3 but the main purpose is similar.
Fill out the person identifier you want to query your system for. Optionally add one or more domains to be returned in the response.
Finally hit the send message button.
4. Response
The received response is parsed to extract the identifiers returned by your system (if some).
5. Validate the messages
Finally, in the test report section, the messages exchanged for the test are logged and you can ask the tool to validate them; the Gazelle HL7 Validator will be called to do so.
- Log in to post comments
[Deprecated] Patient Manager - PIX/PIXV3 Identity Cross-Reference Manager
Warning: This documentation is out-dated, newest version of the documentation is available at https://gazelle.ihe.net/gazelle-documentation
The Patient Manager tool integrates the Patient Identifier Cross-Reference Manager actor as defined in the PIX (Patient Identifier Cross-Referencing) and PIXV3 (Patient Identifier Cross-Referencing HL7V3) integration profiles.
That means that the tool is able to act
- as a receiver in the context of the Patient Identity Feed (ITI-8), Patient identity Feed HL7V (ITI-44), and Patient Identity Management (ITI-30) transactions
- as a responder of the PIX Query (ITI-9) and PIXV3 Query (ITI-45) transactions.
- as a sender of PIX Update Notification (ITI-10) and PIXV3 Update Notification messages
HL7v2 and HL7v3 endpoints
The configuration of the HL7V2 endpoint of the tool is available from menu PIX/PIXV3 --> Patient Identifier Cross-Reference Manager --> HL7v2 Configuration
The configuration of the HL7V2 endpoint of the tool is available from menu PIX/PIXV3 --> Patient Identifier Cross-Reference Manager --> HL7v3 Configuration
Patient Identity Feed / Patient Identity Management
If your system under test is a Patient Identity Source, it can send messages to our Patient Identifier Cross-Reference Manager. For each new patient received, the tool computes the double metaphone for its first name, last name and mother's maiden name. Then, it looks for similar patients. In our cases patients are similar if
- levenstein distance between first names is strictly lower than 2
- levenstein distance between last names is strictly lower than 2
- levenstein distance between mother's maiden names is strictly lower than 2
- Patients are of the same gender
- Patients are born the same month in the same year
If all those criteria are met, then, the two patients are cross-referenced.
PIX Manager
On ADT message reception, the tool will perform the following actions:
- Parse message and extract patient's demographics data
- Create, update, merge ... the patient according to the received event
- If necessary, automatically references (or unreferences) patients
- Send the acknowledgement
PIXV3 Manager
Currently, the manager only acknowledges the messages received in the context of the ITI-44 transaction. They are not yet integrated, this will come with a future version.
PIX/PIXV3 Query
The Patient Identifier Cross-Reference manager actor integrated into the PatientManager implements the responder part of the PIX Query and PIXV3 Query transactions.
That means that it is able to answer to
- QBP^Q23^QBP_Q21
- PRPA_IN201309UV02
You can consult the list of available patients here (go to PIX/PIXV3 --> Patient Identity Cross-reference Manager --> Cross-References Management)
PIX/PIXV3 Update Notification
If your Patient Identifier Cross-Reference consumer supports the PIX/PIXV3 Update Notification option, you can send ADT^A31^ADT_A05 or PRPA_IN201302UV02 messages from the PatientManager.
Enter your system's configuration
If this is your first time in the application, you need to register your system under test in the tool.
Go to
- SUT Configurations --> HL7 responders, for PIX Update Notification (HL7V2)
- SUT Configurations --> HL7V3 Responders, for PIXV3 Update Notification (HL7V3)
and register your system as a Patient Identifier Cross-Reference Consumer actor.
Starting points
For PIX profile
Go to PIX/PIXV3 --> Patient Identity Cross-Reference Manager --> [ITI-10] PIX Update notification
For PIXV3 profile
Go to PIX/PIXV3 --> Patient Identity Cross-Reference Manager --> [ITI-46] PIXV3 Update notification
Configure the update notification
First, select your system under test in the drop-down list and check the configuration (at the right of the sequence diagram)
Then, select the list of domains you want to be sent by the tool.

Finally, select the patient you want to receive and hit the ![]() button. The message will be automatically sent to your system, including all the cross-referenced identifiers which match the set of domains you have selected.
button. The message will be automatically sent to your system, including all the cross-referenced identifiers which match the set of domains you have selected.
Manually cross-reference patients
Although the tool automatically performs a cross-referencing of patients received from the patient identity sources, you may want to complete or correct the cross-references made to a patient. The tool offers a section to manage those referencies manually.
Starting point
Go to PIX/PIXV3 --> Patient Identity Cross-Reference Manager --> Cross-references management.
Send notifications to a system under test
At the top of the page, you can choose to send PIX/PIXV3 update notifications to a system under test, each time you change the list of identifiers of a patient.

Each time you will add create/remove a cross-reference, the sending of a message will be triggered if the domains you have selected are concerned. At the bottom of the page will be displayed the messages exchanged with your system so that you can call the validation service to check the conformance of your acknowledgements with the specifications.
Cross-Reference patients
Clicking on the magnifying glass icon on a patient row will display that patient's information. The table at right lists all the patients which are referenced together with that patients.

To cross-reference other patients with the selected one, drag and drop their identifiers to the panel "selected patient".
To remove the reference between two patients hit the red minus icon.
- Log in to post comments
[Deprecated] Patient Manager - PIX/PIXV3 Patient Identity Source
Warning: This documentation is out-dated, newest version of the documentation is available at https://gazelle.ihe.net/gazelle-documentation
The PatientManager tool integrates the Patient Identity Source actor as defined in the Patient Identifier Cross-Referencing profile (PIX) and Patient Identifier Cross-Referencing profile HL7V3 (PIXV3) integration profiles.
That means that the tool is able to initiate the following transactions:
- Patient Identity Management (ITI-30)
- Patient Identity Feed (ITI-8)
- Patient Identity Feed HL7V3 (ITI-44)
Pre-requisites
Before sending your first message to your system under test, do not forget to register it as a Patient Identifier Cross-Reference Manager in the tool. To do so, go to
- SUT Configurations --> HL7 Responders (for PIX)
- SUT Configurations --> HL7V3 Responders (for PIXV3)
Patient Identity Management (ITI-30)
Refer to the following section of the documentation Patient Manager - ITI-30 initiator.
Patient Identity Feed (ITI-8)
The pages dedicated to this transaction is available from the menu PIX/PIXV3 --> Patient Identity Source --> [ITI-8] Patient identity Feed.
For more detailed information on how to generate and send an ADT message, read the page of this user manual dedicated to the PAM Patient Encounter Supplier actor. The same page layout is shared by those actors and the process flow is the same. Only the choice of events differs.
Patient Identity Feed HL7V3 (ITI-44)
The pages dedicated to this transaction is available from the menu PIX/PIXV3 --> Patient Identity Source --> [ITI-44] Patient identity Feed HL7V3.
![]()
For documentation, refer to Patient Manager - ITI-30 initiator with the following differences:
- Only three events are available
- Add Patient Record (= Create new patient)
- Revise Patient Record (= Update patient information)
- Patient Identity Merge (= Merge patients)
- Messages sent are those defined in the ITI-44 transaction (HL7V3)
- PRPA_IN201301UV02 (Add Patient Record)
- PRPA_IN201302UV02 (Revise Patient Record)
- PRPA_IN201304UV02 (Patient Identity Merge)
- Patient Identity Merge
- incorrect patient is used to populate the InReplacementOf element of the PRPA_IN201304UV02 message
- correct patient is the survival patient and is transmitted in the Patient element.
- Log in to post comments
[Deprecated] Patient Manager - SWF ADT
Warning: This documentation is out-dated, newest version of the documentation is available at https://gazelle.ihe.net/gazelle-documentation
The PatientManager tool integrates the ADT actor as defined in the context of the Scheduled Workflow of Radiology profile. That means that the tool is able to send Patient Registration (RAD-1) and Patient Update (RAD-12) messages to your ADT client.
The following events are available for message sending:
- Patient Registration (RAD-1)
- Admission of an in-patient (A01)
- Registration of an out-patient (A04)
- Cancellation of admission/registration (A11)
- Pre-admission of an in-patient (A05)
- Cancellation of pre-admission (A38)
- Patient Update (RAD-12)
- Change Patient Class to in-patient (A06)
- Change Patient Class to out-patient (A07)
- Discharge Patient (A03)
- Cancel discharge (A13)
- Transfer patient (A02)
- Cancel transfer (A12)
- Merge patient - Internal ID (A40)
- Update patient Information (A08)
Before sending your first message to your system under test, do not forget to register it as an ADT Client in the tool. To do so, go to SUT Configurations page and create a new configuration.
The ADT features are available under the ADT menu at http://gazelle.ihe.net/PatientManager
For more detailed information on how to generate and send an ADT message, read the page of this user manual dedicated to the PAM Patient Encounter Supplier actor. The same page layout is shared by both actors and the procedures are the same.
- Log in to post comments
[Deprecated] Patient Manager - [ADMIN] import patients from CSV
Warning: This documentation is out-dated, newest version of the documentation is available at https://gazelle.ihe.net/gazelle-documentation
Users with role admin_role will be able to create patients from a CSV file.
Start from menu Administration --> Import patients from CSV. You will find the list of attributes which can be put in your CSV file. The order of the attributes does not matter since you will have to select how your file is formatted.
Once you have set the format of your file, upload the CSV file (only .csv extension is allowed).
The tool will parse the CSV and display the list of patients found. If you do not want to import some of them, you can remove them from the list using the red cross button.
Choose the simulated actor which will own the patients, you can also ask the tool to generate local OID (PatientManager namespace ID defined in the preferences will be used) and also to compute the double metaphones for the names (used in the context of the PIX profile).
Finally, hit the "Save patients" button and go to All Patients page, your patients should be available there.
[Deprecated] Patient Simulator - PAM Patient Demographic Consumer
Warning: This documentation is out-dated, newest version of the documentation is available at https://gazelle.ihe.net/gazelle-documentation
The Patient Manager tool implements the Patient Demographic Consumer actor defined by the IHE technical framework for the PAM profile. This simulated actor implements both the Merge and Link/Unlink options. Consequently, the application is able to receive and integrate the following events for the ITI-30 transaction:
- Create new Patient (ADT^A28^ADT_A05)
- Update patient Information (ADT^A31^ADT_A05)
- Change Patient Identifier List (ADT^A47^ADT_A47)
- Merge two patients (ADT^A40^ADT_39)
- Link Patient Information (ADT^A24^ADT_A24)
- Unlink Patient Information (ADT^A37^ADT_A37)
Three sections (pages) of the Patient Manager tool application are dedicated to the use of the Patient Demographic Consumer Actor. You can reach them going to Patient Administration Management --> Patient Demographic Consumer. The 3 pages are available through the related icons.
The first icon is to access to the configuration and messages
The second icon is to access the received patients page
The third one gives you an access to the patient links page
Configuration and messages
When the simulator acts as a PDC, it is only a responder; that means that it is listening on a specific port and sends acknowledgements for the messages it receives. As a consequence, you are not expected to give to the simulator the configuration of the PDS part of your SUT. At the contrary, your SUT needs the configuration of the simulator in order to send it messages. When you go to the page "Configuration and Messages" you can see that various configurations are offered. Actually, in order to be able to properly understand the messages it receives, the simulator needs to open a socket using the appropriate encoding character set. The IP address and the receiving application and facility do not differ from a configuration to another, only the port number should change. Note that if the Character set given in the message (MSH-18) is not the one expected, the message is application rejecting. In the same way that if the receiving application or receiving facility does not match the expected one, the message will be reject with an AR acknowledgment.
In this same page, you can see the list of messages received by the PDC actor. The more recent ones are at the top of the list.
Received Patients
When the simulator receives a message, it tries to integrate it, if it is not able to do it, it sends back an error message. It means that each time it can, it performs the appropriate action on the patient. The resolution of patients is done on their identifiers.
Create new Patient
A new patient is created if none of the given identifiers is already used by another active patient. If one of the identifiers is in use, the PDC application-rejects the message with error code 205 (duplicate key identifier). The creator of the patient is set to sendingFacility_sendingApplication.
Update Patient information
If one of the given identifiers matches an existing patient, the latter is updated with the new values. If the patient does not exist yet, a new patient is created.
Change Patient identifier
If more than one identifier is mentionned in PID-3 or in MRG-1 fields, the message is application-rejected. In the contrary, we get different cases:
- if both correct and incorrect identifiers are used for an active patient; an error message is sent because a merge action should have been performed instead of the change id.
- If the incorrect identifier identifies an active patient but the correct identifier is unknown, the list of identifiers of the retrieved patient is updated.
- if both correct and incorrect identifier are unknown, a new patient is created using values given in PID segment.
Merge two patients
If more than one PATIENT group is contained in the message, the latter is application-rejected. Otherwise, we get four cases:
- both correct and incorrect patient exist, patients are merged and only the correct one remains.
- the incorrect patient is known but not the correct one, a change patient id action is performed.
- both correct and incorrect patient do not exist, a patient is created using the data contained in PID segment.
- the incorrect patient is unknown but the correct has been retrieved, we do nothing.
Link/Unlink patients
For link case: if both identifiers exists, link them. If one or both of them are missing, create them and link them.
For unlink case: if both identifiers exists and are linked, unlink them. otherwise nothing is done.
Received patient links
When displaying the full information about a patient, you can ask the application to show you the possible links between the patient and the other ones. But in some cases, the PDC may have received a message to link two or more identifiers, the ones do not identify patients. In order to check that the messages you have sent have been taken into account, you can go to this page (Received patient links) and you will see the list of links and their creation date. When two identifiers are unlinked, the link between them is deleted so you are not able to view it anymore.
- Log in to post comments