[Deprecated] DDS - User Manual for user interface
Warning: This documentation is out-dated, newest version of the documentation is available at https://gazelle.ihe.net/gazelle-documentation
Overview of the Demographic Data Server (DDS) project
When running a test we often need to inject demographic data. The aim of the tool is to generate the necessary data. Generated data are fictious (not real) but looks like real data. Demographic characteristics consist of
-
a name, last name, mother maiden name ...
-
date of birth,
-
sex,
-
religion,
-
race,
-
address
- etc ...
The address consists of the street, town, state, zip code and country. Addresses are randomly generated. We use the geonames database and googlemaps geocoding webservices in order to generate random addresses or more specific research. Generated addresses contains zip code information, matching the city name. Currently generated demographic information can be generated for the United-States, France, Germany and Japan. We are working on including data for more countries. Demographic Dataserver is taking into account information about the frequency of firstname, lastname, race and religion. The Demographic Data Server provides a Web User interface as well as a Web Service interface.
The java documentation of this project is available here.
DDS Web User interface
User can access to DDS using the DDS web page. The GUI offers the possibility to generate patient data, see all generated patient data and shre this patient data with other systems in HL7 v2 or v3.
How to create a new patient data ?
To create a new patient, go to the ![]() menu. In the create patient page, user will have the choice between to tabs : "Patient's generation" and "Advances Patient's generation".
menu. In the create patient page, user will have the choice between to tabs : "Patient's generation" and "Advances Patient's generation".
- In the first tab, "Patient's generation", the user will be allow to create patient information by selecting the country
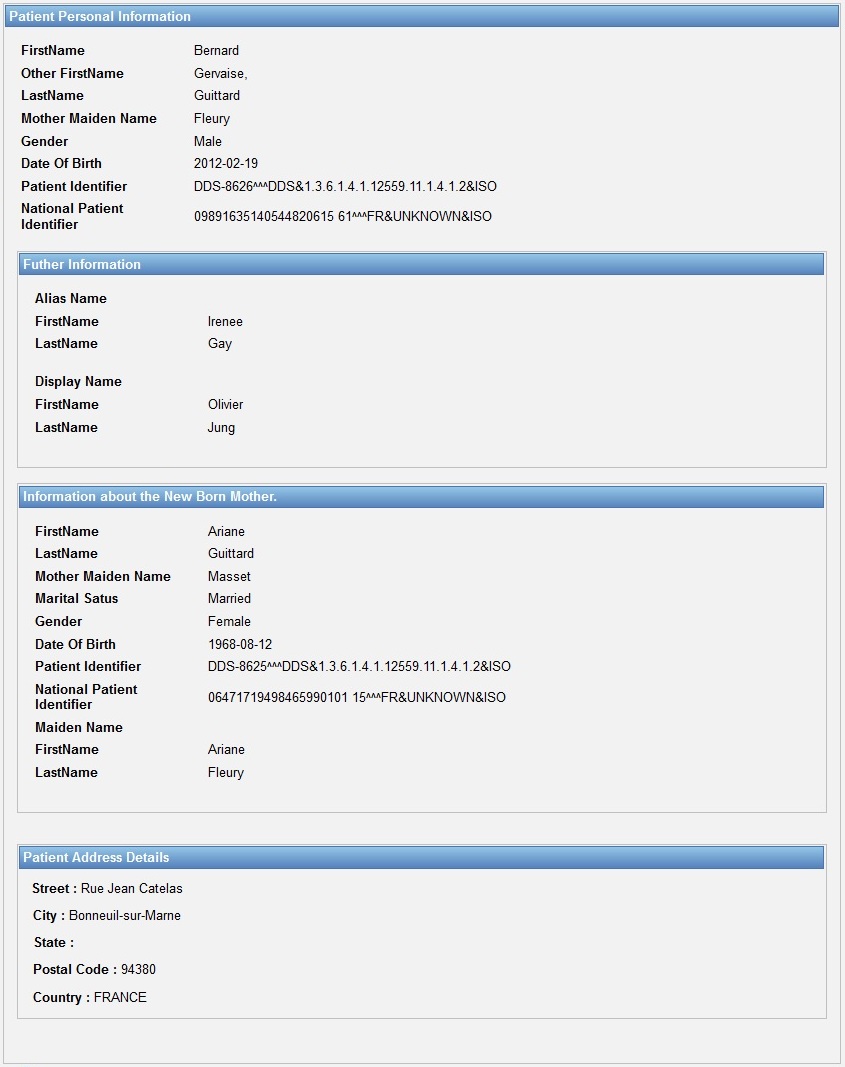
 . Once the country has been selected, hit the "Generate Demographic Data" button. The generated patient will have basic information (last name, first name, other firstname, mother maiden name, gender, data of birth, patient identifier in DDS, National Patient Identifier and one address). It is possible that some of this information are missing. At the bottom of the Patient Information panel, the
  button can be used to send patient (with HL7 v2 or v3 messages) to the user system. Go to the next part below to send a patient with DDS. See below, one example of a generated patient :

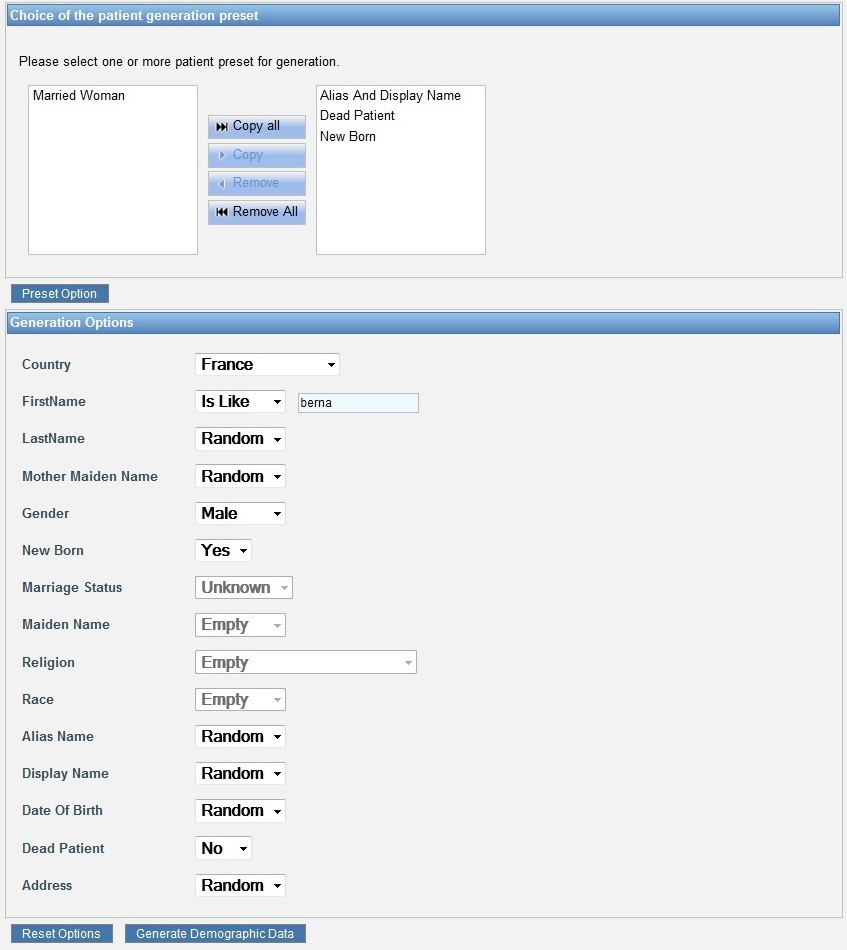
- In the second tab, "Advances Patient's generation", the user will be allow to create advanced patient information by using a lot of criteria. Criteria are all in the "Generation Options" panel. Once the user has set option, just hit the
 button to generate patient information. DDS offers to the user to Preset the generation option according to the selected patient preset(s). For that, select the preset in the left panel, and hit the
  button. Once you have selected all desire presets (selected preset are in the right panel), hit the
  button to preset the option according to the selected preset(s). Then, hit the
  button. (You can select more than one preset at the same time). For example, if user choose the "Dead Patient" preset, the "Dead Patient" option will be set to "Yes". This functionnality allows the user to quickly set the generation option. See below the result of a generated patient information.


How to consult existing patient data ?
To see all patient data generated by DDS, go to the ![]() menu. This page show to the use, in a table, all patient data generated by DDS. User can use the FirstName and the LastName filters to search a specific patient. It is also possible to sort the patient data by Id (Id in DDS), FirstName, LastName, Gender, Race, Religion ... by hiting the
menu. This page show to the use, in a table, all patient data generated by DDS. User can use the FirstName and the LastName filters to search a specific patient. It is also possible to sort the patient data by Id (Id in DDS), FirstName, LastName, Gender, Race, Religion ... by hiting the ![]() button.
button.

In the action column :
- The
 button allows user to see the patient data in a pop-up.
 - The
 button allows user to add the selected patient in the selected patient list. This list can be used to share patient. User can add to this list many patients as he wants.
Finally, just below the patient data table, the user could find all patients of the selected patient list :
- The
 button can be used to share all patient data of the selected patient list.
 - The
 button can be used to reset the selected patient list.
The ![]() button (over the patient table) can be used to refresh the patients list of the patient data table.
button (over the patient table) can be used to refresh the patients list of the patient data table.
How to share patient data ?
The GUI allows the user to send the selected patients through an HL7 V2 or V3 messages. Once user has selected the patients to send to his system (see the section over), it is necessary to configure the sending option :
- User must select the HL7 message type and version. Four options are available, see the screenshot below.

- Once the message typas has been seleted, the user must choose the character set encoding to use (only available for the HL7 version 2). The list of character set encoding depends on the country of the patients to send.

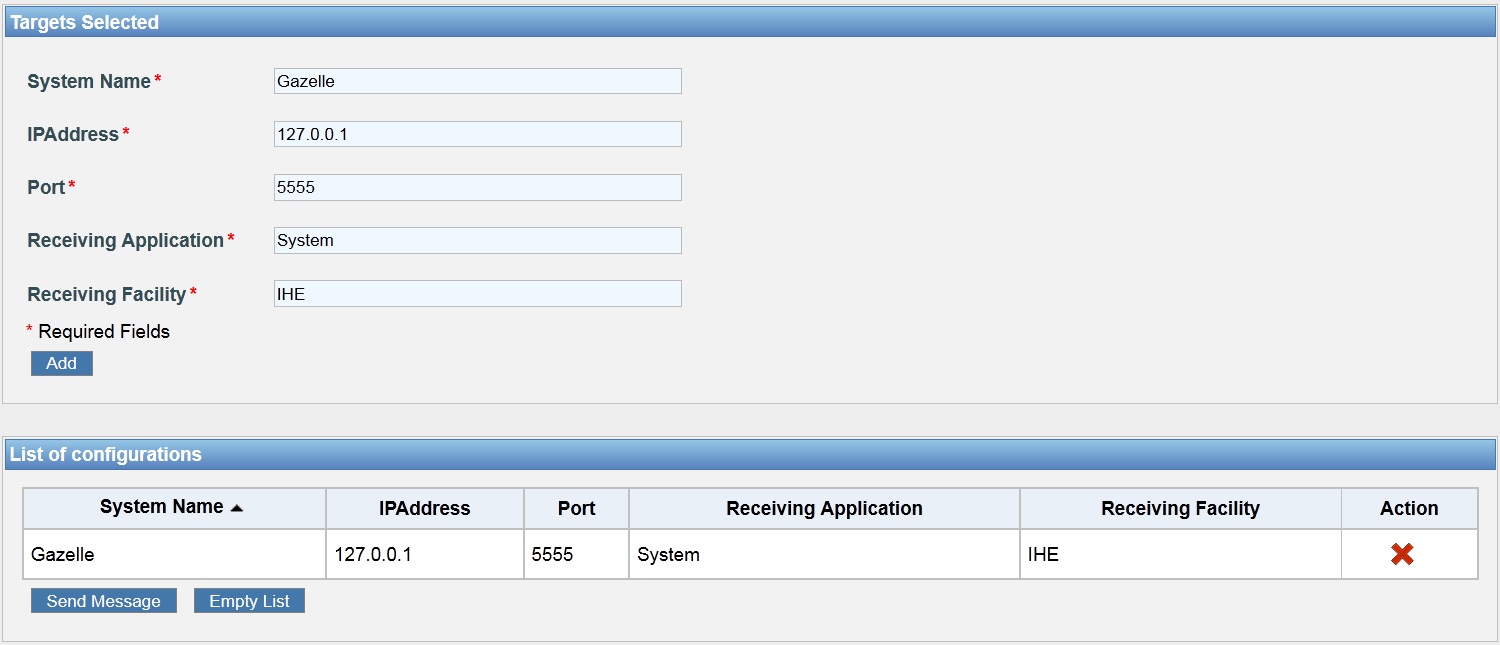
- Then, the user must fill the Targets Selected fields. This information are relative to the user system which will receive the patient data. It is possible to send the patient data to several system at the same time. See the example below, for HL7 v2. Hit the Add button to add the configuration to the list of configuration. Be careful, your target must have a port open on the internet. Before sending messages to your system, ensure that your firewall options give to DDS the access to your system.

- Finally, hit the
 button to send all selected patient data to the configuration(s). A summury of exchanges will appear just below the configuration panel. For each message, you can hit the
  button to see the full sent message content or the full acknowlegdment message content. See the example below.

Web Services Interface
The WSDL file describing the web service is here. You can also download an example of a project soapUI that use these methods from here.
Functionalities
Functionalities of DDS can be used by web services methods. In fact, DDS implement 7 methods on web service :
- returnAddress : generate random address from the country code
- returnAddressByCoordinates : generate a specific address from country code and coordinates
- returnAddressBtTown : generate a specific address from a town
- returnHL7Message : generate HL7 message on format XML from a country code
- returnPatient : generate a patient from a country code. We can restrict generation on same persons by specifying attributes like the gender, or on specifying a nearby name or a part of the name
- returnPatientWithAllOptions : generate a patient from a country code. All options to generate a patient are available here.
- returnPerson : generate a person without address, using the same attributes of generation of a patient
- sendHL7Message : generate and send a HL7 message to a target host and port.
The documentation of classes on this jar is there.
Web Services Limitation
We do not have limited ressources to offer for this service. Thus the access to the webservice is limited to a "reasonnable" number of request per days/minute. We'd like to avoid DoS on the gazelle tools because someone is requesting fake patients every second.
Thus our limitation are :
- No more than 30 requests per IP address per minute
- No more than 3000 requests per period of 24 hours per IP address
If you'd like to generate large random data, please get in contact with Eric Poiseau and we will try to help you and generate data to fill your needs.