[Deprecated] XDStarClient
Warning: This documentation is out-dated, newest version of the documentation is available at https://gazelle.ihe.net/gazelle-documentation
You can access to XDStarClient from this link : http://gazelle.ihe.net/XDStarClient/
Introduction to XDStarClient
XDStarClient is a tool developped by IHE-europe / gazelle team to simulate initiators on XD* profile. Some of implemented actors are already implemented on XDRSRCSimulator and XCAInitiatingGateway simulator. The aim of this simulator is to merge all transactions of XD* to the same tools, to simplify the work of tester and to improve the quality of service.
Merged transaction from XDRSRCSimulator and XCAInitGatewaySimulator are :
- for epSOS domain :
-
- XCA
- ITI-38 : Cross Gateway Query
- ITI-39 : Cross Gateway Retrieve
- XDR
- XDW (XDS.b)
- XCF
-
- DSUB
- ITI-52 [Document Metada Subscribe - Subscribe Request]
- ITI-52 [Document Metada Subscribe - UnSubscribe Request]
- ITI-53 [Document Metada Notify]
- ITI-54 [Document Metada Publish]
- PHARM-1
- IHE, RAD domain :
- RAD-68 : Provide and Register Imaging Document Set - MTOM/XOP
- RAD-69 : Retrieve Imaging Document Set
- RAD-75 : Cross Gateway Retrieve Imaging Document Set
- RAD-55 : WADO Retrieve
XDStarClient simulate also some responders :
XDStarClient validation services
XDStarClient offers three validation services :
We recommand to vendors of epSOS and IHE domain to use XDStar as a client to simulate XDRSRCSimulator, and XCAInitGatewaySimulator. These two old simulators are actually deprecated, all new corrections will be done on XDStarClient.
AuditMessage Validation
XDStarClient provides a validation service for AuditMessages.
The validation tool is based on schema validation and model based validation, which is different from the model based validation of XDS metadatas. The difference is, we do not define the contraints and the rules from a UML model, but from a GUI integrated into XDSarClient. This GUI describe the same table used by dicom and IHE to describe the elements that should be provided in an audit message. The edition of the constraint can be done from TLS application :
- first you have to login as an administrator
- then go to menu -> administration ->

For a simple user, to view the list of constraint related to a kind of audit message, the user shall go to menu -> documentation ->
To view the specific constraints related to an audit message, you hav to click on the message ID. Each audit message description has a unique permanent URL. Example : http://gazelle.ihe.net/tls/amview/auditMessage.seam?id=45

The wsdl has generally this format : http://ovh3.ihe-europe.net:8180/gazelle-atna-ejb/AuditMessageValidationWSService/AuditMessageValidationWS?wsdl and it is always provided by the administrator of the tool, it depends on the configuration of the server.

DSUB Validation
XDStarClient provides a validation service for DSUB messages.
The validation tool is based on schema and model based validation. The documentation of the constraint from the model of validation can be found on XDStarClient : menu -> Documentation ->

The endpoint of the validation service depend on the XDStarClient installation environment, it will be like this : http://131.254.209.20:8080/XDStarClient-XDStarClient-ejb/DSUBValidatorWS?wsdl

ITI-18 : Registry Stored Query
Tool description
The aim of this tool is to simulate an XDS consumer on the transaction Registry Stored Query (ITI-18), on IHE domain.
This module allow vendors to query registries using XDS metadatas.
To access to this simulator, you have to check the menu Simulators --> IHE --> ITI-18 [Registry Stored Query]
System Configuration
Configurations used on this transaction are registries configurations. To use this tool, you have to select a regstry configuration from the selector component :

If your system's configuration does not appear on the list of configuration to select, please go from the menu to SUT-Configurations --> Registries-configurations. Then you will see all available configurations for testing. To add your configuration you have to click on the button "Create Registry Configuration". If you don't see this button, that's means that you are not logged in. Only logged users are allowed to add a system configuration to the XDStarClient tool.
To log in this tools, you have to use the link "cas login" on the menu. The login and password are the same one of gazelle test management EU-CAT. If you don't have a login and a password on EU-CAT, please create an acount.
After login, you will be able to add a registry configuration, on the page:

When clicking on the button "Create Registry Configuration", you will be able to add your configuration to the tool :

- Log in to post comments
ITI-38 - Cross Gateway Query
Tool description
This tool provides the possibility to create a valid request according to the transaction ITI-38. The tool participate as an Initiating Gateway on the transaction.
If you are a Responding Gateway, and you want to test your tool with XDStarClient on the transaction ITI-38, you have to :
1. Login using the cas login.
It is a link on the top, right corner. You will go then to the page of the cas

The login and password are the same one of gazelle test management EU-CAT.
If you do not have a login and a password, you have to create on on http://gazelle.ihe.net/EU-CAT/
2. Add the configuration of your system
Once logged in, you have to go to the page menu --> System Configuration. Select then the System's configuration Type = Responding Gateway Configuration.
Here you have the list of all registred Responding Gateway to XDStarClient.

To add you configuration you have to click on the Button "Create Responding Gateway Configuration"

You have to specify the name of your configuration, the URL, the homeCommunityId, the repositoryUniqueId, and the affinityDomain, in our case it is IHE(XDA) => ITI-38. Then you have to click on the button save.
3. Test your system with XDStarClient
Go then to menu --> ITI-38 [Cross Gateway Query] .

You select then your configuration, your message type, and then you fulfil metadatas. Click then on the button Execute.

ITI-41 : Provide and Register Set-b
Simulator Description
You can access To the simulator here.
The aim of this module is to simulate a document source actor on the transaction ITI-41, IHE domain.
This module allow vendors to submit documents, folders and associations between documents, folders and submissionSet.
To access to this simulator, you have to check the menu Simulator --> IHE --> ITI-41

System configuration

If you your system's configuration doeas not appear on the list of configuration to select, please go from the menu to SUT-Configurations --> Repositories-configurations. Then you will see all avalable configuration for testing. To add your configuration you have to click on the button "Create Registry Configuration". If you don't see this button, that's means that you are not logged in. Only logged users are allowed to add a system configuration to the XDStarClient tool.
To log in this tools, you have to use the link "cas login" on the menu. The login and password are the same one of gazelle test management EU-CAT. If you don't have a login and a password on EU-CAT, please create an acount.
After login, you will be able to add a repository configuration, on the page http://gazelle.ihe.net/XDStarClient/configuration/repository/repConfigurations.seam :
conf")
Water clicking on the button "Create Repository Configuration", you will be able to add your configuration to the tool :

Metadatas edition and configuration
-
Initialization of the request
When going from the menu to simulators --> IHE --> ITI-41, and after selecting your configuration, a GUI for editing metadata and for configuring your submission request appear : 
This GUI contains two sides : a tree to represent folders and documents, and a side to represent metadata for each component on the submissionSet.
The patient Id will be used for all submitted documents, folders and for the submissionSet. The sourceId is by default the one of the XDStarClient, and the uniqueId is automatically generated from the XDStarClient.
If a metadata is present by default on the table of metadatas, that's mean that this metadata is required. For example, for submissionset, the XDSSubmissionSet.contentTypeCode is required. The value that you can select for this metadata are the displayName of codes that will be used for bern CAT. These codes can be token from http://hit-testing.nist.gov:12080/xdsref/codes/codes.xml, or from the SVS simulator as REST request. OID that I have defined for each code are :
| 1.3.6.1.4.1.12559.11.4.3.1 | contentTypeCode |
| 1.3.6.1.4.1.12559.11.4.3.2 |
classCode |
| 1.3.6.1.4.1.12559.11.4.3.3 | confidentialityCode |
| 1.3.6.1.4.1.12559.11.4.3.4 | formatCode |
| 1.3.6.1.4.1.12559.11.4.3.5 | healthcareFacilityTypeCode |
| 1.3.6.1.4.1.12559.11.4.3.6 | practiceSettingCode |
| 1.3.6.1.4.1.12559.11.4.3.7 | eventCodeList |
| 1.3.6.1.4.1.12559.11.4.3.8 | typeCode |
| 1.3.6.1.4.1.12559.11.4.3.9 | mimeType |
| 1.3.6.1.4.1.12559.11.4.3.10 | folderCodeList |
| 1.3.6.1.4.1.12559.11.4.3.11 | associationDocumentation |
Additional metadata can be added to the submissionSet, by clicking on the button "add optional metadata on the bottom of the table of metadata. A list of Optional metadata will appear, and you can then select the one you want. Aditional metadata can be deleted from the table after being added :

-
Attach XDSFolder to submissionSet
To Attach an XDSFolder to an XDSSubmissionSet, you have to click on the icon "add xdsfolder to the submissionSet", on the tree of list attached documents and folder :

When clicking on add folder, a new XDSFolder appear on the tree. On the right side, we can see list of required metadata related to the XDSFolder :
 For each XDSFolder, we can attach an XDSDocument by clicking on the icon "add XDSDocument to the folder.
-
Attach XDS Document Entry
 After uploading your file, you will see that a list of metadata has been rendered.This list contain the XDS metadatas required. To add optional metadata, you have to click on the button "Add optional Metadata", and then select your metadata to add, and finally add your data on the table of metadata :


List of Provide and Register Set-b Messages
We can get all messages sent by this tool from the menu : Messages --> Provide and Register Set-b Messages :

- Log in to post comments
ITI-43 [Retrieve Document Set]
This tool provides the possibility to create a valid request according to the transaction ITI-43
The request generated allow to retrieve a document (or a list of documents) from a repository or a document recipient.
To use this tool you have to :
- Select your responder configuration or add a new one on the page configurations.
- Fulfil metadatas of the request, for each document you are looking for.
- Click on the button 'execute' to retrieve document(s).

The result of the request soap sent is viewed on the table after you click on the button execute, on the panel execution summary.
 To view the content of the messages, you have to click on view image from the table. A popup will be displayed with the content of the messages sent and received.

You can download the file received from the table of the received attachments.
ITI-53 - Document Metada Recipient Endpoint
This tool implements an endpoint to receive metadatas notifications, acting as a Document Metadata Notification Recipient.

To go to the description of the transaction in XDStarClient, you have to go to : menu --> SIMU-Responders -> ITI-53 - Document Metada Recipient Endpoint

The wsdl used and acting as ITI-53 responder depend on the configuration of XDStarClient used, and is configured by the adminisatrator of the tool, and specified in the page of definition of the transaction in the tool :
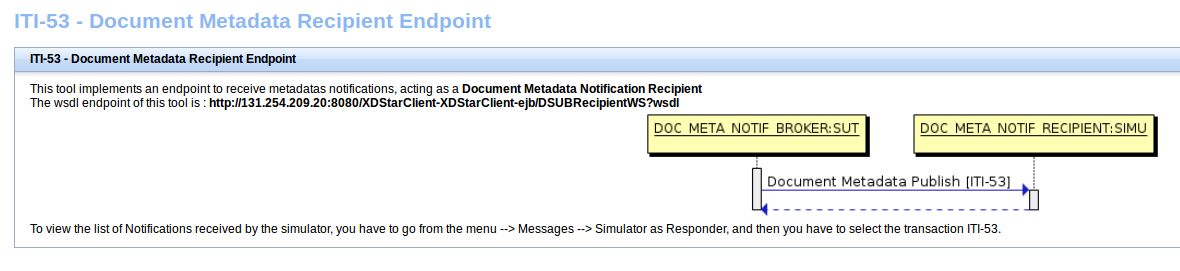
To view the list of Notifications received by the simulator, you have to go from the menu --> Messages --> Simulator as Responder, and then you have to select the transaction ITI-53.

ITI-54 - Document Metadata Publish
This tool allows to simulate the transaction ITI-54 between a Document Metadata Publisher and a Document Metadata Notification broker. The tool plays the role o a Document Metadata Publisher.
To access to the tool you should go to XDStarClient > Simulators > IHE [ITI] > DSUB > ITI-54 [Document Metada Publish]
Then you have to select your system under test, the Document Metadata Notification broker.

The user is able to add even a submission set, a folder, or a document entry to the publish request using the buttons : ![]() ,
, ![]() or
or ![]()
After fulfilling the metadatas related to each entry, the user can send the webservice message using the button execute.

The result of the request is displayed even in a permanent link using the id shown in the table after the execution, or using the loop button in the action column, from the table shown below.

ITI-55 [Cross Gateway Patient Discovery]
Click here to access the ITI-55 Simulator
Introduction
The XCPD Initiating Gateway simulator is developed in conformance with the IHE Technical Framework and especially the epSOS extension to the profile. The GUI of this simulator lets users to generate PRPA_IN201305UV02 messages (XCPD requests), and to send this type of messages to a responder endpoint.
Tools
-
Generation of XCPD Request
This tool allows the generation of XCPD requests from many parameters, which are : family name, given name, birthdate, patient id (id.root and id.extension), gender, address (street, city, country, zipcode), and mother maiden name. These parameters let to generate the request for a patient, and there are two others parameters which are sender homeCommunityId and receiverHomeCommunityId, which let to identify the message's actors. The homeCommunityId used by the simulator is 2.16.17.710.812.1000.990.1 .

-
Communication with Responding Gateway
This tool allows sending XCPD request to the endpoint of an XCPD responding gateway. The endpoint of the IHE XCPD Responding Gateway Simulator is http://jumbo-2.irisa.fr:8080/XCPDRESPSimulator-XCPDRESPSimulator/RespondingGatewayPortTypeImpl?wsdl. This tool lets to generate request and send it to the endpoint, or copy directly the XCPD request message, and send it. You need so to click on the button ""

This page allows also to validate the generated or the uploaded message before sending it to the responder endpoint. The validation is done by communication with the EVSClient. The validation done is a schema validation and a schematron validation, using IHE and epSOS schematrons.

Messages Transaction
All messages sent via this simulator are saved on its database. This simulator can be used by two way : using gazelle driven from tests launched with this simulator, or using the GUI. On the two cases, all messages are saved, and can be viewed on https://gazelle.ihe.net/XDStarClient/messages/allMessages.seam

On this table, for each message sent, we can view it, we can validate it, we can view also the response of the responding gateway and validate its content. Also we can notice that we can choose to view web application messages or gazelle driven messages. We can also notice that for each couple of request/response, we have a permanent link, specified by a unique Id, the permanent link has this form : https://gazelle.ihe.net/XDStarClient//messages/message.seam?id=ID

This permanent link contains the content of the request and the response, the date of the transaction, the responder endpoint, the message type, the transaction type, and the context of the transaction (GUI or gazelle driven message). We can also validate the request and the response directly from the permanent link.
ITI-62 - Delete Document Set Responder
This tool implements an endpoint to receive delete document set messages, acting as a Document Registry Actor.

To go to the description of the transaction in XDStarClient, you have to go to : menu --> SIMU-Responders -> ITI-62 - Delete Document Set

The wsdl used and acting as ITI-62 responder depend on the configuration of XDStarClient used, and is configured by the adminisatrator of the tool, and specified in the page of definition of the transaction in the tool :

To view the list of request received by the simulator, you have to go from the menu --> Messages --> Simulator as Responder, and then you have to select the transaction ITI-62.
ITI-62 [Delete Document Set]
This tool allows to simulate the transaction ITI-62.
This transaction allows to delete document(s) from a repository.
To use this tool you have to
- Select your repository configuration or add a new one on the page Configurations.
- fulfil the request parameters, which are a list of ObjectRef ID.
- execute the request using the button 'execute'. You can preview your request SOAP by using the button 'preview'.
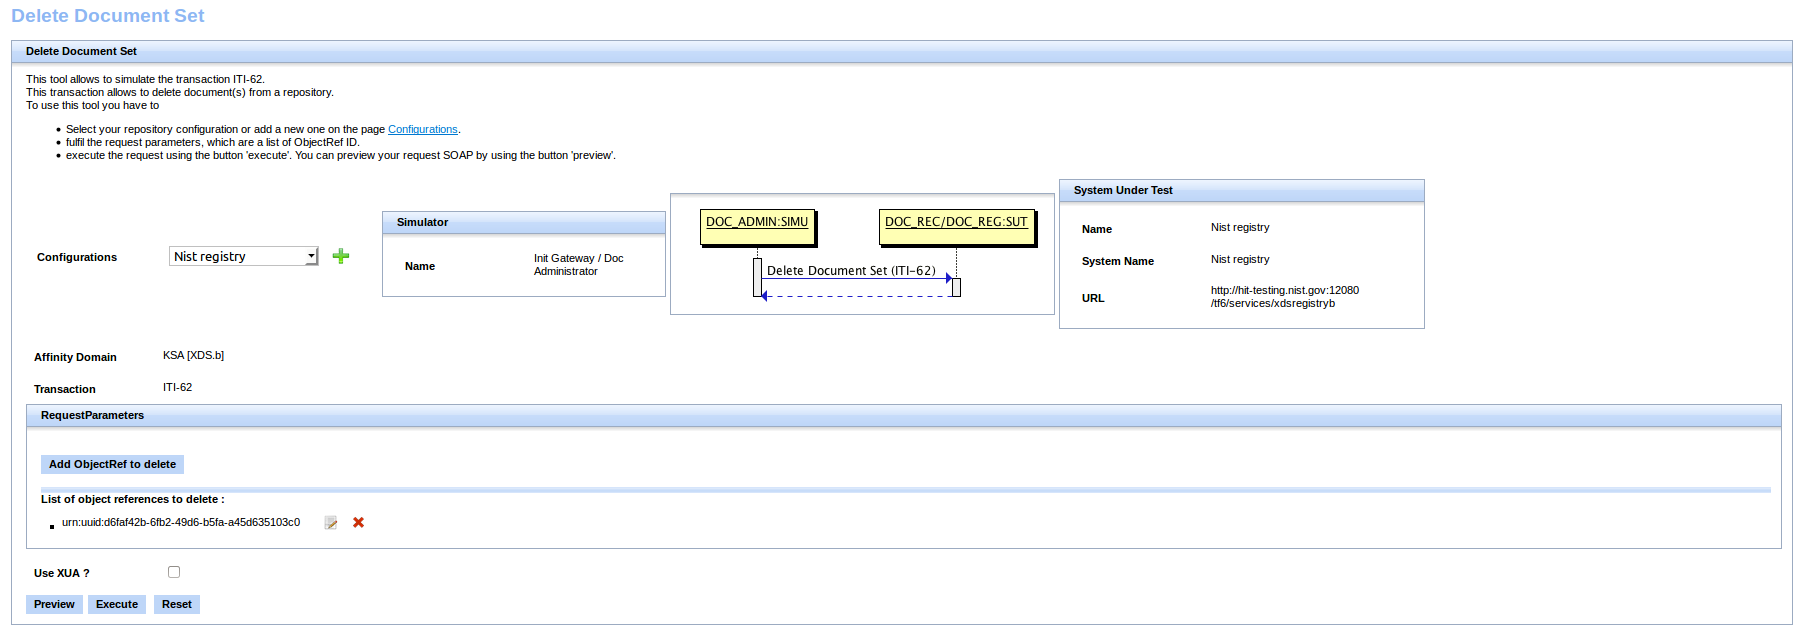
After clicking on execute button, a table will be displayed, containing the result of the execution.

RAD-55 [WADO Retrieve]
This tool provides the possibility to create a valid request according to the transaction RAD-55
To use this tool you have to :
- Select your responder configuration or add a new one on the page configurations.
- Fulfil metadatas of the request
- Click on the button 'execute' to retrieve the document requested

The attribute of the request are the same specified by dicom and restricted by IHE.
The validator of WADO request is integrated into XDStarClient. To validate a wado Request you have to refer to the validation of WADO request in EVSClient tool.
RAD-68 [Provide and Register Imaging Document Set - MTOM/XOP]
This tool provides the possibility to send documents to a repository or a document recipient using the transaction RAD-68
To use this tool you have to :
- Select your repository configuration or add a new one on the page configurations.
- Fulfil metadatas of the submissionSet. The patientId of the submissionSet is required.
- Upload the document(s) to submit, and fulfil IHE metadatas related to the document(s).Uploaded documents shall be dicom KOS Manifest or CDA documents.
- Click on execute button to send the document(s) to the selected configuration.
RAD-68 transaction is too similar to the ITI-41 transaction, with different metadatas.

For more documentation on how to fulfill the metadatas, please refer to the documentation of ITI-41 transaction.
RAD-69 [Retrieve Imaging Document Set]
This tool provides the possibility to create a valid request according to the transaction RAD-69
The request generated allow to retrieve a DICOM document (or a list of documents), based on informations provided by the KOS Manifest.
To use this tool you have to :
- Go to menu > > Simulators > IHE [RAD] > XDS-I.b > RAD-69 [Retrieve Imaging Document Set]
- Select your responder configuration or add a new one on the page configurations.
- Fulfil metadatas of the request, for each document you are looking for.
- Click on the button 'execute' to retrieve document(s).

This tool offer the possibility to upload a KOS manifest, and then generate the corresponding soap request to retrieve the DiCOM sop instances.

After clicking on execute button, the soap request is sent, and the result of the request can be seen in the table displayed.
XDS Metadata validation
XDStarClient provides a validation service for XDS metadatas.
The validation tool is based on schema and model based validation, and sometimes for some kind of validation we use also the nist validation services.
The endpoint of the validation service depend on the XDStarClient installation environment, locally it will be http://localhost:8080/XDStarClient-XDStarClient-ejb/XDSMetadataValidatorWS?wsdl.

The documentation of XDS metadatas constraints is available in XDStarClient GUI : menu -> Documentation ->

This guide will explain how to use the XDS Validator, to be able to list, create, edit and delete validators for the IHE XDS profile. Everything is configurable directly from this GUI, so you don’t have to type code to create a new XDS Validator on the Gazelle platform.
To access or configure a new XDS validator, go to XD*Client http://gazelle.ihe.net/XDStarClient/home.seam. The tabs related to the configuration of a validator are under the XDS-Metadata section.

1. Access to the validator list
Under the XDS-Metadata section, click on the Validator Pack association link.

You should arrive on the validator page list. For each validator, you can edit it, delete it, and export it in XML format with the actions buttons.

To add a new validator, click on the “Add new validator” button at the bottom of the page, or import one through the “XML Validator import” button.

2. Add a new Validator
When you click on the “Add new Validator” button or you try to edit a validator, you will arrive on this page, with many options which must be filled in.

-
From this page, you have to fill the validator name, which generally consists of the domain (epsos, IHE, KSA), the transaction name and the type of transaction (request or response). This can lead to a validator name like this : IHE XDS.b ITI-18 Registry Stored Query - request.
-
The version of the validator doesn’t have to be changed when you add a new validator. If you edit a validator, you must update the version. This way, it’s easiest to know on which validator version an XDS message is passed or failed.
-
The technical framework reference is a reference to the transaction concerned by the validator in the Technical Framework. For example, for the IHE XDS.b ITI-18 Registry Stored Query - request validator, you can find the reference to the ITI-18 transaction in the paragraph 3.18 of the Technical Framework. In this cas, you have to fill the field with “3.18”.
-
The namespace attribute depends on how the XML nodes of the tested files must be prefixed.
-
The extract node attribute is used to parse and select only the children of this XML node and ignore the others when validating a XDS message.
-
PackClass is an optional attribute, used if the validator calls validation methods inside a specific class (generated via OCL language). This attribute must only be used if your validator can’t be express by a composition of AdhocQuery metadata and RegistryObjectList metadata elements. For instance, all the “Response” transactions can only be expressed this way.
-
The files which must be tested in front of the validator you are currently configuring, are tested thanks to the AdhocQueryMetadata and RegistryObjectListMetadata selected. Each metadata defines the mandatory and optional elements, and different constraints expressed in the technical framework. If the metadata needed is not created, please report to the section 3. of this user guide to create a new one.
-
The usages attribute is used to select the usage context of a validator. New usages can be created under the “AffinityDomain-Transactions” tab under XDS-Metadata.
-
Has Nist Validation and the other attributes (Metadatacodes, isRegister, isPnR, isXca, isXdr) are only used if the validator currently added in Gazelle is supported by the NistValidator (an external XDS validation tool).
Once all the fields are filled in, just click on the Save button on top of the page.
3. Add a new XDS Metadata
By configuring a new validator, you may find that some metadata are missing. In this case, you can add new ones, in the same way you add a new validator. Under the XDS-Metadata section, click on the metadata you want to add.

For example, if you want to add a new AdhocQuery, click on the “add new AdhocQuery Metadata” button at the bottom of the AdhocQueries page. You will arrive on this page

If the metadata has itself some children (for example a Classification included in a RegistryPackage), they could be selected under the “Classification”, “Slot” or “External identifier” section. You can’t directly create a child metadata from this page (except for the Slot), it’s necessary to create the child in the first place, save it, and then select it from the parent.
-
UUID : Unique identifier of the metadata.
-
Name : name of the metadata
-
Display name : Used to create an alias for the “Name” field. Used only for display puposed
-
Value : Default Value of the metadata
-
Usages : Context of use
If there is a constraint that can’t be expressed directly from the fields or if this constraint concerns many entities, it’s possible to write an XPATH expression which will be evaluated on the tested document.

4. Add a SlotMetadata
As stated before, there is no dedicated page for SlotMetadata. They are directy editable from the other metadata pages.

-
Name : Slot name. It’s the identifier of a Slot
-
Multiple : If checked, the slot can have multiple values.
-
IsNumber : If checked, the String value of the slot must only be composed of figures
-
DefaultValue : If the slot has a default value, fill the field with it
-
Attribute : Alias for the Slot Name. Used only for display purposes.
-
Valueset : Code referencing a list of authorized values for the string value of the slot. Valueset can be found with SVS Simulator. If the value must not be restricted by a valueset, leave empty.
-
Regex : If the slot value must match a specific regex, the regex must be filled in here. Leave empty otherwise
- Cardinality : Number of times this slot is allowed to appear in the XDS message