[Deprecated] TM - Test Management
Warning: This documentation is out-dated, newest version of the documentation is available at https://gazelle.ihe.net/gazelle-documentation/Test-Management/user.html
- Log in to post comments
Gazelle Test Management Feature List
The following table summarizes the list of features in the Gazelle Test Management Tool.
| Feature | Bordeaux 2010 |
Pisa 2011 |
Chicago 2012 | Bern 2012 |
| Registration Process Management | ||||
| Users Management | x | x | x | x |
| Contacts Management | x | x | x | x |
| Companies Management | x | x | x | x |
| Contracts Management | x | x | x | x |
| Fees Management | x | x | disabled | x |
| Systems Management | x | x | x | x |
| Test Definition Management | ||||
| Tests Management | x | |||
| Binding to Gazelle Master Model | x | x | x | |
| Test Session Management | ||||
| Configuration management | x | x | x | x |
| Proxy Management | x | disabled | x | |
| Order Manager | ? | x | ||
| Monitor Management | x | x | x | x |
| Test Update Notification | disabled | x | ||
| Goodies | ||||
| Mobile Test Grading for Monitors | x | ? | x | |
| Single Sign On | x | disabled | x | |
Test Management Components
Testing Session Management
Gazelle Test Management can handle multiple testing sessions. The Multiple Test session can be run in parallel. Monitor and Systems register for specific testing session. One can select the coverage of the testing session in terms of Domain and/or Profile. One can also specify the type of testing to be performed in a testing session : Pre-Connectathon, Connectathon, Certification.
Users Management
Module for the management of gazelle users and their roles. Handles the users account management: registration, lost password, user information update. Handles the management of the roles of the users.
Users are associated to an organization. .
Contacts Management
Management of the contacts for a participating company. Allows the participating companies to enter contacts within Gazelle. Contacts are mainly used for administrative purposes. Used to identify the financial contact, the contact for marketing questions and the contact for technical questions.
Contacts are NOT required to have a login.
Organizations Management
Management of all organization relative information. This information is mainly for the purpose of the connectathon management. Users, Contacts and Systems belongs to an organization. The module allows the management of the information about the organization : Address, Contacts, VAT information,... Read more...
Contract Management
Component that manages the creation of the contract for testing session participants. Summarize the registration of the participants and create a pdf document based on a template that can be customized for each testing session. This makes use of the jasperreport library. The link to the jasperreport template for the contract definition in a testing session, is specified within the properties of the testing session. One has the choice to enable or disable it for a given testing session. Read more...
Fees Management
Component for the management of invoice (generation of the invoice, based on a template) and estimation of the amount of the fees to be gathered for an event based on participation. Helpful for connectathon management. Invoice generation is dependent of the testing session and as for the contract based on a template that can be specific to a session. Can be disabled for a given testing session. Read more..
Systems Management
Module for the management of Systems Under Tests (SUT). Manages the registration of the SUT for a testing session. What are the actors, integration profiles and options supported by each SUT. Allow participants to copy system characteristics from one testing session to the other.
Contains a rules engine that checks if the system correctly implements the IHE requirements of dependencies among the actors and profiles.
Tests Management
Modules for the definition of the tests. Test requirements per Actor/Profile/Options. Test script definition : Who are the participants ? What are the instructions for the participants ? What are the steps required to perform the test ?
Proxy Management
Interation with the Proxy component. Control of the proxy, instruct the proxy of the interfaces to open and close for testing purposes. Allow participants to link test instance steps to corresponding messages captured by the proxy.
Simulator Management
Component for the declaration and the management of the simulators that Gazelle uses to perform the tests.
Configuration Management
Management of the configuration of the systems and simulators performing together in a testing session. Knowing that most of the time spend during testing is lost during exchange of configuration parameters, it is essential that Gazelle allows the test participants to correctly and rapidly share configuration informations. That component allows the user to provide the information relative to their own systems. It also allow the test participants to rapidly find the relevant information about their peers in a test.
Monitor Management
Management of the monitors. Monitors are the independent and neutral individuals that check and validate the test performed during a testing session. The component allows the Technical Manager to assign tests to specific monitors. It allows the manager to split the load of test verification among the monitors. Test can be assigned to monitors either test by test, or monitor by monitor
Samples Sharing Management
Module for sharing samples. This component allows registered system to share and find samples. Some system need to provide samples, some need to render them. The component allows the participants to easily find the samples relevant for their systems. The sample sharing module is linked to External Validation Services for checking the conformity of the shared samples. The component makes also use of internal validation services
When relevant, the component module allows sample creators to provide a screen capture of the rendering of their samples. It also allows sample readers to provide a screen capture of the rendering of the sample on their system.
A sample and a test can be linked together. This is usefull in the case of scrutiny test. Read more...
Pre-connectathon Test Management
Allows managers to define the pre-connectathon test : Where to find the tool ? Where to find the documentation ? What actors/profile/options are concerned by the test.
Allows participants to find out what pre-connectathon tests they have to perform, to return corresponding logs and view result of logs grading. Read more...
Connectathon Test Management
Allows the managers to define the tests.
- What is the purpose of the test ? (assertion tested)
- What actors/profile/options are concerned by the test ? (test participants including the cardinality for each participants)
- The scenario of the test (sequence diagram of the interactions between the participants to the test), including the definition of what need to be checked at each step.
- How many instances of the test are required for a SUT to be declared as successfull to the test.
Allows engineers to find out what test need to be performed by their systems.
Allows engineers to start a test and select its participants (peer system under test or simulators)
Connectathon Test Grading
Module to allow the grading of systems participation during the connectathon. Allows the project managers to review test performed a determine success or not of a system to the participation of a specific actor / integration profile / option combination.
Patient Demographics for Testing Purposes
Module for sharing patients among the participants to a test instance. The module allow generation of simulated patient data using the Demographic Data Server. Generated patient data can be send to a selection of test participants using HL7 V2 or HL7 V3 messages.
Selection of the target is done based on systems configuration as declared in Gazelle. Target can be also configured manually. The component allows the management of multiple patient identification domains. The generated patient are assigned a unique id in the various patient identification domains of the target systems.
Stored data information can be used for validation of messages exchange by test instance participants.
Single Sign On
When enable component of Gazelle Test Management allows user to use a CAS server for their identification. Allows harmonization of the logins among the different applications. All Gazelle simulators also use the CAS login component. JIRA bug tracking system makes also use of it. Read more...
Test Update Notification
The purpose of the Test Update Notification is to reduce the load on the server that is hosting the Gazelle application. It allows connectathon participants to be informed of updates on the test instances that are of concern for them. Instead of refreshing the Gazelle Connectathon Dashboard all the times the participants are informed of new tests instances creation, updates, comments and grading.
Order Manager Binding
This feature is an extension of the Patient Demographic for testing purposes. It allows in addition of the creation of dummy patients, to create encounters and orders for them and send them to test participants. This is useful in the context of preparing the right conditions for a test. All SUT participating to a test can be aware of the same patient, encounter and order. Read more...
Mobile Test Grading for Monitors
This feature add a webservice front end to Gazelle Test Management in order to allow the grading of the test using a mobile device like a WIFI enabled tablet PC (iPad) or a smart phone (iPhone, android...). Monitors can use their mobile device to scan a QR code on the page of test instance to grade and then directly access the page on their device. Read more...
- Log in to post comments
[Deprecated] Gazelle Test Management User Manual
Warning: This documentation is out-dated, newest version of the documentation is available at https://gazelle.ihe.net/gazelle-documentation/Test-Management/user.html
This page indexes the different links to the user manual for the Gazelle Test Management application.
Basic Terminology
Test Types
No Peer
- Test run by your self. There is no need of a test partner to run this type of test
- Used for conformance testing of artefacts (document, messages) that the SUT can produce.
- No peer tests are usualy pre-requisite to Peer to Peer tests.
Peer to Peer
- Test run with one or two partners SUT.
- Test scheduled by SUT manager.
Group Test
- Test run with a larger group of SUT
- Test scheduled by management
Thorough / Supportive
See more information there. The Thorough / Supportive testing mode is defined at registration time.
Thorough Testing
- For those who do not qualify for Supportive Testing. The default testing mode.
Supportive Testing
- For profiles in Final Text
- For Actor / Integration Profile / Option that have been tested by the vendor in a past connectathon
- There must be a published integration statement
- Used for participants who would like to help partners
Test / Test Instance
Test
A definition of a test involving one or more IHE actors in one or more profile.
Test Instance
One instance of a test with specific test partners
Registration Process
During the Registration process, the Gazelle Test Management Application gathers information needed in order for an organization to participate in an upcoming testing session.
To complete registration for a testing session, an organization uses Gazelle to enter:
- User account(s) in Gazelle
- Organization details
- Contact persons in your orgainzation
- System information - the profiles/actors/options that you will test
- Participant information - people who will attend the testing session
When this information is complete, you may be asked to generate a contract in Gazelle for the testing session.
"How to" details for these tasks follow in the pages below.
- Log in to post comments
Registration concepts
Organization
In Gazelle, an organization is the entity that is presenting test systems at the Connectathon.
IHE publishes Connectathon results are per organization, thus, the organization name, address, and finanical contact you enter in gazelle is important.
Users and Contacts
A “User” has a login and password to access the gazelle webtool
A “Contact” is a person in your organization who will interact with us in preparation for the connectathon:
- Financial Contact (only 1)
- Marketing Contact (1 or more)
- Technical Contact (1 or more)
A user may, or may not, be a contact
Users and Contacts belong to an Organization
Users Roles
Two levels of users :
- Vendor admin role
- Approves new user accounts for your organization
- Can edit user and contact information
- Can edit organization info (eg address)
- Can edit all test system & testing details
- Vendor role
- Can edit all test system & testing details
System
In Gazelle, a ‘system’ represents
- a set of IHE profiles, actors and options an organization wants to test.
- Participate in the testing session as the SUT
Testing Session
Gazelle Test Management can manages multiple testing session. A testing sessions may represent:
- Connectathons
- Internet Testing
- Projectathons
When a user logs in to Gazelle, the user is viewing information for a single testing session. Gazelle always "remembers" the last testing session a user was working in. A user may switch between testing sessions. How-to instructions are here.
Creating and managing user accounts for an organization
A "user" is person with a login and password to access the Gazelle Test Management tool. A user in Gazelle is always linked to an organization. A user can only view/modify information for that organization.
Creating a new user account
To create a new user, go to the home page of Gazelle Test Management and click on the link "Create an account"

Then you need to fill the form with valid information.
If your organization is already entered in gazelle, select it from the "Organization Name" dropdown list; otherwise select "New company" as the "Organization Name" in to create a new organization in Gazelle.

Whn you complete the user information, an email is then sent to you to confirm your registration.
The user account is not activated until a user in your organization with admin privileges in Gazelle activates your account.
User privileges in Gazelle
If you are registered as a user with 'vendor' privileges in Gazelle (the default), you can manage the tests and configurations for your organization's test systems.
If you are registered as user with 'admin' privileges in Gazelle, you are able to :
- manage users related to your organization (activate/de-activate accounts)
- manage contacts to your organization
- manage the testing session participants
- manage contracts and invoice
Managing your organization's user account as a "vendor_admin" user
As an admin user you can manage the users in your organization from Gazelle menu Registration -> Manage users
You can use this form to activate or de-activate user accounts, or update email or password for a user.

Registering an organization
Gazelle gathers information about organizations participating in a testing session. This enables managers of the testing session to contact you about invoicing and other testing session logistics. The organization information is also used when publishing the successful results of a testing session.
Organization information is entered in two scenarios
- If an organization is registering in Gazelle for the first time, a user creating an account in Gazelle is asked to link the account to an organization and enter organization details.
- You can edit the information for your organization through the Gazelle menu Registration --> Manage organization information. The organization information is as follows:


Contacts Management
A "Contact" is a person in your organization who will interact with managers helping you to prepare for the testing session.
An organization must identify:
- Financial Contact (only 1)
- Marketing Contact (1 or more)
- Technical Contact (1 or more)
Note: a "contact" may, or may not, be a person with a "user" account in gazelle
A user with vendor_admin privileges can enter contact information in Gazelle with menu Registration --> Manage Contacts
The page looks like this.
Selec the "Add a contact" button to enter name, email and phone information for the contacts in your organization.

Entering system information -- profile/actor/options to be tested
In Gazelle Test Management, the term "system" refers to a set of application functionaity expressd in terms of IHE profiles, actors, and options. An organization may register one or more systems in a testing session.
The "system" participates in the testing session with peer "systems" from other organizations.
"System registration" is an important step because the profiles/actors/options you select drive much of what happens during the test session. It determines:
- what test tools you will use
- what test you will be required to perform
- who your test partners will be
Starting system registration
First, ensure that you are logged into the Testing Session that you want to register for. The name of the testing session is displayed at the top of the page whenever you are logged into gazelle. You can learn more about testing sessions here.
Next, the system registration page is accessed through Gazelle menu : Registration -> Manage Systems.
On that page you can :
- Add a system : This will create a new system in the Gazelle tool.
- Import systems from another testing session : A click on that button enables you to copy a system from a previous testing session into this new testing session. The new systems contains all of the profiles/actors/options that you registered in the previous session. You will be able to modify them if you wish. The name and the keyword of the system are appended with the string "_COPY" in order to distinguish the new system from the old one.
The instructions below assume you select Add a system.
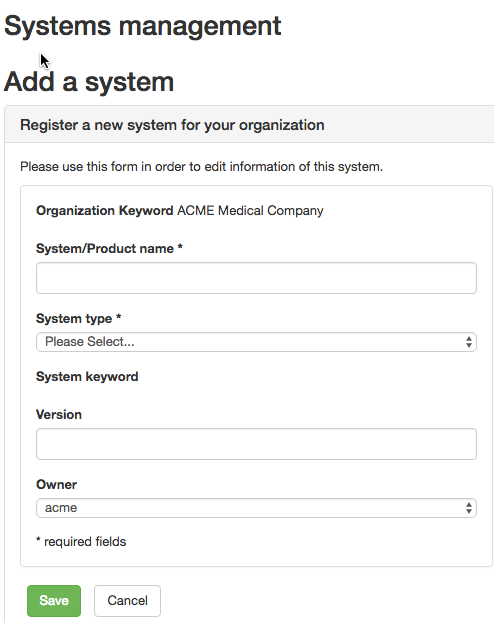
Completing the System Summary
You will be prompted for general information to identify your system:
- System/Product Name - this is how you refer to your system within your organization
- System type - you will select from a drop-down list of labels that are general categorizations of systems under test (eg "PACS", "EHR", "GATEWAY"). There is no right or wrong selection here.
- System keyword - this is how we will refer to your test system during the testing session. This field is auto-filled by Gazelle. It is a combination of the system type you selected and your organization's acronym (eg "EHR_ACME"). You can append a suffix to the gazelle-generated value.
- Version - an optional field that enables you to identify the version of your product
- Owner - this is a user within your organization who will have primary responsibility for managing this system during the test session
Completing the Profiles/Actors tab
After saving the system summary information, Gazelle creates a System Management page to collet information about your tests system.
The next step is toProfiles/Actors tab and Edit.
Select "Click on this link to add IHE Implementations..."
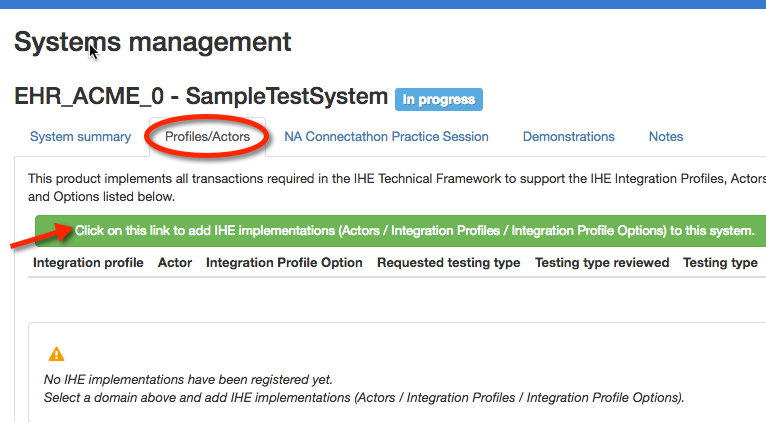
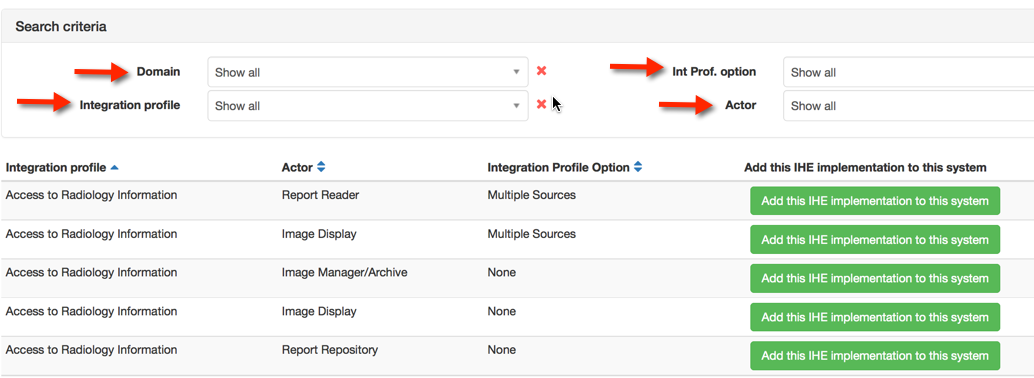
Next, you will use the dropdown lists to select the Domain, Profile, Actor, Option supported by your system. After making your selection, click on "Add this IHE Implementation to this system." You will repeat this procedure for each profile, actor, and option your system supports. Note that the "None" option represents the baseline requirements for that profile/actor without any option.
When you have selected the profile, actor, and options for your test system, they will appear on the Profile/Actors tab of your system's registration as follows:
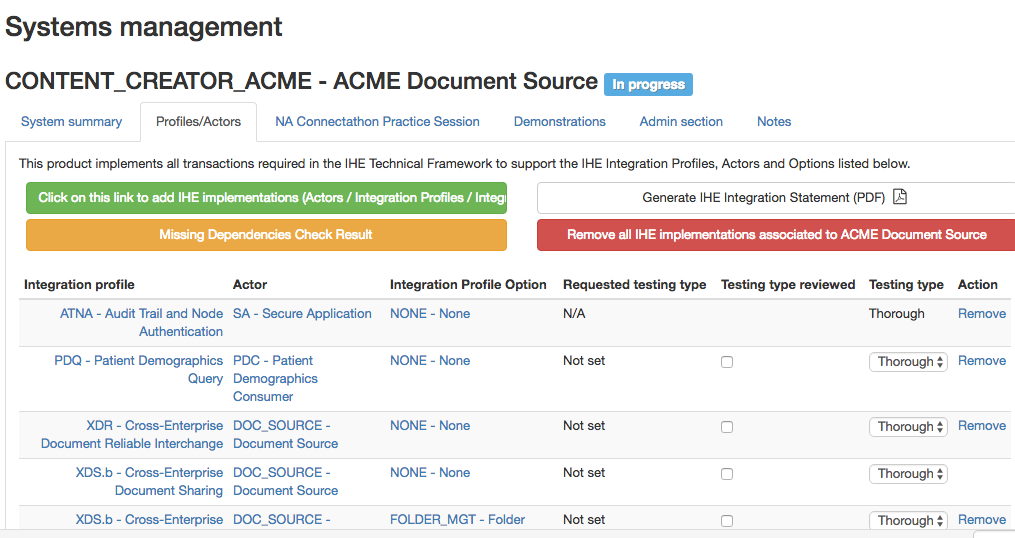
Finishing System Registration
To finish your system registration:
- On the "Profile/Actors" tab, look for the yellow "Missing Depenendencies" button. If it appears, it means that you have registered for a profile/actor that has a dependency on another profile. Select the button to complete registration for those dependencies.
- On the "Profile/Actors" tab, some of the profile/actor pairs you selected may be eligible for "Supportive" testing. "Thorough vs Supportive testing" is explained here.
- On the "System Summary" tab, change the Registration Status from "In progress" to "Completed". This is a signal to the technical manager of your testing session that you have completed your registration for this system
Generating a contract in Gazelle
Introduction to contract generation
The Gazelle Test Management tool is used to generate a contract for some testing sessions.
The contract includes the information you have entered into gazelle during the registration process:
- Organization details
- Contacts in your organization - financial, marketing, and technical
- One or more systems to be tested and several contacts .
If any of these is missing, Gazelle will not let you generate a contract.
To generate your contract
A gazelle user with "vendor_admin" privileges is able to generate a contract. Select Gazelle menu Registration --> Financial Summary
First Level Registration Errors
This section contains common error messages that occur when generating a contract. The error messages in red are generated by Gazelle. The numbers in ( ) are pasted onto the screen capture and refer to notes below the figure.
- The mailing address is missing for the company
- This is for general correspondence with your company.
- Select Registration -> Manage company information
- Under Mailing address, add an address for your company. This is on the right half of the form. Select Click here to add a new address. If you already have entered an address but you were presented with the error message, you need the next step that associates the address as your company mailing address. This first step adds an address to our database, but does not make it your mailing address.
- The address that you entered is presented in a table with the rightmost column an action column. If you have added a second address, you will see a table with two lines. To associate an address as your mailing address, click on the Select link in the appropriate row.
- You will now see the address copied from the right part of the form to the left side of the form, including the country flag. Scroll down and select Save. That should get rid of error (1).
- Missing address for Financial Contact
- This address is for the person in your organization responsible for processing our requests for payment.
- Select Registration -> Manage company information
- Scroll down to the Billing address section. Add an address on the right side of the form; Select Click here to add a new address.
- i) You might already have an address for your company that is the same for thisperson. Great; skip down to iii.
- ii) If you don’t have an address registered for this financial contact or the address of the financial contact differs from the main address, add it now.
- iii) In the table of addresses on the right side of the form, under the Billing address section, click on the Select link in the appropriate row.
- iv) You will now see the address copied from the right part of the form to the left side of the form.
- Scroll down and select the Save button.
- Missing Technical Contacts
- We need to verify that there are one or more staff members in your organization we can contact for testing and other technical details.
- Select Registration -> Manage contacts
- You will see a table of contact points in your organization. That table might be empty or already have members. You can add a contact person with the Add a contact button in the upper right corner. For this error (Missing Technical Contacts), make sure you select the checkbox for Technical.
- If the Technical Contact was already listed in the table but is not indicated as a Technical Contact in the Professional functions column, edit the row for that person (right most column of the table, edit button). Select the checkbox for Technical and do not forget to hit Save.
- We require at least one contact entered in the system for the generation of the contract. You are welcome to enter more technical contacts. This will be useful for organizations that have multiple systems, each with a separate technical contact.
- If you are bringing one system and three engineers, please enter one candidate as your technical contact. That person would be able to answer most technical questions or delegate to someone else. Please do not enter a person who is merely going to contact your engineers and pass along the questions.
- Missing Marketing Contacts
- We need to verify that there are one or more staff members we can contact if we have marketing questions (is there a logo we can use in documentation? What is the exact name to use for your company?).
- Refer to (3) above. Rather than selecting the checkbox for Technical, select the checkbox for Marketing/Commercial.
- The same person can fill the roles for Billing, Technical and Marketing/Commercial. We split them out for those organizations that have separate duties.
- Missing System Information
- If there is missing system information, you have registered zero systems for testing. The purpose of the contract is to explicitly list what you will test and include a computation for fees. You will need to register the system or systems you wish to test and all profile/actor pairs to be tested.
- Select Registration -> Manage systems
- Enter one or more systems.
- Make sure you save the systems.
- Make sure you select the Profile/Actors tab and enter what you want to test. Check for missing dependencies (ATNA requires CT).
- Fill in information if you plan to participate in a Showcase/Demonstration
- Missing Domain Information
- This means you have either entered zero systems, or you have entered systems but included no profile/actor pairs.
- Refer back to (5) for details.
Second Level Errors: Dependencies
Many IHE Integration Profiles have dependencies defined in the documentation. One example is that an ATNA Secure Node is always required to implement the Time Client actor in the Consistent Time profile. When you enter registration information, there is a button available to you labeled Check for Missing Dependencies. Rather than automatically register you, the system gives you this button to let you check when you feel it is appropriate. A box will pop up, list the missing dependencies, and give you the option to click a link to add them on the spot.
When you return to the financial page, one section will list all of your registered systems. The grid will give the system name, domains tested and fee information. One column will also indicate if all dependencies have been resolved. A green icon indicates sufficient registration; a red icon means that a dependency needs to be satisfied.
You cannot generate a contract if there are dependencies to be resolved, so you need to return to the page for managing systems.
- The rules defining dependencies are written in the Technical Frameworks. We transcribe those rules into Gazelle.
- The rules defining dependencies do not identify all combinations that you will find important. For example, the XDS.b profile requires the Document Source and Document Consumer to obtain a consistent patient identifier for an Affinity Domain but does not specify the mechanism. We support that with the PIX and PDQ profiles for Connectathon testing, but do not require that. Participants fail to register for PIX or PDQ and are then surprised to realize they do not have a mechanism to obtain the patient identifier in the Affinity Domain.
Register Participants to Testing Session
This page describe how to register the participants to a Testing Session. Participants to the testing session are the person who will get a badge an will be able to enter the floor where the testing in taking place.
Registration of the participants to the Testing Session can only take place when the registration of the systems is over.
Only the users with the role "vendor_admin" can register participants to the testing session.
One accesses the participants registration page through the menu Registration -> Testing Session Participants
See the illustration below :

There are 3 means to register a participant to a testing session :
- import from users
- import from contacts
- add participant
Import from Users
By selecting the button import from users, one can select the participants to add from the list of registered users for the organization.
Import from Contacts
By selecting the button import from contacts, one can select the participants to add from the list of contacts already declared in Gazelle Test Management tool. Contacts do not need to have a login.
Add Participants
When selecting the button add participants, the users can enter manually all the information about the participant to register.

User Preferences
User preferences are mainly used the GazelleTest Management application to customize some views according to the user's wishes. The main preferences you may want to update are
- The number of results (rows) in table
- Whether or not you want the diagram sequence of a test to be displayed on the Test Instance page. If not, you may save some space in the page, the one will be lighter to load.
User preferences can also be used to communicate some useful pieces of information to monitors and other connectathon participants, such as your photo, the languages you speak...
To configure your own user preferences, you must first log in to Gazelle. Then, on the top right corner of Gazelle, click your username and then select User Preferences (shown below).

This link leads you to your preferences management page. If you never change anything, the page may look something like this.

Preferences on this page:
Change your password
Skype account During the connectathon week, it can be useful to communicate using Skype. Such a field already exists for the system but a monitor for example, who does not own systems may want to "publish" his/her Skype name to speak with other monitors or participants.
Table Label During the connectathon week, you will sit at a table, the one will be localized by everybody thanks to a table label, typically A1, J10... When you sit the first day of the connectathon, fill this value so that other attendees will find you more easily.
Spoken languages The languages you are able to speak.
Hit the Edit button to update those fields. The following panel will be displayed.

When you hit the "plus" icon, a menu is displayed and you can pick up your language(s). If need, hit the "red cross" button in front of a language to remove it from the list. When finish, hit the "finish" button.

When you hit the "add/change photo" button, a panel like the one below is displayed. Clicking on "add" will open your file repository. Select your photo, only PNG and JPG files are allowed. Be careful to do not choose a too large image, all images with a height greater than 150px will be proportionately resized up to 150px (height).

Do not forget to save your changes before leaving this page.
- Log in to post comments
Testing Session
Concept of the Testing Session
Gazelle Test Management can manages multiple testing session. A testing sessions may represent:
- Connectathons
- Internet Testing
- Projectathons
Testing sessions are created by Gazelle Test Management administrators.
When a user logs in to Gazelle, the user is viewing information for a single testing session. Gazelle always "remembers" the last testing session a user was working in. A user may switch between testing sessions.
Selecting a Testing Session
In order to change testing session, log in to Gazelle. The name of your current testing session is displayed at the top of the screen.
To change testing sessions, select the "Switch" button.

Then select the session of your choice by clicking on the check-mark in the right column and press the "Continue" button on the bottom right of the page

The top of the screen displays the name of the testing session that you have selected.
- Log in to post comments
Pre-Connectathon Testing
Testing before IHE Connectathons is a requirement and is achieved using software written by several different organizations
An index to all available tools for testing IHE profiles is provided at the following URL: http://wiki.ihe.net/index.php?title=IHE_Test_Tool_Information
Gazelle helps Connectathon participants manage the pre-connectathon test.
- Based on the system declared list of actors and profiles, Gazelle will identify the list of test that needs to be executed.
- Gazelle provides information about the location of the documentation of the tests
- Gazelle provides a mechanism for a participant to return the test logs and for a connectathon manager to grade the returned logs.
Getting the list of test to be performed
This screen capture presents the Pre-connectathon test overview page in gazelle. The page is accessed through the menu : Connectathon->Pre-Connectathon Testing.

It shows the list of systems registered by the Organization, and for each system :
- the number of tests to do
- the number of tests to complete
- the number of tests verified
Click on the link in the: "Number of tests to do" column in order to view the detailled list of test to be executed for each system:

If you have a long list of tests, use the filters at the top.
Each row in the table represents one pre-Connectathon test and contains:
- a test identifier, usually a number. Hover your mouse over the test number to see a tooltip containing the test name
- a globe icon which is a link to the detailed description for the test. These test descriptions exist on several different websites, depending on the tool used.
- the profile, actor, and option the test applies to
- Optionality. R=the pre-Connectathon test is required. O=the pre-Connectathon test is optional.
- Status of the test
- Running--you are still working on it
- Verified by vendor--you have run the test, confirmed that the results are good, and uploaded evidence of that result (eg a log file, screen shot)
- Completed, with errors--you have run the test, but some problems occurred--either with the tool or with your implementation. You have made a comment in the test explaining the error.
- Supportive--you have registered for supportive testing. Selecting this status is a signal to connectathon management that you are choosing to skip this test (but you could perform it if you wish).
- A link to enable you to "Return a log file"
To learn how to submit results for a pre-Connectathon test, click on "Return logs for performed tests" below.
Return logs for performed tests
The general process for performing a pre-Connectathon test instance is:
- Read the Test Description (test steps). This is found by clicking the globe icon in the test.
- Access the tool used for this test (if applicable). An index to all IHE tools is here: http://wiki.ihe.net/index.php?title=IHE_Test_Tool_Information
- Perform the test.
- Capture evidence of your success; this may be a log file output by the tool, a screen capture showing success, or a text file you create that describes your successful result.
- Upload the result file into gazelle using the 'Upload a file' button. You can 'drag and drop' a file onto the button, or use your file browser to select the file.
- Change the status of the test
- Running: you are still working on it
- Verified by vendor: you have run the test, confirmed that the results are good, and uploaded evidence of that result (eg a log file, screen shot)
- Completed, with errors: you have run the test, but some problems occurred--either with the tool or with your implementation. You have made a comment in the test explaining the error.
- Supportive: you have registered for supportive testing. Selecting this status is a signal to connectathon management that you are choosing to skip this test (but you could perform it if you wish).
This screen capture presents an example pre-Connectathon test instance in gazelle:

Sample Sharing
The following sections describe how to use the Gazelle Test Management application to share samples (DICOM images, CDA documents...) and to verify the content of those samples.
Concepts -- sample sharing
Gazelle has a feature that allows participants in a testing session to share sample objects with other participants.
In Gazelle a "sample" is any object or message that an application creates and is used by another application. Typical samples include:
- DICOM object
- ISO image of DICOM CD-ROM or DVD
- CDA documents
- XDW documents
- HL7 messages
- ...others...
Gazelle Test Management uses the profiles and actors selected during Connectathon System Registration to determine which systems are 'creators' of samples and which system are 'consumers' of samples
Creators upload a file containing their sample into Gazelle.
Creators may use the Gazelle EVSClient tool to perform validation of the sample.
Consumers find samples uploaded by their Creator peers. Consumers download the samples and are able to test them with their application.
The following pages in this section detail how to upload, validate and access samples in gazelle.
Uploading a new sample
Creators of samples include DICOM Modalities, Content Creators of CDA documents, and other actors. These systems upload samples into Gazelle so that they are available to their test partners.
To upload a new sample, select Gazelle menu Connectathon-->Connectathon-->List of samples

When you select your system from the dropdown list, the "Samples to share" tab shows a list of samples for which your system is a creator. The list is based the profiles/actors in your system registration.
To add a new sample, for click the green "+" button next to the sample type.

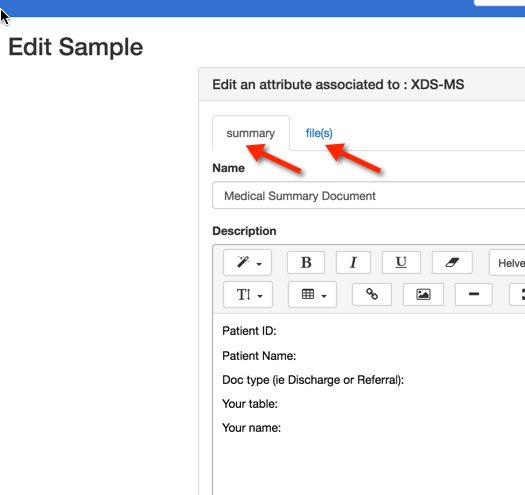
Give your sample a name as follows:

Next complete the "summary" tab, and on the "file(s)" tab, upload a file containing your sample.
When you have finished uploading your file and saving your sample, the sample entry in Gazelle will look like this:

Verifying samples using Gazelle EVSClient
After creators upload their sample file(s) into gazelle, it is possible to validate that content using the Gazelle EVSClient tool. (Note that Gazelle has validators many sample types, but not all.)
On the "Samples to Share" tab, find the entry for the file uploaded. Clicking on the green arrow will call the Gazelle EVSClient application:

In the EVSClient application, select the proper validator from the dropdown list. In this example, we are validating a DICOM image:

Depending on the type of sample you are validating, you may need to choose the tool and execute the validation. The results will appear at the bottom of the page:

And, here is a screen shot of a the validation result for a CDA document. The gazelle EVSClient shows a "permanent link to the sample". You may be asked to provide that link as evidence for a test case. The validation status and details appear at the bottom.

Finally, note that you can use the EVSClient application directly. See these EVSClient tests: https://gazelle.ihe.net/content/evs-client-tests
Accessing shared samples
If your systems is a Consumer of objects (documents, images...), to access samples that have been uploaded by Creators, select Gazelle menu Connectathon-->Connectathon-->List of Samples
After selecting your system from the dropdown list, find the "Samples available for rendering" tab as follows:

When you select a sample from the list, you will have access to sample details and can download the sample file(s):

System Configuration
Default configurations are assigned to the systems participating to a testing session. Once the Testing Session manager has assigned the configurations, participants can edit them and approve them.
This section describe how to edit and approve the configuations in Gazelle Test Management
The configurations are accessed through the menu "Configurations" as shown on the follwoing screen capture

HL7v2
This page present the form to edit the HL7v2 configurations :

HL7v3
DICOM
Webservices
Extract Configs from Gazelle
This page explains how to export the configuration information from Gazelle in a format the SUT can use to configure themselves.
There are 2 methods to get the configurations from test partners :
For the moment the only export format is CSV (Comma Separated Values) files generation.
Export Peers configuration parameters from the GUI
When searching for peers configurations in Gazelle (menu Configurations-> All Configurations)

In the configurations page, when available, click on the link "URL for downloading configurations as CSV" :

This URL is accessing the parametric service for downloading configurations.
testingSessionId, configurationType and systemKeyword are parameters that can be set by accessing the URL directly :
Europe : http://gazelle.ihe.net/EU-CAT/systemConfigurations.seam
North America : http://ihe.wustl.edu/gazelle-na/systemConfigurations.seam
System keyword is given if you use the GUI.
You can build the url that matches your need and have periodic query to the tool in order to feed your SUT with the most up to date information from the database.
Here are examples on how to use it :
- http://gazelle.ihe.net/EU-CAT/systemConfigurations.seam?testingSessionId=25&configurationType=HL7V2InitiatorConfiguration
- http://gazelle.ihe.net/EU-CAT/systemConfigurations.seam?testingSessionId=25&systemKeyword=ADT_AGFA_ORBIS_8.4
The response is a CSV file like this one :
"Configuration Type", "Company",  "System" , "Host" , "Actor" , "is secured", "is approved" , "comment" , "aeTitle", "sopClass","transferRole","port" ,"port proxy" ,"port secured"
"DICOM SCU","AGFA","WS_AGFA_0","agfa13","IMG_DOC_CONSUMER","false","false","For optional DICOM Q/R","WS_AGFA_0","QR","SCU","","",""
"DICOM SCU","AKGUN","PACS_AKGUN_2012","akgun10","PPSM","false","false","","PACS_AKGUN_2012","MPPS","SCU","","",""
Export peers configuration parameter using SOAP webservices
The wsdl of the webservice to access the peers configuration parameter is located there :
For Europe :
For North America :
http://ihe.wustl.edu:8080/gazelle-tm-gazelle-tm-ejb/ConfigurationsWS?wsdl
OID Management
This page explains how to access the OID values assigned to the systems participating to a testing session.
There are 3 methods for that purpose :
Export OIDs from GUI
You can get the list of OIDs from the GUI : configurations --> "OIDs for current session". On this page, you can do a search for a specific OID by filtering on the institution, the systemKeyword, the testing session, the integration profile, the actor, the option, and the label of the OID (homeCommunityId, organization OID, etc).
You can then use the link "Export as Excel file" to get an xls file containing all OIDs looking for.
Export OIDs using Rest webservices
You can generate directly a CSV file containing the oid, the label and the system keyword, by using REST webservice. The URL of the webservice is :
http://131.254.209.16:8080/EU-CAT/oidSystems.seam?systemKeyword=XXX&testingSessionId=YYY&requirement=ZZZ
where arguments used are :
| Argument | Opt | Type | List of Possible Values |
| systemKeyword | O | String | |
| testingSessionId | R | Integer | |
| requirement | O | String |
|
Export OIDs using SOAP webservices
The wsdl of the webservice to access the OIDs of systems is located there :
http://131.254.209.16:8080/EU-CAT-prod-TestManagement-ejb/ConfigurationsWS?wsdl
The concerned methods are :
- getListOIDBySystemByRequirementAsCSV : return a csv string which contains all OIDs searched by systemKeyword, testingSessionId and oidRequirementLabel
- getOIDBySystemByRequirement : return exactly the first OID searched by systemKeyword, testingSessionId and oidRequirementLabel

Network Configuration
The page Network Configuration Overview provides the users with the necessary information for the current testing session.
The information provided in that page is of 2 kind.
A blob where the administrator of the current testing session can provide to the participants a list of usefull an relevant information. This can be the networking parameters:
- Default gateway
- DNS
- Netmask
- ...
But it may also contain the information for the printer that is on site.
The page also provides a button to download a hosts file for the configuration of the systems that do not support DNS.
THe preferred method is for the participants to the testing session to use DNS in order to resolv hostnames. However we have encountered some systems in some past session that could not use DNS. So we have provided a mean to give the participants the access to a hosts file that can be installed on their SUT for name resolution.
Note that hosts file is NOT dynamic and the hosts file will have to be reloaded and reconfigured by the participants who have chosen not to use DNS after each test partner IP or name change.
Once the hosts file is downloaded it can be used to configure the SUT. Please refer to the operating system of the SUT for the set up of that file. Below is a list of pointer for 3 OSes
Connectathon Testing
Different category of tests
There are 3 types of test :
- No peer tests
- Peer to peer tests
- Group tests
Starting a Test Instance
Connectathon Dashboard
Gazelle Test Management users access the connectathon dashboard through the menu "Connectathon -> Connectathon " as shown on the following screen capture.

The dashboard offer advance filtering capabilities and allows the user to have an overview of the testing progress from different angles.

Monitor Workflow
Test validation workflow
- Find test in the monitor worklist
- Claim test (release it if necessary)
- Review test requirements
- Visit participants, look for evidence
- Grade the test
- Verified -> Done
- Failed -> Enter comments, done
- Partially Verified -> Enter comments, done
Gazelle Monitor App
The Gazelle Monitor application has been developed to help monitors validating tests without spending their time running from their desk to the participants' table. If the monitor own a smart phone with a WiFi connection, they will be able to claim and validate tests from their smart phone.
The GazelleMonitorApp is a tomcat application designed for mobile screens. It requires the installation of an application on the mobile devide that scans a QR code (for example http://en.wikipedia.org/wiki/QR_code).
The application you choose will depend on your device. You can download Barcode scanner, Google or other free applications from your market places. The use of MobileTag is discouraged since it accesses the links through an external server, and that will not work from most connectathon floor.
We have successfully tested the application with Android phones, iPhones and Windows phones.
In Europe, you will access the application at the following URL : http://gazelle.ihe.net/GazelleMonitorApp , the QR code leading to this application is given below:
How to proceed
After you have installed the QR scanner, connect your mobile device to GazelleMonitorApp application and sign in using your login and password; they are the same as what you use to connect to Gazelle (Test Management). Once the application has identified you, a cookie is stored in your (mobile) browser for 7 days (connect-a-thon duration) so that you will not have to sign in again even if your session expires. If it does not work, check that cookies are enabled in your browser. To remove this cookie, go to the application home page and use the "logout" button.
|
Home page |
|

 login page, use your Gazelle account
This workflow assumes that you have claimed one or more tests from the Gazelle Monitor Worklist, most likely using a laptop/PC. Once you are logged in with your mobile device, hit the "View claimed tests" button. If you are monitor at a Connectathon that is currently in progress, you will see the list of available testing sessions, as shown below. Selecting one of the testing sessions will lead you to the list of test instances you have claimed for that testing session. To select another testing session use the "Sessions" button of the navigation bar.
|
Choose your testing session |
Here is the list of test instance you have claimed and which still need work |
summary of a test instance. Click on update to see details and verify it, click on unclaim to release it |


A second workflow allows you to claim a test directly with your mobile device. You can do this at the participant table or using Gazelle at your laptop/PC. At your laptop/PC, go to Connectathon --> Monitor Worklist, you will see the list of test instances you can verify and claim them. Select a test instance by its identifier (id). When that brings up the Test Instance page, a QR code is displayed beside the metadata of each test instance (see the photo below). By scanning this QR code, for instance, you will be lead to the home page of GazelleMonitorApp; hit the "I've flahed a code" button, the test instance will appear (if you have access rights !)
|
Run a QR code scanner and flash the code |
Click on "I've flashed a code" to confirm and display the test informations |
Update informations and submit the result ("submit" button at the bottom of the page) |


By clicking the "View selected test instance" you confirm that you want to claim this instance. Nevertheless, the application may not be able to assign you this test for one of the following reasons:
- No test instance with the given id has been found within Gazelle
- You are not logged in or not a monitor for the testing session in which the test instance has been performed
- The test instance has already been claimed by someone else
- The test instance status is not either "to be verified", or "critical", or "partially verified"
- The connect-a-thon in which the test instance has been performed is over
When you get the screen with the test instance information, change the test status to failed, passed or patially verified. You may optionally change the status of individual test steps or leave a comment before submitting the result. If you want to add a long comment or if you prefer to change the step status using Gazelle Test Management, submit only the test status using the mobile app and then go to GazelleTest Management for further work. You can easily retrieve a test instance by its id using the search bar at the top of the home page of Gazelle Test Management on your laptop or PC.
Test Instance Workflow
Test Instances Statuses
A test instance can have the following statuses :
- Running : this is the initial state of a test instance, once the user press on the "Start" button.
- Paused : A test instance can be paused, and the restarted by the user.
- Aborted : If the test instance was started per mistake, or is a duplicate of an existing test instance. Then one can abort it. Aborted test instances are not checked by monitors.
- To be verified : Once a test instance is completed, the user can set it status to "to be verified". Monitors work list contains test instances with that status.
- Failed : Based on the evidences and the observation of the logs or the actual run of the test by vendors, a monitor may fail a test.
- Verified : A monitor once convinced that the test is successful can mark it as verified
- Partially verified : If a monitor thinks that a test is incomplete but that their is a chance that the vendor may fix the problem during the test session, then he/she can mark the test as partially verified.
- Critical : Sometime toward the end of the connectathon, the project manager activates the "critical" status mode in Gazelle. Monitors verify then the Test instances with the status critical first.
Test Instances Transitions states
From the Vendor perspective

From the Monitor perspective
Monitors work on test instances that have one of the 3 following status:
- To be verified,
- Critical or
- Partially Verified.
The output status are :
- Failed
- Verified
- Partially Verified
")
Complete state diagram for Test Instances

Validation of test steps logs within test instance
The aim of this page is to explain how the validation result displayed on a test instance page are retrieved from the EVSClient tool.
When a test instance is created, the page looks like:

The are different possibilities, like the next sequence diagram shows :

If we choose the first case, which is to add the permanent link from the proxy in a step message :

When it 'is added :

The file is to be validated in Proxy to EVSClient, the test instance page looks like (use the refresh button is not) :

We can see in data column the last validation status from EVSClient.
We can see in EVSClient status column :
-A color button (green=passed, blue=unknown or not performed, red=failed)
-The last date when the status was verified
-The refresh button
If the user clickon color button, then he is redirected towards the last result of validation.
If the user click on refresh button, then TM reloads the last validation status.
The button's color evolves according to the result and the date is update.
Generate and Share patient data
One of the numerous functionnalities of Test Management is called "Patient Generation and Sharing". This feature, available under the "Connectathon" menu, enables testers to generate patient demographics and to share them among systems registered within Gazelle for the same testing session. In this way, systems involved in a same test can be pre-filled with the same patients, the ones will be used during the test process.
List of patients
The first tab available in the "Patient Generation and Sharing" page is entitled "Existing patients". It list all the patients registered in Test Management, you can restrain the list of patients using the filters available in the table column headers. If you need to find a patient created by yourself, select your username in the "Select creator" drop-down list.
For some of the patients, the "test keyword" column is filled, it matches the test keyword in which you have to use this patient. For instance, if you want to pre-fill your system for testing PIX, enter "PIX" in the filter box of the "Test keyword" column, you will get the list of patients to use for this set of tests.
Update patient data
Test Management enables you to edit a patient in order to update his/her demographic data. Actually, instead of updated the information in the database, a new patient is created with the new demographics and the original patient cannot be updated anymore. For the new patient, a link to the "original patient" is made. To access this feature, use the edit button displayed on each row of the table ![]() (except for patients already updated once).
(except for patients already updated once).
Share a list of patients
Using the "Export as CSV file" link, below the table, you will get a CSV file gathering all the demographics data for all the patients displayed in the page. If you need patients displayed on several pages, please, before clicking on that link, increase the number of "results per page" in a manner that you will see all the patients you want to export.
In the same way, the ![]() button at the bottom of the page enables you to share those same patients using an ADT message. See below for explanations about how to set the sending options.
button at the bottom of the page enables you to share those same patients using an ADT message. See below for explanations about how to set the sending options.
Share a patient
The tab entitled "Share patient" is available only if at least one patient is selected. The purpose of this page is to send HL7 messages to the CAT participants in order to help them with sharing the same patients demographics. You will first have to select the message to send and then to select the systems to which send those messages.
Four HL7 message types are available in this section:
- ADT^A01^ADT_A01 (HL7v2.3.1)
- ADT^A04^ADT_A01 (HL7v2.3.1)
- ADT^A28^ADT_A05 (HL7v2.5)
- PRPA_IN201301UV02 (HL7v3)
Depending if you select a message with a version equals to HL7v2.x or HL7v3, the list of available systems will gather systems registered with respectively an HL7v2 Responder or HL7v3 Responder configuration approved within Gazelle. Those systems are listed by HL7 Responder actors. Select all the systems you need (by double-clicking on a system, it will pass from a box to the other). Once the systems, for a given actor, are selected, click on the "Add selection" button. The systems and their configurations will appear in the table below.
If the system you are looking for is not available in the displayed list or if you are using this functionality out of a connectathon period, you may want to manually enter the configuration of the system (IP address, port, receiving application/facility ...). To do this, use the form available in the right hand part of the screen.
You can use at the same time Gazelle and manual configurations. When all of them are selected, click on the "Send Message" button.
A table will then appears which gathers all the logs of the event. For each selected systems, the message sent by Gazelle and the acknowledgment received are stored there; so that you can see which systems received and integrated the message.
Generate a patient
This part of the tool is available under the "Generate patient" tab. The generation of patients' demographics and addresses is done calling the webservice offered by the Gazelle tool named Demographics Data Server (DDS). The generator can be configured to return or not such or such data. For instance, you might not want your patient to have a religion or a race but you want it to be called MY_COMPANY MY_SYSTEM. You can do that. Select the "random" option for the generation of names and fill out the first name and last name; also select the gender of the patient. Then, select the other criteria you want and click on the "Generate patient" button. After a while, the patient demographics will show up.
If you want to immediate share the just generated patient, click on the "Share patient" button, available under the patient's demographics.
Permanent link
Each patient can be accessed using a permanent link. This one is available in the page gathering the data of a particular patient.
Quick search
Using the quick search box available beside your username at the top of the tool, you can search the patient by its name, first name (criteria: Patient by name) or by id (criteria: Patient by id).
For learning more about this functionality and seeing annotated screen shots, refers to the attached pdf file.
- Log in to post comments
Internet Testing
The purpose of this chapter is to explain how to use gazelle test management in order to perform testing over the internet.
Using Gazelle Test Management for Internet testing provides testers with the following functionalities.
- Registration
- Sharing of configurations
- Partner discovery
- Test execution and logging
Specificity of Internet testing
Internet testing using Gazelle Test Management is very similar to testing during the connectathon. The major difference between connectathon testing and Internet testing is an increased difficulty to achieve the communication between the different test partners.
- Test Partners are not located in the same room.
- Communication between the SUT needs to go through corporate firewalls
Registration
Usage of Connectathon and PreConnectathon presets
The purpose of this chapter is to explain how to use presets in Gazelle pages where they are available.
Presets are available for the following page :
- Connectathon page
- Pre-Connectathon page
The aim of the preset is to allow the user to save some filtering configuration and directly load the page with the filtering value set with the saved ones. The intent is double : speed up navigation for the user and reduce the load on the server by avoiding loading all the tests when only a few of them needs to be loaded.
First of all, a preset use cookies,you need to activate them! Normally if you are able to log into the application your brower is already configured to accept cookies
Let's take the PreConnectathon result page for instance, it is ver y similar to the Connectathon page.

You can see in red rectangle the new feature.
Select an organization, add a name to your preset and clic on save. Your preset is added !

Two fonctions are available:
- You can check a box to replace your main PreConnectathon result page. By default, it's none.
- You have a list of all of your presets with the name, the possibility to remove it, the current and default page.
You can save up to 4 presets. Once they are all created, you need to remove one before creating a new one.

Now you can click on PreConnectathon results page and the loaded page is your default page :

Systems Management
- Log in to post comments
Permanent link to system
For each system, there are a permanent link from gazelle to go directly to the summary of the system on the specified session. The link contains the description of the system, implemented IHE actors/profiles, system information summary, and the list of demonstrations that the system is registered for.
This permanent link has this form :
http://gazelle.ihe.net/EU-CAT/systemInSession.seam?system=XXXX&testingSessionId=XX
- system : the keyword of the system
- testingSessionId : the id of the testing session (15 for pisa, 8 for Bordeaux, etc).
Test Specification
- Log in to post comments
Searching a test
Editing a test
[Deprecated] Gazelle Test Management Administration Guide
Warning: This documentation is out-dated, newest version of the documentation is available at https://gazelle.ihe.net/gazelle-documentation/Test-Management/admin.html
This section of the user guide is dedicated to the administrator of Gazelle Test Management, Gazelle Product Registry and Gazelle Master Model tools. It explains how to configure the tool, how to manage users, systems and so on.
Home page
The home page of Gazelle Test Management can be customized for your needs. This page is made of two main frames, one is first populated with informations coming from the database and you can edit the rest, the other one, can be displayed only if you need it, above or below the first one; and you are totally free to define its content.
From the home page, "Edit" button are available in the panel headers to edit the title. The ones available at the bottom of the panels are for editing the content. The "Move panel to the botoom/top" button can be used to change the location of this panel.
When you edit a title or a panel content, do not forget to hit the "Save" button.

Configuration of the application preferences
The configuration of gazelle TM is done throught the menu Administration --> Application Preferences

This page contains multiple sections allowing to configure the different behaviors and modules of gazelle.
Application mode

This section allows to configure the different modes of the gazelle TM application.
Gazelle TM can be configured into three modes, and four configurations:
- Master Model: gazelle act as editor of profiles, samples, and tests plan (example GMM: gazelle.ihe.net/GMM/)
- Test management (for a Connectathon): used when gazelle act as manager of CAT testing sessions
- Product registry (store integration statements): gazelle used in this mode to store the integration statements
Gazelle can act as
- Master Model
- Test Management
- Master Model and Test Management
- Product Registry
Any other configuration will make gazelle out of use
Application settings

This section allows to configure the different administration properties of gazelle TM, which are:
- Application URL: the URL to gazelle application (example: http://gazelle.ihe.net/EU-CAT/). This attribute is used to create permanent links into the application to the test plan, test instances, etc
- Application OID: the unique identifier of gazelle instance (example: 1.3.6.1.4.1.12559.11.1.5). This element is used to create permanent identifiers into the application
- Application URL basename: the base name of gazelle TM instance (example: EU-CAT)
- Application Name: the name of gazelle instance (example: gazelle)
- Admin Name: the administrator's name
- Admin title: the fonction of the admin
- Admin Email
- History Account Email
- Documentation URL: the URL to the documentation of gazelle
- Issue Tracker URL: the URL to the jira tool
- Release Notes URL: URL to release note
- Zone: example : EUROPE
- Google Analytics Code: the identifier of GCA
- Default test language: the default language of test plan descriptions
- Default color: the default skin of the tool
- Session timeout (in minutes)
- Ping frequency (s): the frequency to update the status of sessions (example : 30)
Messages
![]()
This section describes the ability to uses messages modules into gazelle. When allowed, the monitors and the vendors are notified of the status and changes into their test instances.
Assertions

Allows to show or to hide assertions link to a test. This sections is linked to assertion manager via the property 'Assertion Manager rest api url' (example: http://gazelle.ihe.net/AssertionManagerGui/rest/)
CAS - Central Authentication Service
This section allows to link the gazelle TM to a cas service, or to use local database of the TM tool.

Deploy section

The deploy section allows to schedule deployment of gazelle TM ear into a jboss server. This section contains 4 elements:
- Auto deploy scheduled
- Deploy source : the path to the ear to be deployed
- Deploy target: the path to the ear in the jboss server
- next schedule : the next time of deploying
Cache section
![]()
Allows to reset the cache used with gazelle (for developers, the cache used is ehCache).
Jira

Allows to link gazelle TM to the jira used, and then vendors can report problems encountered in tests descriptions or test steps.
Avaiable attributes:
- Display jira issues related to test
- Jira base url
- Jira Projects keys to fetch issues from: List of project keys (comma separated) that store test issues
- jira Project key to Report issues : Test issues will be reported in this project
Security
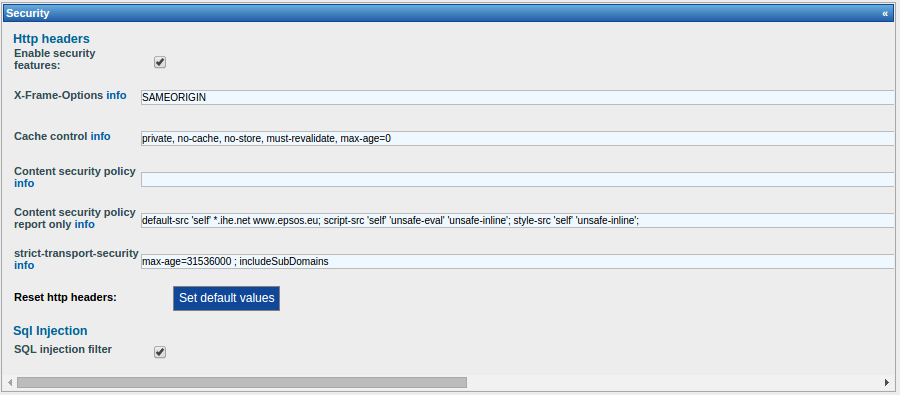
This section allows to describes the differents http security attributes related to gazelle.
New features added to improve the security of applications developed by IHE-Europe
The audit security was done by two external teams.
Improvement added :
- CSRF (cross site request forgery)
- SQL injection filter
- HTTP Headers security enforcement
- Better cookies management
| Pref key | kind Pref | value | description |
| security-policies | Boolean | true | Enable or Disable http security headers |
| sql_injection_filter _switch |
Boolean | true | Enable or Disable Sql Injection filter |
| X-Content-Security -Policy-Report-Onl y |
String | default-src 'self' *.ihe.net; script-src 'self' 'unsafe-eval' 'unsafe-inline'; style-src 'self' 'unsafe-inline'; |
To verify that the content of the site is provided only by domain specified (trusted domain) (report only!) |
| X-Content-Security -Policy |
String | To force that the content of the site is provided only by domain specified (trusted domain) |
MESA tests

This section allows to configure the behavior of pre-cat tests : automatic validation and mail notification
Certificates
![]()
Provides a link to the TLS tool
External Validation Service Front-end
![]()
Provides a link to EVSClient tool
Auto update section

This section describe a module in gazelle allowing to update the relationship between Results of testing session, and the systems participating. This section contains two attribtues:
- Auto update CAT results : this section shall be selected during testing session registration and execution, no need to it otherwise
- Test Result Refresh Interval (s): the interval of updates
Proxy

This section describes the proxy tool informations
TLS Section
![]()
Link to the Client simulator related to gazelle
QR Codes

used for communication between the monitorApp and the gazelle TM. Each TestInstance is described then by a DR codes, which used later by the monitorApp.
DDS - Demographic Data Server

Link to the DDS tool.
Order Manager section

Link to order manager tool
Files/Paths Management
List of path files used by gazelle TM in the server.
Users Administration
The admin can manae user registration, for all the companies, vendor_admin can do so for users registred for his company.
To do so, the admin shall go to menu -> Administration -> Manage -> manage users

The GUI of the users administration page looks like this:

The admin has the possibility to filter users by
- Organization
- Firstname
- active users
- role of users
- username
- lastname
- blocked or not blocked users
The table that show the list of users contains the following information:
Organization keyword
- username
- name
- activated
- blocked
- number of logins
- last login date
- last modifier username
- the roles affected
The administrator is able to
- create new user
- edit old users
- view information of a user
- connect as a user !
- disable user account : the delete act as 'block', the user is not really deleted from the database
Add users
To add user the admin shall click on the button 'add user'

The page of adding user contains this information:
- The name of the organisation the user belongs to
- firstname
- lastname
- email (shall be a valid mail, and so the user can activate it, and the reset his password, etc)
- username
- blocked?
- account activated
- the list of role attributed:
| admin_role | The admin role is responsible to manage gazelle |
| monitor_role | A monitor for gazelle testing sessions |
| project-manager_role | a project manager in gazelle (rarely used) |
| accounting_role | |
| vendor_admin_role | an admin of a system / organizarion |
| vendor_role | a simple vendor |
| user_role | a user |
| tests_editor_role | a test editor role -> allowed to edit test plans |
| vendor_late_registration_role | a vendor who is lately registred to a testing session ( this allows to register even if the session is closed) |
| testing_session_admin_role |
An admin for a specific testing session |
The following table describe what a user can do and cannot do:
| Fonction | admin_role | monitor_role | project-manager_role | accounting_role | vendor_admin_role | vendor_role | |
| Edit institution | x | x | x | x | |||
| Delete institution | x | ||||||
| View institutions list | x | x | x | ||||
| View institution summary | x | x | x | x (only his company) | x (only his company) | x (only his company) | |
| Access institution web site | x | x (only his company) | |||||
| Access users list | x | x (only his company) | |||||
| Access contacts list | x | x (only his company) | |||||
| Access invoice | x | x (only his company) | |||||
| Add system | x | x | x | x | |||
| Edit system summary | x | x | x (only his company) | ||||
| CRUD Actor/Profiles for a system | x | x | x (only his company) | ||||
| CRUD Demo for a system | x | x | x (only his company) | ||||
| Delete system | x | x | x (only his company) | ||||
| View system | x | x | x | x | x | x | |
| View systems list | x | x (all companies) | x | x (only his company) | x | x | |
| Generate Integration Statement | x | x | x | x | x | x | |
| Check missing dependencies | x | x | |||||
| Add missing dependencies | x | x | |||||
| Create user | x | x | x | ||||
| Edit user | x | x | x | ||||
| Delete user | x | x | x | ||||
| View User | x | x (only his account) | x | x (only his account) | x | x (only his account) | |
| List all users | x | x (only his account) | x | x (only his company) | |||
| Update user preferences | x | x (only his account) | x (only his account) | x (only his account) | x (only his account) | x (only his account) | |
| Create/Update user picture | x | x (only his account) | x (only his account) | x (only his account) | x (only his account) | x (only his account) | |
| Change password | x | x (only his account) | x (only his account) | x (only his account) | x (only his account) | x (only his account) | |
| password lost | x | x (only his account) | x (only his account) | x (only his account) | x (only his account) | x (only his account) | |
| Create contact | x | x | x | x | ??? | ||
| Edit contact | x | x | x | x | ??? | ||
| Delete contact | x | x | x | x | |||
| List contacts | x | x | x | x (only his company) | x (only his company) | ??? | |
| Create invoice | x (automatic) | x (automatic) | x (automatic) | x (automatic) | x (automatic) | ||
| Edit financial summary | x | x (in institution page) | x (in institution page) | ||||
| Edit invoice | x | ||||||
| Delete Invoice | x | ||||||
| View Invoice | x | x | x | ||||
| Download PDF Contract | x | x | x | ||||
| Generate PDF Invoice | x | ||||||
| Generate report of financial overview of all companies | x | x | |||||
| List invoices | x | ||||||
| Add / Edit a test | x | NA | NA | NA | |||
| Add/Edit RoleInTest | x | NA | NA | NA | |||
| Add / Edit metaTest | x | NA | NA | NA | |||
| Add / Edit path | x | NA | NA | NA | |||
| Copy a test | x | ||||||
| Print a test | x | x | x | x | |||
| Add / Edit Domain | x | NA | NA | NA | |||
| Add / Edit Integration Profile | x | NA | NA | NA | |||
| Add / Edit Actor | x | NA | NA | NA | |||
| Add / Edit Options | x | NA | NA | NA | |||
| Add / Edit Transaction | x | NA | NA | NA | |||
| Add Transaction Option Types | x | NA | NA | NA | |||
| Add/Edit Message Profiles | x | NA | NA | NA | |||
| Add/Edit documents | |||||||
| Link documents to TF concepts | |||||||
| Add / Edit ObjectType | x | ||||||
| Add / Edit ObjectFileType | x | ||||||
| Define validators | x | ||||||
| Access certificates page | |||||||
| List Pre-CAT Tests | |||||||
| Add logs | |||||||
| List Pre-CAT Tests | |||||||
| Consult test logs | |||||||
| Change status | |||||||
| Create demo | x | ||||||
| Edit demo | x | ||||||
| Delete demo | x | ||||||
| View demo | x | x | x | x | x | x | |
| Create Testing Session | x | ||||||
| Edit Testing Session | x | ||||||
| Delete Testing Session | x | ||||||
| View Testing Session | x | x | x | x | x | x | |
| List Testing Session | |||||||
| Activate/Deactivate Testing Session | |||||||
| Create/Edit sample | |||||||
| View samples | |||||||
| Upload samples | |||||||
| Validate samples | |||||||
| Update status | |||||||
| Search for samples | |||||||
| Generate connectathon report | |||||||
| Download Systems summary | x | x | |||||
| Create a new patient | x | x | x | x | x | x | |
| List patients | x | x | x | x | x | x | |
| Edit patient | x | x | x | x | x | x | |
| Delete patient | x | x (only the ones he/she created) | x (only the ones he/she created) | x (only the ones he/she created) | x (only the ones he/she created) | x (only the ones he/she created) | |
| Share patient | x | x | x | x | x | x | |
| List sharing logs | x | x | x | x | x | x | |
| Add/Edit assigning authorities | x | ||||||
| Link systems to authority | x | x | x | x | x | x | |
| Create patient (admin part) | x |
Edit users
To edit a user, you have to click on the button ![]()

The edit page contains the same information as the add user page, with the possibility to change the password for a user, using the button "change password"
View users
To view user information, admin shall click on the button ![]()

The information provided are the same as in the edition mode
View user preference

The admin is able to view the user preferences, regarding gazelle use, which are:
- Username
- firstname
- last name
- organization
- skype account
- table label : the table used in a current testing session CAT
- show sequence diagram: this enable or disable the use of sequence diagram under test plan and test instances, may be important for performance issues
- Display your email address to everybody ? : for security issue we added this optionality
- Display Tooltips ? : a number of tooltip are disabled when user want it
- Results per page : the number of result found by page of search, largely used in seach pages (like for test plan , etc)
- Spoken languages : the list of spoken language ( useful in CAT)
- user's picture
User preference is more explained in this link : http://gazelle.ihe.net/node/141.
Connect as user
Gazelle offer the possibility to the admin to view the GUI of the vendor, the same GUI configuration, and to connect as the corresponding user; which could be useful when the vendor has a problem, and the admin want to see what it really looks like.
Companies/Organizations administration
The administrator has the possibility to edit Administrations registred into gazelle, or to add new organization/companies.
To do so, the admin shall go to menu -> administration -> manage -> Manage Organizations.

The page of this module looks like this:

For each organization, we can go to :
- its website
- the list of users related
- the list of contacts related
- the invoice of the institution
The table describes the information related to the institutions: the name, the keyword; the type, the number of related systems, the last modifier and the last modified time.The administrator has the possibility to view, edit or delete an institution.
Create New Organization
The administrator is able to create a new administration using the button "Add an organization".
The result of clicking on this button is the organization edit page:

View Mode
The view mode is possible using the loop : ![]()
The result of this page is a html description of all the information related to the institution:
- Organization Demographic Summary
- Mailing address
- The billing address
Edit Mode
the Edit mode is shown using the button ![]()
The result of this page is the same rendering for the vendor who create the organization, and which look like this:
Contacts Administration
The admin of gazelle TM can access to the list of contact of organizations, modify, delete or add new ones.
To access the administration of contacts, the admin shall go from the menu to administration -> Manage -> Manage Contacts
The main page looks like this:

The button "Add a contact" allows to add a new contact.
The table describes the information related to contacts registred, and we can filter by organization.
The contacts displayed can be edited or deleted, as a vendor admin can do.
Systems administration
The management of systems contains 6 sub-sections listed below
Manage systems
The manage system page allows the admin to have the same optionality as the vendor admin, the advantage is the admin is able to edit all the systems related to Gazelle TM.
To go to this page, from the menu Administration -> Manage -> System -> Manage systems

 4
4
Add systems
The administrator is able to add new system to gazelle TM for the current testing session, by clicking on the button "add system"

Import Systems
The admin is able to import old systems from other testing session.
Edit Systems

The admin is able to edit information related to existing system in the current session. The information related to the system are:
- system summary (org, name, etc)
- Profiles/actors registred for
- Information related to the session
- demonstrations registred for
- admin information system
- notes (text area)
Update the registration status
The admin is able to update the system registration status (dropped, in progress, completed)
View Systems
The admin is able to view information related to systems by clicking on the button ![]()
This information is the same in the page of edition of systems.
Find systems
This page is here to allows the admin to look for systems in the gazelle TM tool.
To go to this page, the admin shall go from the menu Administration -> Manage -> System -> Find systems


This allows to search by
- organization's name
- testing session
- domain
- integration profile
- actor
- test registred for
- demonstration registred for
- integration profile option
- transaction
The table of systems provides information about the table odf the systems looked for, and the principal contact email.
Also, from this page, the admin is able to edit, add, remove, or view systems informations.
Manage Simulators
Systems acceptation
This module is very important, as if the admin does not accept the system registred, it will not be able to execute tests with other partner during the CAT.
To go to this page from the menu Administration -> Manage -> System ->Systems acceptation

The admin is able to filter by Organization keyword or institution, and then he is able to :
- accept all the system in the list
- do not accept all the list systems
and this can be done by clicking on the buttons under the filter from the GUI.
Supportive AIPOs
This is the page where admin or testing session manager can grant testing session participating system the ability to participate as "supportive" with a selected list of actor/profiles.
It is not our purpose here to describe what supportive and thorough testing means. For more information please visit this link
To go to this page, from the menu Administration -> Manage -> System -> Supportive AIPOs
The page offers the ability to use filters in order to get the system information, and is able to set to supportive or to thorough all the systems filtered.
Please also note that it is possible to set the value of the testing type by using the select on the top right of the table. All the entries in the table will then be set in a single click

Registration Overview
The registration overview allows the admin to view the list of profiles and actors by system.
The admin is able to download the coverage of the profiles by systems, and to download the systems summary regarding the profiles.
This help the admin to know which profile/option has missing parteners, and what actions should be taken in accordance to this information.
To go to this page, the admin shall go to: Administration -> Manage -> Registration Overview


Administration of Testing Sessions
A testing session in Gazelle Test Management is used to manage a testing event. It can be a connectathon, an accredited testing session, a projectathon or even a virtual testing session. Users registered in the application will be able to create new system for a testing session in particular or to import systems from other events.
The tool is able to manage several sessions at the same time; each session can have a different status.
Accessing the testing sessions
Management of sessions is performed from menu Administration --> Manage --> Manage sessions.
The first page you access to list the testing sessions registered in your instance of Gazelle Test Management. The highlited one (bold font) is the testing session you are currently logged into.

From this page, you can see what are the active testing sessions, active/inactive them, edit them or event delete them. You can also, by clicking on the green tick, set the one which will be used as default when a new user creates an account. Note that logged in user will also be able to acess the activated testing sessions; the other ones will be hidden from the list.
Creating a new testing session
From the Administration of testing sessions page, click on "Add an event"; a new form will be displayed. The following information are requested
- Year : when the testing event takes place
- Zone : where the testing event takes place
- Type : what type of event are you registering
- Description : will be used as title of the testing session
- Start date : beginning of the testing event itself
- End date : end of the testing event
- Registration deadline : after this date, users will not be able to alter their system (addition/removal of actor/profile)
- Mailing list URL and wiki URL are given for informational purpose only
- Logo URL : can be the link to an image in the tool (/img/gazelle.gif for instance) or an external link. It will be displayed in the right of the page when this testing session is selected by the user)
- Link associated to the logo : when clicking on the logo, user wil be redirected to that page
- Color: theme of Test Management can be customed and the background color can be different for each testing event. Note that the color of the text will not change, so be careful to use a color which will still allow the reading of the application
- Order in GUI : used to order the testing session in the pop-up used to change the current testing session of the logged in user
Then you can select several options :
- If this event the default one for new users (Default testing session)
- Is Internet testing enabled (that means that users can enter their SUT endpoints outside of the testing event network)
- Is pre-connectathon testing requested (users will be expected to perform some in-house tests before showing up at the event)
- Is Gazelle Test Management used to manage the badges (Allow Participant registration)
- Hidden from list : if checked, users will not be able to select this testing session
- Critial Status : At some point during the event, you may want users to highlight the test instances they really need; enabling the critical status will allow users to mark some test instances as critical and will then be checked in priority by monitors
- Session closed: if the testing event is closed, users will not be able to create new test instances nor alter others
- Disable auto update result : the connectathon results are periodically computed, you can disable it for a testing session. Note that you might not want to disable it until a testing event is running since it will also prevent the tool from creating the test plan of the systems.
Then you can select a set of test types among the following ones :
- 17025 : used for accredited testing sessions, only tests of type 17025 Cofrac will be displayed to the user
- certification: only tests of type "certification" will be displayed to the user
- connectathon: only tests of type "connectathon" will be displayed to the user, this is the testing type to use in most cases
- HISTP was used in the USA in the context of a regional project
- interoperability-testbed enables the ITB (Interoperability Test bed) feature

The testing session administrators are used in the header of the test reports
Then, pick up the integration profiles for which the users will be allowed to register their systems.

Contact information
Here you need to give information about the person to contact for questions about the event.
Certificates menu URL
Depending of the events, the management of certifactes is not performed by the same tool. If you want users to share certificates using a specific tool, tick the "Display certificates menu" checkbox and enter the URL of the tool.
Financial section
Gazelle Test Management can generate the contract and the invoice, if this testing event requires a contract and you want the tool to manage it, tick the checkbox "Required a contract ?".
Note that the rule for computing fees currently applies in Gazelle Test Management is the following:
The amount is relative to the number of systems the company has registered, and marked "completed". You can state that the price for the first system is different from the one for the following. Regarding the fees for additional participants, it is the amount due per participant when the number of participants is strictly higher than 2 times the number of systems.
Currency code is used to express the currency to be used. Then you can custom the VAT and give the list of country VAT it the VAT of the country applies instead the global one (that's the case in Europe).
Finally, the contract and the invoice are generated based on a Jasper report, you need to provide the location of those *.jrxml files.
Testing management
From this point, you can randomly generate test instances for testing the tool. You can also delete all the test instances to reset the testing session.

Manage demonstrations

Demonstrations liste

View demonstration

Edit demonstration

Systems Configurations Administration
The system configuration administration is divided into 3 parts, reachable from the Administration --> Manage --> Configurations menu
- Manage Hosts' configuration : manage the host name and IP addresses assigned to systems for the event (in the event floor)
- All configurations : manage all the configuration of all the systems
- OIDs management : manage the OIDs to be used by system during the event

Network Configuration
Before managing the hosts and the system network configurations, you need to configure the network of the testing event. To do this, go to Configurations --> Network configuration Overview. This page is made of three sections materialized by three tabs.
Hosts configuration
This page shows to text area. In the first one, you can give tips to the user regarding the network configuration during the event. We usually provide the Wireless SSID and keys, the subnet information (netmask, gateway, DNS server, internal domain name and so on), the URL of the tools and their IP addresses.
In the second area, you are requested to provide the header of the host file so that people will be able to download a complete host file gathering the hostnames and addresses of all the systems connected during the connectathon.

Participants to the testing session who do not want to use DNS can download the host file and use it to configure their system. THIS OPTION IS NOT RECOMMENDED BUT WAS IMPLEMENTED FOR ONE DEVICE THAT COULD NOT USE DNS. DNS IS THE PREFERRED SOLUTION AS IT IS DYNAMIC !
- Configuration of host file on windows system
- Configuration of host file on MacOsX system
- Configuration of host file on Linux system
Configure IPs and DNS
Filling out those information will help the tool with assigning IP addresses and build the DNS and DNS reverse file.
Example of DNS file header and DNS reverse file header are provided below.
;
; BIND data file for local loopback interface
;
$TTL    604800
@    IN      SOA     ihe-europe.net. root.localhost. (
                              1         ; Serial
                         604800         ; Refresh
                          86400         ; Retry
                        2419200         ; Expire
                         604800 )       ; Negative Cache TTL
;
@                      IN      NS      ihe-europe.net.
@                   IN      A       127.0.0.1
$ORIGIN            ihe-europe.net.
;
;
;
ntp                  IN  A 192.168.0.10
dns                  IN  A 192.168.0.10
ihe-eu0            IN  A 192.168.0.10
gazelle            IN  A 192.168.0.10
proxy              IN  A 192.168.0.10
printer             IN  A 192.168.0.10
syslog           IN  A 192.168.0.13
central-archive     IN  A 192.168.0.11
central    IN  A 192.168.0.11
gazelle-tools     IN  A 192.168.0.13
dvtk    IN A 192.168.0.12
 $ORIGIN 168.192.in-addr.arpa.
$TTL    86400
@       IN      SOA     ihe-europe.net. root.ihe-europe.net. (
                              1         ; Serial
                         604800         ; Refresh
                          86400         ; Retry
                        2419200         ; Expire
                          86400 )       ; Negative Cache TTL
; authoritative name server
;       NS      127.0.0.1
@       IN      NS      dns.ihe-europe.net.
;
10.0  PTR     dns.ihe-europe.net.
10.0  PTR     ihe-eu0.ihe-europe.net.
10.0  PTR     proxy.ihe-europe.net.
11.0  PTR     central.ihe-europe.net.
11.0  PTR     central-archive.ihe-europe.net.
12.0  PTR     dvtk.ihe-europe.net.
12.0 PTR     connectathon2014.ihe-europe.net.
13.0 PTR     syslog.ihe-europe.net.
13.0 PTR     gazelle-tools.ihe-europe.net.

DNS automatic configuration on the server
In order to automatically update the DNS configuration on the server that is hosting the Gazelle Test Management application, one need to run the following script update_dns.csh
- Download the script and place it in the directory /opt/gazelle/dns
- install bind9 on the server :
apt-get install bind9
You also need to configure bind9 (see documentation) in order to add a new zone that matches the requirement of the network on your session.
In the file /etc/bind/named.conf.local add a line specific to your zone
include "/etc/bind/named.conf.ihe-zones"
Here is an example of the file named.conf.ihe-zones as used at one of our event for illustration. Note that the file makes references to the 2 files created by the update_dns.csh script.
zone "ihe.net" IN {
  type master;
  file "/etc/bind/zones.ihe.net";
  forwarders {
        213.33.99.70;
        };
};


zone "ihe-europe.net" IN {
  type master;
  file "/etc/bind/db.192.168";
  forwarders {
        213.33.99.70;
        };

};
zone "168.192.in-addr.arpa" {
  type master;
  file "/etc/bind/reverse.192.168";
};
Finally edit the script update_dns.csh and configure it in order to match the configuration of your network and the session in use.
Currently the DNS can only be updated for ONE SINGLE testing session.
We recommend to use a cron to automatically update the DNS configuration on the server
*/15 * * * * /opt/gazelle/dns/update_dns.csh
Then SUT can be configured to point to the DNS server that is configured that way.
- Configuration of DNS client on windows system
- Configuration of DNS client on MacOsX system
- Configuration of DNS client on Linux system
Configure IPs and port for proxy
You may have configue the URL of the proxy in the application preferences. However, you might not want to use the Gazelle Proxy tool for all the testing event registered in the tool. From this page, you can enable/disable the use of the proxy during the event. In order to help users with using the Proxy, you are asked to provide the IP address used to contact it.
When generating the system network configurations, if the proxy is enabled, each configuration will have a proxy port assigned. You need to provide the range of port used by the proxy so that the tool knows which values are allowed.
From this page, you can also start all the channels on the proxy; that means that the tool will gather all the system network configuration of receivers and tell the proxy to open the corresponding ports.

Manage Hosts' configuration
The list of hosts which is displayed on that page is restricted to the host assigned to the systems from the testing session you are currently logged in. If you need to access the list of hosts for another testing event, you need to change your testing session from the Gazelle --> Change testing session menu.

From the Manage Hosts' configuration page, you can assign internal IP addresses to all the hosts/systems registered for the testing event or you can even release all the IP addresses. The latter means that for each host defined in this testing session, the IP address will be set to null.
- A host name in Gazelle Test Management has the following attribute
- The system it is assigned to
- The host name
- An alias for this host name
- The assigned IPv4 address
- A comment about its usage
You can edit each host and then get additional options/informations:
- Is the host external to the testing event network
- Assign the next available IP address from the range defined for the event
All Configurations
A network system configuration gives information to the user on how to configure their systems for the testing event and how to reach the systems of their partners for testing. Which type of configuration is requested by each actor is defined in Gazelle Master Model.

From menu Administration --> Manage --> Configurations --> All configurations, you will access the list of configurations defined for the testing session you are currently logged in. From this page, you can edit each configuration one by one, approve it (it is usually an action to be performed by the SUT operator) or delete it.

"Add a config" button will allow you to create a new entry in the list for a system registered in the testing session you are currently logged in.
"Generate configs for selected session" will generate all the entries for all the systems registered in the testing session. Note that this task is long and performed in background; you will have to refresh the page latter on to get the list of configurations.
Note that if you select an Organization in the filter available at the top of the page, you will get a button to generate the configurations for all the systems owned by this organization; if you select a system from this same filter, you will get a button to generate the configuration for this specific system.
OIDs management
In some profiles, the messages or the documents described must be populated with OIDs. An Object Identifier shall be unique, it is composed of a root, managed by an authority and the rest manage by the system to which the root is assigned; in order to help vendor to configure their system, Gazelle Test Management offers a feature to manage the OID roots.
From menu Administration --> Manage --> Configuration --> OIDs management, you will access a page divided into four tabs; they are described below:
OID - System assignement
In this tab, you will find the list of OID roots assigned to the systems registered within the tool. You can filter the list by testing session; knowing that the testing session set when you accessed the page is the testing session you are currently logged into.
Note that you can edit those values by clicking on the edit icon.

OID requirements
This section allows the administrator of the tool to define for which actors OIDs need to be defined and what this OID will be used for. You can edit, delete or create requirements. Before creating a new requirement, if you intent to use an OID different from the ones already used, first jump to OID Roots tab to define a new OID. Note that those OID requrements are common to all the testing sessions.
When you edit or create a requirement, you are ask to provide the list of Actor/Integraiton Profile/ Option tuples to which it applies; to do so, use the "add AIPO" button; select your AIPO and click on the "Add new AIPO" button.
You can also remove an AIPO from the list, only click on the red cross in the table on the corresponding line.

OID Roots
Here are listed all the OID roots which are used to build OIDs; the last value coming from the database is already displayed there. For each root, you can also provide a comment to inform the users what this root is used for.
You can edit and delete root OID, you can also create new ones; only click on the "Add a new OID Root" button and fill out the form which appears in the pop-up. Note that those roots are common to all the testing sessions.

OID Testing Session Management
From this section, you are allowed to perform three actions:
- Removing all the OIDs which have been assigned to the systems registered to the current testing session
- Removing and generating again all the OIDs for the current testing session
- Updating the OIDs assigned to the systems; that means that systems which have been newly added will get OIDs and if no requirements have been creating, they will be applied to the concerning systems.

Invoices Administration
Financial Summary Administration
Samples Administration
Sample Type management
The sample type view mode is accessible for the admin of gazelle TM when the tool act as Test Management mode, or as master model mode. However, the edition of samples type is accessible only when master model mode is activated.
To access the sample type management, from menu -> administration -> manage -> samples -> Manage samples

The home page of sample type management looks like

The module Sample management contain two panel : sample type management and document type management.
The document types are used to describe files used in sample type description.
Sample Type edition
To edit sample type, we use the icon edit.

The GUI of edition of sample type contain :
- summary : the description of the sample type
- creators : the list of creators of the sample type
- readers : the list of readers of sample type
- files : the list of files related to the sample type
- attribtues : the list of attributes that could be selected for the sample type

The creators of the sample type are defined by the list of AIPO that can create the sample. So, when a system implement an AIPO, and this aipo is a creator of the sample, the system can add files corresponding to the sample type defined.
The readers are also definded by the list of AIPO that can read the sample, and so when a system implements an AIPO , which is a reader of sample, the system could access to the list of sample uploaded by the creators, and even add comment, or upload files related to the sample type, as a reader.

The edition of files contains two list: the list of files that could be uploaded by the creators, and the list of files that could be uploaded by the readers. Generally the readers can upload a snapshot of the rendering of the file of the creator.
Document Type Edition
This panel allows to edit the document type, and to specify their properties.

Validator Management
Annotation Management
This section allows to manage the comments written by the vendors into the samples uploaded by systems.
As the vendors are not allowed to delete these comments from the sample, and only the admin can do it, this module is extracted in a page for the admin.
To access to the Annotation management, from teh menu -> -> administration -> manage -> samples -> Manage Annotation
Monitors Administration
The monitors are the persons who are present during the testing event to verify the tests performed by the SUT operators. The recruitment process is not descibed there neither the work of the monitor. This section focuses on how to set persons as monitor, how to say to which testing session they attend and how to create their list of tests, it means, what are the tests they will have to verify during the event.
First of all, all the users in Test Management who are aimed to be a monitor for a testing session shall have the "monitor_role" role. Refer to the User Administration part if you do not know how to grant users.
Then, under the Administration --> Manage --> Manage monitors, there are two entries. The first one "Manage monitors" will be used to link the users with role "monitor-role" to a testing session and then assign them a list of tests. The second entry "Assign monitors to tests" is useful if you want to assign a batch of monitors to a batch of tests.

Manage monitors

This page lists the monitors already link to the current testing session (the one you are currently logged into). For each monitor, beside his/her contact and connection information, you will get the number of tests which have been assigned to him/her. Note that above the table is given the number of monitors registered for the current event.
In the last column, buttons are available to view the detail of a monitor test list, print this test list, edit it or unassign the user from the list of monitors (the red cross).
When you edit the test assignments of a monitor, the list of already assigned tests is displayed, you can remove some of them by hitting the red cross. If you want to add some more, use the "Edit Test Assignment" button, il will open a new panel. You can filter the test either by domain, integration profile or actor. First select the criteria type, then select one domain or integration profile or actor and pick up the tests to assign to the current monitor.
At the bottom of the page, two buttons are available : the first one will open the "Assign monitors to tests" page and the second one opens a new panel in which you can pick up the users to add to the list of monitors. Monitors are sorted by organization. When you have made your choice, do not forget to hit the "Add monitors to activated session" button (bottom right corner); this button shall be hit before moving to another organization.
Assign monitors to tests
If you prefer to assign the monitors to a list of tests instead of assigning a list of test to a monitor, you can use this feature.
First, select a sub set of tests by applying filters. Then, click on the green tick in the Selection column. If you click on the icon located in the table header, it will select all the tests currently displayed in the table. To unselect a test / all the displayed tests, hit the grey tick.
When at least one test is selected, the number of monitors assigned to this selection is displayed below the table. Note that if several tests are selected, the number displayed represents the intersection of the monitors assigned to each test. If at least one monitor is assigned, the list is displayed below the table.
From this point, you can modify the list of monitors by clicking on the button "Modify list monitors", pick up the ones to add (or to remove) and it the "Save modifications" button.

Testing Session Participants Management

It gives the administrator an overview of users attending to the connectathon. It helps planning the catering, tables...
A participant can register for some connectathon days, specify if he eats vegetarians and if he will attend the social event.
The administrator has an overview of who is going to attend the connectathon on moday, tuesday....
An administrator can add participants from the users list, contact list or create a new participant.
![]()
An administrator can remove a connectathon participant, or edit it.
An administrator can filter participants by organization

Edit testing session participants

Connectathon results
Grading the systems during a testing event is a manual process performed by the testing session managers.This section of the administration manual does not focus on the rules to grade system (they might be different depending on the testing events) but it describes how to do it with Gazelle Test Management.
You will access the connectathon result page from menu Connectathon --> Connectathon --> Connectathon results.

This page is divided into two parts; first you can filter the results and below the results (restrained to the filter criteria) are displayed.
In the first panel, a button labeled "Update results" can be used to force the update of the results. It will not grade the system, it will retrieve some information from the database like the number of test instances performed by each system and compute an indicator to help you with grading the systems.
In the table, a line is displayed for each actor / integration profile / option (AIPO) tuple registered by a system; in Test Management, results are given at system level even if we usually communicate the results at company level.
- The column "Type" tells you if the system is supportive (S) or Thorough (T) for this AIPO.
- Column "R/O" indicates the number of required vs optional tests to be performed by the system for this AIPO
- Column "V" indicates the percentage of verified (successful) test instances versus the number of expected successful test instances
- Column "W" indicates how many test instances are waiting for verification
- Column "P" indicates how many test instances are in state "Partially verified"
- Column "F" indicates how many test instances are failed
- In the "Partners" column, you will find, for each role involved in the test other than the one played by the system, the number of "used" partners versus the number of available ones. For each a tool tip give you the keyword of the role.
- In the Tests column, the magnifying glass opens a sub table which gathers all the test instances related to this AIPO. To close a sub-table, click again on the magnifying glass. To close all the sub tables you have previously displayed, use the "Close and reset all details" button available above the table.
- In the Results column, you can select the status for this line, it will be automatically saved
Finally, you can leave a comment to the user.
To help you focussing on the lines which need to be reviewed, lines are colorized and appears in grey if no result is set.

TM Functional Checking
This list of modules allows the admin to verify and to check the well functioning of the Test Management tool.
TF Model Consistency Check List
This module allows the admin to check the consistency between the different profiles/actors/domain defined in the database.
To access to this page, from the menu -> administration -> check -> TF Model Consistency Check List

This page allows to do the checking about the following objects:
- domains
- actors
- Integration profiles
- actors
-Integration profile options
- Documents and Documents sections

Tests Definition CheckList
This module allows the admin to verify the consistency of the information in the test plan module. We could so verify if there are RoleInTest with no participant, or some test step instances with no test instances. Multiple check could be performed in this page.
To access to this page, you should go from the menu -> administration -> check -> Tests Definition CheckList

To access a check, you have to select the information looked for from the tree.
Sessions Dashboard
The session dashboard allows to access information about the current selected session.
The information provided are :
- Companies without participants
- Tests overview for systems/companies
- Test Instances Overview
To access to this page, you have to go to menu -> Administration -> Check -> Sessions Dashboard

Companies without participants
This describe the companies that do not have a participants in the current testing session, and which are registred by a system.
Tests overview for systems/companies
This panel describes the list of systems registred in the testing session, and for each system we provide : the organization, the status of the system, the number of tests executed by the system during the CAT and the details about the results of these tests.
Test Instances Overview
This panel allows to have information about the use of the monitor app tool.
Gazelle KPIs

There are 4 types of KPIs:
- Tests kpi
- Systems kpi
- Monitor kpi
- Validator kpi
All KPIs can be exported in an excel file
Monitors KPIs
This page displays for each monitor the number of:
- test assigned
- systems in the session that the monitor can work with
- test instances claimed
- test instances claimed and started
- test instances claimed and completed
- test instances claimed and paused
- test instances claimed and verified
- test instances claimed and aborted
- test instances claimed and partial
- test instances claimed and failed
- test instances claimed and critical

Filtering
Results can be filtered by:
- Testing session
- Domain
- Integration profile
- Actor
- Test
- monitor first name
- monitor last name
- monitor username
- integration profile option
- transaction
| Attachment | Size |
|---|---|
| 37.03 KB |
Systems KPIs
This page displays for each system the number of:
- test to realize
- monitors involved
- test instances
- test instances started
- test instances completed
- test instances paused
- test instances verified
- test instances aborted
- test instances partial
- test instances failed
- test instances critical

Filtering
Results can be filtered by:
- Testing session
- Organization
- Domain
- Integration profile
- Actor
- Test
- Demonstration
- integration profile option
- transaction
Tests KPIs
This page displays for each test the number of:
- monitors assigned to the test
- systems in the session that have to test it
- test instances
- test instances started
- test instances completed
- test instances paused
- test instances verified
- test instances aborted
- test instances partial
- test instances failed
- test instances critical

Filtering
Results can be filtered by:
- Testing session
- Domain
- Integration profile
- Actor
- Test type
- Test peer type
- last modifier
- integration profile option
- transaction
- test status
- test version
Validators KPIs
This page displays for each validator the number of:
- Validations performed
- Users that used it
- File validated

Filtering
Results can be filtered by:
- Testing session
- validator name
| Attachment | Size |
|---|---|
| 66.16 KB |
Gazelle Server Monitoring

This page allows you to monitor:
- memory usage through time
- active pages through time
- sessions through time
- session details
- caches usage
In graphs trought time on the time axis you can move time cursors to zoom into a specific time.
Memory usage though time

Active pages through time

Sessions through time

Session details

Caches usage

TM - Release notes
Gazelle Test Management release notes can be found on the JIRA pages of the project at the following URL :
- Log in to post comments