[ARCHIVES] Deprecated projects

Below are gathered the links to the Gazelle projects/tools which have been deprecated.

INRIA HL7v2.x Message Profile Repository (Now integrated in Gazelle HL7 Validator)

Important news

The InriaHL7MessageProfileRepository application is no more maintained and the service has been dropped at the end of August 2012. The HL7 Message Profiles database has been merged with the HL7 v2.x validation tool and is now available in Gazelle HL7 Validator tool. For more informations about this new Gazelle project, read documentation at http://gazelle.ihe.net/content/GazelleHL7v2Validator

Inria HL7 Message Profile Repository

Project Overview

The HL7v2.x Message Profile Repository is the part of the HL7v2.x external validation service which contains all the message profiles and tables needed to validate messages.

Actually, when you use the External Validation Service (EVS Client) to validate your message, you are asked to provide the context in which this message is sent, it means domain, actor, transaction, and the trigger event. This context enables the validator to retrieve the profile your message must be validated against.

Profiles and resources (data tables containing the codes for Sex, Religion and so on) are XML files referenced by an OID.

The HL7v2.x Message Profile Repository provides a Web Service interface to retrieve and submit message profiles and resources.

The Javadoc is available online [Deprecated]

GUI

Users can browse the content of the HL7 Message Profile Repository using the web interface available here. Each message profile is referenced in the Gazelle Master Model so that a profile OID is related to a tuple (domain, actor, transaction, trigger event and HL7 version) and the search is made easier. By going to "Browse all message profiles" section, you will get the list of all profiles, each one is available for display and dowload. You may prefer download rather than the display which may takes a long time for big profiles.

The repository could be enriched by new profiles in the future, that's why a section (with access restricted to authorized users) has been added in version 1.1-SR1. To create a new profile, the user will have to :

  1. Upload the XML file, the one will be stored in the InriaHL7MessageProfileRepository database with an OID (generated by the application or given by the user)
  2. Select the tuple (domain, actor, transaction, trigger event and HL7 version). Available domains, actors, and transactions lists are retrieved from the Gazelle Master Model thanks to a web service entitled IHEConcepts. Those information will be then sent to the Gazelle Master Model which will create a new reference for this profile.

Webservice

The WSDL file describing the web service is here [Deprecated] . You can also download an example of a soapUI project that uses these methods at here [Deprecated].

Functionalities

HL7v2.x Message Profile Repository implements various web service methods to retrieve and submit profiles and resources. Most of them can be used by anybody but some methods are reserved only to authorized users in order to ensure the integrity of the database.

Those one can be use freely:

  • getListOfAllProfiles : returns the list of all profiles stored in database
  • getListOfAllResources : returns the list of all resources stored in database
  • getProfilesForGivenResource : lists all the profiles linked to the specified resource
  • getResourcesForGivenProfile : list all resources linked to the provided profile
  • getProfile : returns the profile selected by its OID. Be careful, the returned content is Base 64 encoded
  • getResource : returns the resource selected by its OID. Be careful, the returned content is Base 64 encoded
  • aboutThisApplication : returns the information about current application release running on server

Usage of the following methods is restricted to authorized users. You will be asked to provide your UUID as first parameter of the method. If you think your are allowed to submit profiles and/or resources, ask the administrator (Eric Poiseau) who will send you a valid UUID.

  • getNewOIDForResource : generates and returns a new OID for resource using the IHE root for HL7v2.x resources, the one you can use to submit a resource using setResourceWithOID.
  • setResourceWithOID : stores the given resource in database with the provided OID (resource content must be base 64 encoded)
  • setResource : stores the given resource in database with a generated OID (resource content must be base 64 encoded)
  • getNewOIDForProfile : generates and returns a new OID for profile using the IHE root for HL7v2.x profile, the one you can use to submit a profile using setProfileWithOID.
  • setProfileWithOID : stores the given profile in database with the provided OID (profile content must be base 64 encoded)
  • setProfile : stores the given profile in database with a generated OID (profile content must be base 64 encoded)
  • setProfileResources : links the given profile to the list of given resources

Static WS Client for HL7v2.x Message Profile Repository

We have implemented a Static WSClient for HL7v2.x Message Profile Repository. The related jar is easy to use. You have only to add the jar file to the project, and use it.

The jar file is downloadable here. The documentation of classes on this jar is there [Deprecated].


Release Notes

The application release notes are available here.

INRIA HL7v2.x Message Validation Service (Now named Gazelle HL7 Validator)

Click to here to access EVS client

Important News !!!

The INRIA HL7v2.x validator is not more maintained and the web service has been removed at the end of August 2012. The definition of the new web service is available at the URL given in the GazelleHL7v2Validator's documentation. A JAR gathering the client-side classes and an API is also available in our Nexus repository. For more information about the new validation service, read documentation at http://gazelle.ihe.net/content/GazelleHL7v2Validator


Inria HL7v2.x validator

Project Overview

The Gazelle HL7v2.x Message Validation Service is part of the External Validation Service provided by the Gazelle project. It allows you to validate HL7v2.x messages against message profiles written at INRIA. For each message you want to validate, you will be asked to provide the context in which this message will be sent, in order to help the application to choose the appropriate message profile. All those profiles are gathered in a database called InriaHL7MessageProfileRepository.

The HL7v2.x Message Validation Service provides a Web Service interface as well as a Web User Interface. validation service is under development.

HL7 Message Profiles

A new web application is now available for browsing, viewing and downloading the HL7v2.x message profiles used by the Message Validation Service. Read the documentation here or direct access the InriaHL7MessageProfileRepository GUI.

Web GUI

Users can access the logger of the HL7v2.x Message Validation Service through the Web GUI available here.

Actually, each time the validation service is called, the message and its validation results are stored in database. This Web GUI lists all the messages and their results and the user can look for a message in particular. Multiple criteria research is enabled. You can retrieve a message thanks to its OID or one or several of the criteria that follow:

  • the profile OID the message has been validated against
  • the validation date
  • a part of the content of the message
  • the validation result (PASSED, FAILED ...)
  • the IP address of the system which called the validator

Webservice

The WSDL file describing the web service is here. You can also download an example of a soapUI project that uses these methods at here.

Functionalities

HL7v2.x Message Profile Repository implements various web service methods to validate HL7v2.x messages knowing the OID of the appropriate message profile and to retrieve the results of a validated message.

Functionalities of HL7v2.x Message Validation Service can be used by web service methods. Those ones are listed below:

  • getValidationServiceStatus : tests if the validation service is available
  • validateMessage : validates a message against the given profile and returns the result
  • getDetailedResults : returns the detailed results of a validation for a given message OID
  • getSummaryResults : returns a summary result of a validation for a given message OID
  • getXmlTransformedMessage : returns the message (selected by its OID) using XML formatting
  • clearResultCache : clears cache
  • aboutThisApplication : returns the information about current application release running on server

WS Client for HL7v2.x Message Validation Service

A Maven project has been developed to help you with accessing the validation web service from your Java applications. Information for retrieving the web service client are:

<dependency>
 <groupId>net.ihe.gazelle.maven</groupId>
 <artifactId>InriaHL7ValidatorClient</artifactId>
 <version>1.5</version> 
</dependency>

You will just need to instanciate the class HL7v2Validator using the URL of the Web Service deployed by InriaHL7Validator application. If you want to use ours, the URL is ... You will be asked to provide the OID of the message profile to use for the message validation, all the profiles we have developed are gathered in one application you can access at http://gazelle.ihe.net/InriaHL7MessageProfileRepository. Those profiles are sorted by domain, actor, transactions and trigger event.

The result is an XML string, an XSL to pretty display these results in HTML has been written and is available here.


Our Maven repository is available at http://gazelle.ihe.net/nexus.

AttachmentSize
File InriaHL7CupsWS-soapui-project.xml1018.15 KB

[Deprecated] LBL Simulator

The implementation of the LBL actors has been moved to the Order Manager  simulator.

Click to here to enter the LBL Simulator

Introduction

The LBL Simulator emulates the actors involved in the Laboratory Specimen Barcode Labeling (LBL) integration profile. The simulator can be used to simulate the missing partner when testing that profiles :

Integration ProfileActorOptions
LBL Label Broker

Query for labeling instruction

Labels and Containers Delivered

LBL Label Information Provider Labels and Containers Delivered


The LBL simulator can help testing applications implementing the Label Broker and/or the Label Information Provider actor.

Thanks to a mechanism which enables Gazelle TestManagement to communicate with the simulator, this one can also be picked as a test partner during a connectathon if no another system supports this actor.


For more details about the various functionnalities of the HMW Simulator, visit the following links.

  1. LBL Simulator : User Manual Introduction
  2. LBL Simulator : How to get started
  3. LBL Simulator : Label Broker
  4. LBL Simulator : Label Information Provider

Release Notes

Roadmap

LBL Simulator : User Manual Introduction

 Click here to access the LBL Simulator. 

Introduction

This simulator can be an Initiator and a Responder.

As an initiator, this simulator is aimed to send messages to a responder. So, if your system is ready to listen and accessible from the Internet, you will be able to send some messages to it.

As a Responder, this simulator is aimed to listen messages from an initiator.

By now, this simulator can act as two different actors:

  • LB (Label Broker)
  • LIP (Label Information Provider)

The table below gathers the supported affinity domains, transactions and SUT actors.


Integration ProfileActorAffinity DomainTransactionSystem Under Test

 LBL

 Label Broker

 IHE

LAB-61

LAB-62

LAB-63

 Label Information Provider

 LBL

 Label Information Provider

 IHE

LAB-61

LAB-62

LAB-63

 Label Broker


What is this simulator able to do ?

This simulator has been developed with the purpose of helping the developers of actors, such as Label Broker and Label Information Provider, to communicate with the SUT actor.  We have tried to manage most of the cases, that means that, all (or almost) message types defined in the technical framework of the various supported affinity domains and transactions are offered. For each message type, we have tried to distinguish the required parameters from the optional ones, in order to help you with building the request or the query. Formatting of each field is not checked, so that you can test the robustness of your system by feeding it some with exotic values.


LBL Simulator has two differents options depending on Label Broker or Label Information Provider Actor. For each actors, you can send messages (when actors are initiators) to your SUT Responder. To do that, you must created your configuration (See the section below) on the System Configuration menu. All details concerning the LIP and LB simulators behaviours are given below.

LBL Simulator : How to get started

Get a Gazelle account


First of all, note that, like the other applications from Gazelle testing platform, the HMW Simulator is linked to our CAS service. That means that, if you have an account created in Gazelle, you can use it, if you do not have one, you can create one now by filling the form here. Create an account in Gazelle is free. The login link ("cas login") is located in the top right corner of the page.


Registration of Systems Under Test (SUT) acting as HL7 responders


If your system acts as an HL7 responder in one of the transactions offered by the simulator (for example your system is Label Broker and supports LAB-61 transaction), you will have to enter its configuration in the application. (No need to enter one configuration per transaction for your SUT. For example, the Label Inormation Provider acts as a responder for the transaction LAB-62 and LAB-63. Just need to enter one configuration for your Pharmaceutical Adviser SUT.)

In order to proceed, go to "System Configurations" and hit the "Create a Configuration" button. You can also copy copy or Edit edit an existing configuration (one of yours !).

In both cases, the simulator needs to know:

  • A name for your configuration (displayed in the drop-down list menus)
  • The actor played by your system under test
  • The receiving facility/application
  • The IP address
  • The port the system is listening on
  • The charset expected by your SUT

If you are logged in when creating the configuration, you will be set as the owner of the configuration. If you do not want other testers to send messages to your SUT you can uncheck the box "Do you want this configuration to be public?" and you will be the only one to be able to select your system in the drop-down list and to edit it (if logged in!).

Before sending messages to your system under test, ensure that your firewall options give to LBL Simulator the access to your system.

LBL Simulator : Label Broker

In order to access to the Label Broker simulator, go to the "Simulators" menu and hit "LB". 

LB menu

Once on the LB Simulator page, the user will choose wich transaction to test, LAB-61, LAB-62 and LAB-63.


LAB-61 : Label Delivery Request.

To get more information about the role of the LB and LIP actors in this transaction, see the IHE Laboratory Technical Framework, Volume 2.


In the LAB-61 tab, the user will find a sequence diagram which resume the interaction of the transaction. At the right of this diagram, a panel shows all information about the configuration of the LB Simulator. The configuration is linked to a charset. Change the charset to get the appropriate configuration, using the charset list. See the example below, for the selected UTF-8 charset.

lab-61 configuration of the LB Simulator

The LB Simulator is a responder and is able to respond to the LIP SUT with the appropriate Acknowledgment message. If the message receives by the LB Simulator is not consistent with the IHE technical framework, the LB Simulator will respond with an error Acknowledgment.

Once the LIP SUT has sent the labeling instructions to the LB Simulator, the user must hit the Refresh Button button in order to refresh the HL7 messages table. This table shows all HL7 messages received by the LB Simulator. See the last section of this tutorial for further information on the HL7 message validation.


LAB-62 : Query for labeling instruction

To get more information about the role of the LB and LIP actors in this transaction, see the IHE Laboratory Technical Framework, Volume 2.


To send a query to the LIP SUT with the LB Simulator, go to the LAB-62 tab. First at all, choose the LIP SUT Configuration to use. (Please go to the LBL Simulator : How to get started section for more information about the SUT configuration.)

Once the user has choosen the SUT configuration, a summary of the configuration will be appear on the top of the page. 

To send the query, the user must fill the Request Parameters section. A table gathers the fields of the request and the values they will be filled with. At least one of the fields must be valued! (The user will find the information necessary to fill the request parameter panel in the SUT system.) Then hit the Send button to send the query to the LIP SUT.

request parameter panel

At the bottom of the page, an HL7 message table will show all HL7 messages send by the LB Simulator to the selected LIP SUT. See the last section of this tutorial for further information on the HL7 message validation.


LAB-63 : Labels and Containers Delivered

To get more information about the role of the LB and LIP actors in this transaction, see the IHE Laboratory Technical Framework, Volume 2.

To send a notification message to the LIP SUT with the LB Simulator, go to the LAB-63 tab. First at all, choose the LIP SUT Configuration to use. (Please go to the LBL Simulator : How to get started section for more information about the SUT configuration.)

Once the user has choosen the SUT configuration, a summary of the configuration will be appear on the top of the page. 

Then, the user must select for which labeled tube information send the notification message. To do that, hit the select tube button in the Action column. The user can select severals labeled tubes information at the same time. It is also possible to choose which columns will compose the table, in order to customize the information to display. For that, tick the desire checkbox, and hit the Refresh table columns button button. See the example below. (The Receipt Date column can't be remoove.)

Labeled tube table
Finally, hit the Send the notification button button to notify the effective labeled containers production to the LIP SUT.

LBL Simulator : Label Information Provider

In order to access to the Label Information Provider simulator, go to the "Simulators" menu and hit "LIP". 

LB menu

Once on the LIP Simulator page, the user will choose wich transaction to test, LAB-61, LAB-62 and LAB-63.


LAB-61 : Label Delivery Request.

To get more information about the role of the LB and LIP actors in this transaction, see the IHE Laboratory Technical Framework, Volume 2.


To send a request to the LB SUT with the LIP Simulator, go to the LAB-61 tab. First at all, choose the LB SUT Configuration to use. (Please go to the LBL Simulator : How to get started section for more information about the SUT configuration.)

Once the user has choosen the SUT configuration, a summary of the configuration will be appear on the top of the page. 

Then, in the Request Parameters panel, the user can see the Patient Information to use for the request. This is the only information to choose, the labelling information will be automatically generated by the LIP Simulator. 

In the Patient Information table, the user can find information about the patient data saved in the LBL Simulator data base. To get new patient data, select the country of the patient in the country list, then hit the New patient data button button. TheRandom Patient Data buttonbutton can be used to get the existing patient data. All data about the patient are generated with the DDS (Demographic Data Server) project. See this link for further information : DDS.

c

Finally, hit the Send button to send the request to the LB SUT.

At the bottom of the page, an HL7 message table will show all HL7 messages send by the LB Simulator to the selected LIP SUT. See the last section of this tutorial for further information on the HL7 message validation.


LAB-62 : Query for labeling instruction

To get more information about the role of the LB and LIP actors in this transaction, see the IHE Laboratory Technical Framework, Volume 2.


In the LAB-62 tab, the user will find a sequence diagram which resume the interaction of the transaction. At the left of this diagram, a panel shows all information about the configuration of the LIP Simulator. The configuration is linked to a charset. Change the charset to get the appropriate configuration, using the charset list. See the example below, for the selected UTF-8 charset.

LIP configuration

In the Patient Information table, the user can find information about the patient data saved in the LBL Simulator data base. Patient information are essential to query the LIP Simulator. To get new patient data, select the country of the patient in the country list, then hit the New patient data button button. The Random Patient Data buttonbutton can be used to get the existing patient data. All data about the patient are generated with the DDS (Demographic Data Server) project. See this link for further information : DDS.

patient information table

The LIP Simulator is a responder and is able to respond to the LB SUT with the appropriate Acknowledgment message. If the message receives by the LIP Simulator is not consistent with the IHE technical framework, the LIP Simulator will respond with an error Acknowledgment.

Once the LB SUT has sent the labeling instructions to the LIP  Simulator, the user must hit the Refresh Button button in order to refresh the HL7 messages table. This table shows all HL7 messages received by the LIP  Simulator. See the last section of this tutorial for further information on the HL7 message validation.


LAB-63 : Labels and Containers Delivered

To get more information about the role of the LB and LIP actors in this transaction, see the IHE Laboratory Technical Framework, Volume 2.


In the LAB-63 tab, the user will find a sequence diagram which resume the interaction of the transaction. At the left of this diagram, a panel shows all information about the configuration of the LIP Simulator. The configuration is linked to a charset. Change the charset to get the appropriate configuration, using the charset list. See the example below, for the selected UTF-8 charset.

LIP Configuration

The LIP Simulator is a responder and is able to respond to the LB SUT with the appropriate Acknowledgment message. If the message receives by the LIP Simulator is not consistent with the IHE technical framework, the LIP Simulator will respond with an error Acknowledgment.

Once the LB SUT has sent the labeling instructions to the LIP  Simulator, the user must hit the Refresh Button button in order to refresh the HL7 messages table. This table shows all HL7 messages received by the LIP  Simulator. See the last section of this tutorial for further information on the HL7 message validation.


LTW ORT Simulator (Now integrated in Order Manager)

The LTWO/ORT actor is now part of the Order Manager tool

Introduction

The LTW ORT Simulator emulates the actor ORT (Order Results Tracker) involved in the Laboratory Testing Workflow (LTW) integration profile. The simulator can be used to simulate the missing partner when testing that profiles :

Integration ProfileActorOption
LTW Order Results Tracker  


The LTW ORT simulator can help testing applications implementing the Order Filler actor.

Release Notes

Change logs for the simulator can be found here

Roadmap

Information about the roadmap of the LTW ORT Simulator project can be found in the jira page.

LTW ORT Simulator - User Manual

Click here to access the LTW ORT Simulator.

Introduction

This simulator is playing the role of the Order Results Tracker for the profile LTW.

This simulator receives messages from the Order Filler in the context of the transaction LAB-3.

The table below gathers the supported affinity domains, transactions and SUT actor.


Integration ProfileActorAffinity DomainTransactionSystem Under Test

LTW

 Order Results Tracker

 IHE

LAB-3

 Order Filler


What is this simulator able to do ?

This simulator has been developed with the purpose of helping the developers of Order Filler actor to communicate with the ORT actor. 

The ORT simulator can handle messages of type OUL^R22^OUL_R22 and ORU^R01^ORU_R01 and responds with an Acknoledgment (ACK) message.  This transaction detail is illustrated in the sequence diagram below.

The ORT simulator is able to handle error cases and to indicate it in the ACK message.

Finally, this simulator makes available a HL7 validation service for messages (see this documentation page for more details).


Sending a message on the Simulator

Make sure your system is ready for sending messages to the LTW ORT Simulator.

  1. Go to Simulators --> Select the actor ORT.
  2. A sequence Diagram Picture is available to help you to understand the transaction and the role of each actors.
  3. Below this picture, a tab with all messages for the transaction and the actor selected is available. You can find your messages in using the filter fields.
  4. Don't forget to refresh this messages list. To do that, only hit the "Refresh List" buttom.

See the HL7 Messages details

This page allow users to visualize the information contained in the received HL7 messages.

This information is classified by :

  • Patient
  • Specimen
  • Observation Request
  • Common Order

For each elements, it is possible to see the dependency tree related to the others elements. (Use for that this button )

The User can click on each Tree node to view more information about this node. See an example below.


PDS Simulator (Now integrated in Patient Manager)


Click to here to enter the PDS Simulator


The PDS Simulator is a tool that mimics the Patient Demographic Supplier on a test instance. This simulutor can participate as a responder in many tests, like the PDQ_Exact_Name test define in Gazelle. The PDS Simulator has a GUI that helps to configure and manage this simulator. Users can specify patients in the database of the PDS Simulator. They can manually add patients, or can requests the Demographic Data Server to generate patients and save them on the PDS database.
The GUI of the PDS Simulator provides an access to all queries/responses received/send by the simulator.


The PDS Simulator interacts with gazelle using the simulator web service API.


PDS Simulator's communication with gazelle


This figure represents steps needed using web service methods of PDS Simulator to launch a test with a system consumer:


image desc


Gazelle uses the web service method startTestInstance to start a new communication with the PDS Simulator. Then it uses the web service method setTestPartenerConfigurations to send the configuration of the system under test, which is a patient demographic consumer. So the communication between the simulator and the SUT is done, and the SUT can send HL7 query to the PDS simulator, and wait for a HL7 response.
The GUI of the PDS Simulator lets us to view configurations and systems in communication with the simulator. And we can also view all messages sent and received by the simulator.


Installation and documentation


You can download PDS Simulator from the forge of the INRIA. You have to download the project GS-Common too. The links to sources are https://scm.gforge.inria.fr/svn/gazelle/branches/simulators/PDQPDSSimulator and https://scm.gforge.inria.fr/svn/gazelle/branches/simulators/GSCommon-ejb. To install PDS Simulator, you should download openempi from here. You should have two jboss: jboss-4.0.5.GA and jboss-5.1.0.GA.

1- Installation of openempi

First you have to install openempi on jboss-4.0.5.GA. You create a database on postgreSQL named openempi. Then you have to launch the sql script named ICS_schema_create-postgres.sql, that you download with the openempi zip file. You copy then the ear of openempi to the deploy folder of jboss-4.0.5. The last thing that you need to do is copy the two OpenEMPI files ICS.properties and IcsSql.xml from the dist/conf directory to the root directory of the jboss-4.0.5. Then you launch this jboss using ports-01 as ServiceBindingManager on the configuration file jboss-service.xml.

2- Installation of PDQPDSSimulator

You have first to create a database on postgreSQL named pdq-pds-simulator. Then you add the ear of PDS Simulator to the deploy folder of jboss-5.1.0.GA.

The documentation of the PDS Simulator is available here.

PDS Simulator FAQ

How to start the server of PDQ Patient Demographic Supplier?

The server of PDS can be launched using the panel server from the GUI of PDQ Patient Demographic Supplier Simulator. So you can specify the port on which the PDQ Patient Demographic Supplier Simulator can listen.

How to manage patients of PDQ Patient Demographic Supplier Simulator?

You can use the GUI of PDQ Patient Demographic Supplier Simulator to delete some or all patients. You can manually add some patients, and you can generate patients using the IHE tool: Demographic Data Server. The GUI of the PDQ Patient Demographic Supplier Simulator uses this tool to generate patient from some countries: Fr, USA, Germany, etc. You can then add these patients to the database.

GUI

How to use the PDQ Patient Demographic Supplier Simulator with its web service?

PDQ Patient Demographic Supplier Simulator has a wsdl which lets you communicate with this tool. The wsdl is here. The web service of PDQ Patient Demographic Supplier Simulator contains all methods needed to communicate between gazelle and this simulator. These methods let gazelle to start communication with the PDQ Patient Demographic Supplier Simulator and to send configuration of the SUT Consumer.

XCA Initiating Gateway Simulator (Now integrated in XD* Client)

Introduction 

The XCA Initiating Gateway Simulator emulates a test partner that supports the following IHE Integration profiles: 

Integration Profile Actor Option
XCA Initiating Gateway  
XDS.b Document Consumer  
XUA X-Service User  
ATNA Secure Application  


Consequently, this simulator can help you with testing your XCA Responding Gateway outside of a Connect-a-thon period. Thanks to a mechanism which enables Gazelle Test Management to communicate with the simulator, this one can also be picked as a test partner during a connectathon if no another system supports this actor.

For staying aware about the development advancement, consult the Roadmap.

XCA Initiating Gateway Simulator - Developers' Guidelines

Click here to enter the XCA Initiating Gateway Simulator


The XCA Initiating Gateway Simulator has been developed to mimic the Initiating Gateway actor of the XCA (Cross Community Access) integration profile in connectathon (or pre-connectathon) tests when needed. This tool can participate as an initiator in many tests like XCA_Query_and_Retrieve thanks to its web service methods which provide to Gazelle a mean to communicate with it. A Web GUI is also available and enables the users to test their XCA responding gateway outside of a connectathon context. From this GUI, connecthaton participants can retrieve the messages sent and received during a test instance they have initiated. Note that this tool is able to send requests using TLS.

This simulator also supports the XUA (Cross Enterprise User Authentication) profile and can act as a X-Service User actor.

Transactions and Messages supported

As an Initiating Gateway for XCA, this simulator supports the ITI-38 and ITI-39 transactions. As it has been first developed for epSOS purposes, the epSOS affinity domain and more especially the epSOS-1 transaction is supported.

The exhaustive list of affinity domains, transactions and message types supported by the XCA Initiating Gateway Simulator is available in the "Informations" section of the XCA Initiating Gateway Simulator GUI.

Communication between the simulator and Gazelle

All simulators developed for interacting with Gazelle are built on the same model. The following diagram represents the different steps performed during a test instance.

Gazelle / Simulator interactions

Installation and Documentation

You can download sources of the XCAInitGatewaySimulator project from the INRIA Forge. This project required two additional modules: GSCommon-ejb and GSCommon-ui. Links to those sources are:

https://scm.gforge.inria.fr/svn/gazelle/branches/simulators/GSCommon-ejb

https://scm.gforge.inria.fr/svn/gazelle/branches/simulators/GSCommon-ui

https://scm.gforge.inria.fr/svn/gazelle/branches/simulators/XCAInitGatewaySimulator


This is a project built with Ant and running under JBoss 5. Once you have downloaded all the sources, you can build a development version of the project.

  1. Firstly, you have to make sure that Jboss 5, Jboss seam 2.1.0.GA and Postgresql 8 or later are installed.
  2. Copy the build-dev.properties.template file into build-dev.properties and edit this new file in order to set the different variables to match your system properties.
  3. Create the postgresql database that will host the data for the simulator and edit the file resources/XCAInitGatewaySimulator-dev-ds.xml to match your database set up. 
    {syntaxhighlighter brush: as3;fontsize: 100; first-line: 1; }createuser -P --username=gazelle --createdb createdb -E UTF8 -U gazelle xca-init-gw-simulator {/syntaxhighlighter}
  4. From the root directory of XCAInitGatewaySimulator project run the following command line:


{syntaxhighlighter brush: bash;fontsize: 100; first-line: 1; }ant -Dprofile=dev -Dapplication=XCAInitGatewaySimulator deploy{/syntaxhighlighter}

If your Jboss 5 server is running, the project will automatically be deployed, otherwise, start your server. During the deployment, the database (the name of which is configured in build-dev.properties file) will be populating using the resources/import-dev.sql file.

Finally, you can access the newly deployed project at http://localhost:8080/XCAInitGatewaySimulator

Javadoc relative to the XCAInitGatewaySimulator is available here.

How to write tests involving the XCA Initiating Gateway actor

When a test instance is created with the XCA Initiating Gateway Simulator as one of the test instance participants, Gazelle needs some additional information to be able to communicate with the tool. 

When you edit a test definition, for each step in which the XCA INIT_GATEWAY actor acts as the initiator of the transaction, you are expected to give the following information:

  • Transaction must be one of those supported by the simulator. See table in the "Informations" section of the simulator.
  • The message type must be one of those defined for the selected transaction. Make you sure the name is correctly written.
  • You also need to fill the contextual information. For this step, referred to the parameters required and optional for each message type. Please be careful to copy and paste properly the name of the parameter.
  • If the communications have to be secured, make sure you have checked the TLS option.
  • If the messages must be sent using XUA (a SAML assertion will be included in the SOAP header), add a contextual information with path "useXUA" and value equals to "true".

Contextual Informations

In order to send correct messages, the simulator expects some contextual informations from Gazelle. It is the responsability of the test designer to define the contextual information for each step if needed. For each test instance, the simulator stores the contextual informations so that it can retrieve them for the next steps. Informations extracted from the responding gateway response are also stored; consequently, the Patient Unique Id is enough to build all of the messages supported by the simulator; if the responding gateway provides enough informations in its responses. If XUA is used, you only need to fill the contextual informations for the first step and it will be reused for the next steps. Gazelle X Assertion Provider requires at least the Pratician ID and the Pratician Role.

XCA Initiating Gateway Simulator - Release Notes

Release Notes - XCA Initiating Gateway Simulator - Version 0.2-SR1

Sub-task

Bug

  • [XCAINIT-7] - Message table: filtering does not work properly
  • [XCAINIT-25] - XDS.b Doc Consumer: when selecting SUT Doc Repository, all fields are selected but the "execute" button is not shown
  • [XCAINIT-28] - Timestamp of received message and received message content are not displayed

Improvement

  • [XCAINIT-14] - Review response parsing to match the new model
  • [XCAINIT-26] - Update parameters according new specifications

New Feature

  • [XCAINIT-27] - epSOS Affinity Domain requires use of TRC assertion

Task

Release Notes - XCA Initiating Gateway Simulator - Version 0.2-GA

Bug

  • [XCAINIT-15] - Adding a configuration from the simulator page does not render the AffinityDomain selection box
  • [XCAINIT-23] - User shouldn't be able to create an empty configuration.

Improvement

  • [XCAINIT-24] - add a "message preview" button to show the message before sending it

New Feature

Release Notes - XCA Initiating Gateway Simulator - Version 0.1-SR1

Bugs

  • [XCAINIT-18] - Execute button must not be visible until the MessageType is not selected
  • [XCAINIT-20] - Selecting a new transaction does not empty the parameters list

Improvements

  • [XCAINIT-19] - Add a page which gathers the list of affinity domains, transactions and message types supported by the simulator


    Release Notes - XCA Initiating Gateway Simulator - Version 0.1-GA

    Bugs

    • [XCAINIT-8] - Crash when playing Find+Get Documents with no document found for given patient
    • [XCAINIT-10] - Assertion is not supported by Tiani's responding gateway

    Improvements

    • [XCAINIT-11] - returnType for FindDocuments in epSOS context must be LeafClass
    • [XCAINIT-12] - enable the user to customize the request


      Release Notes - XCA Initiating Gateway Simulator - Version 0.1-RC6

      Bugs

      • [XCAINIT-6] - Transaction failed when trying to send a message
      • [XCAINIT-9] - Tiani's responding gateway returns a ValidationException: Signature did not validate against the credential's key

      Improvements

      • [XCAINIT-3] - Add internationalization for GUI
      • [XCAINIT-4] - Add footer to the template
      • [XCAINIT-5] - Create a page which gathers Messages from test Instances and Messages from GUI

      XCA Initiating Gateway Simulator - User Manual

      Click here to access the XCA Initiating Gateway Simulator .

      New! The functionalities offered by this XCA Initiating Gateway simulator are getting more numerous and consequently the name of this simulator is going to change in the next weeks. As part of this improvement, the simulator now also works as a XDS.b Document Consumer

      Introduction

      As an initiator, the XCA initiating gateway simulator is aimed to send messages to a responder. So, if your system is ready to listen and accessible from the Internet, you will be able to send some messages to it.

      By now, this simulator can act as two different actors:

      • Initiating Gateway for XCA (Cross-Community Access)
      • Document Consumer for XDS.b (Cross-Enterprise Document Sharing b)

      The table below gathers the supported affinity domains, transactions and SUT actors.


       Integration Profile

      Actor

      Affinity Domain

      Transaction

      System Under Test

       XCA

       Initiating Gateway

       IHE

      ITI-38

      ITI-39

       XCA Responding Gateway

       epSOS Patient Service

       epSOS Order Service

        NCP-B

      epSOS

       epSOS-1

       NCB-A

      XDS-b

       Document Consumer

       IHE

       ITI-18

       XDS-b Document Registry

      "
       "  "

       ITI-43

       XDS-b Document Repository

      What is this simulator able to do ?

      This simulator has been developed with the purpose of helping the developers of responders, such as XCA Responding Gateway, XDS.b Document Repository and XDS.b Document Registry, with receiving messages and sending the responses to the Initiator (Initiating Gateway or Document Consumer). We have tried to manage most of the cases, that means that, all (or almost) message types defined in the technical framework of the various supported affinity domains and transactions are offered. For each message type, we have tried to distinguish the required parameters from the optional ones, in order to help you with building the request. Formatting of each field is not checked, so that you can test the robustness of your system by feeding it some with exotic values.

      The exhaustive list of affinity domains, transactions and message types supported by the simulator can be found in the section "Informations" of the XCA Initiating Gateway Simulator. If you notice an error please refer it to us by adding a new bug in our issue tracker.

      For each response it receives, the simulator tries to extract the relevant informations and displays them at the bottom of the page. Relevant informations which can be used as parameters for future requests are stored in memory (until the next response) and are use to pre-fill the field you will choose for the next request (if available). This functionnality used to be available but some recent changes in the architecture of the simulator have forced us to remove it for a while. As the response is available for display at the bottom of the page, you can copy and paste the informations you need for the next request.

      Adding a system as a receiver

      To communicate with your system under test, the simulator needs your system's endpoint configuration. Two ways to configure the simulator with your system properties:

      • Simulator --> Configurations --> The tab corresponding to your SUT actor then then hit "Create a Configuration"

      or

      • Simulator --> "The simulator you need" then hit "New Configuration"

      In both cases give:

      • A name to your configuration (you can choose to create several configurations for the same system, for instance you may have an unsecured and a secured URL). This name must be unique, you will be asked to retry if the name is already used,
      • The name of your system,
      • The full URL to join your system,
      • The Home Community Id your system is expecting to receive (optional),
      • The Unique Id of the Repository your system is linked to (optional).

      You need to record your configuration only once, then you will be able to select it in the drop-down list or to change it by going back to the Configurations page.

      Sending a message to your system

      Make sure your system is ready for receiving messages and no firewall prevents your system from receiving messages from the simulator.

      1. Go to Simulator --> "The actor you need" and select your configuration in the drop-down list.
      2. You will be then asked to select the Affinity Domain (IHE or epSOS); selecting the affinity domain give you access to one or several transactions the simulator is able to emulate. Select one of them.
      3. Then, a list of message types is offered to you. Select one of them.
      4. For each type of message, required and/or optional parameters are defined according the technical framework of the selected affinity Domain. The list of required parameters will be displayed first (if not empty). For each fields you fill, hit the OK button to confirm the addition of the value.
      5. If you want to add some optional parameters: hit "Add optional parameter" and select the parameter name you need in the drop down list. Finally hit "Add" to extend the list of parameters.1
      6. Once you have set all the parameters you need, select the return type. This value will be used for @returnType attribute of AdhocQueryRequest/ResponseOption tag.

      7. Finally, you can choose to use XUA or not. If so, an SAML assertion will be added in the SOAP header of the request. 

      8. To send the message to your system, only hit the "Execute" button.

      If only one affinity domain, and/or transaction and/or message type is available for testing your system under test, those fields will be automatically filled in.

        Management of parameters  

        • If a field supports multiple values, a "plus" (plus sign)  icon will appear below the last value of the parameter.
        • If a field supports multiple values and the AND/OR semantic, you will be asked to choose between these two options. By now, only the syntax value1 AND value 2 AND value3 AND ... is supported. You will not be allowed to mixed AND and OR for the same field.
        • To remove a single value or an entire field (except required ones) hit the "minus" (minus sign) icon.

          Retrieving sent and received messages

          Messages sent and received by the simulator, either from the GUI or from Gazelle, are gathered in a single page. You will find them clicking on "Messages" link in the topbar menu.

          Get informations about Test Instances played from Gazelle

          Each time an orchestrated test instance involving the XCA Initiating Gateway Simulator is started, the informations about the test participants are sent to the simulator. Those informations are available for viewing in the "Test Instances" section of the simulator (link in the topbar menu).

          XCPD Initiating Gateway (integrated in XD* Client)

          Introducing the XCPD Initiating Gateway Simulator (integrated in XD* Client)

          The XCPD Initiating Gateway simulators emulates a test partner that supports the following IHE Integration profiles: 

          Integration ProfileActorOption
          XCPD Initiating Gateway  
          XUA X-Service User  
          ATNA Secure Application  


          Access to the XCPD Initiating Gateway simulator

          Release Notes

          Change logs for the simulator  can be found in the Jira pages

          Roadmap

          The roadmap for the simulator can be found here

          XCPD Initiating Gateway - User Manual

          Click here to access the XCPD Initiating Gateway Simulator

          Introduction

          The XCPD Initiating Gateway simulator is developed in conformance with the IHE Technical Framework and especiallu the epSOS extension to the profile. The GUI of this simulator lets users to generate PRPA_IN201305UV02 messages (XCPD requests), and to send this type of messages to a responder endpoint.

          Tools

          • Generation of XCPD Request

          This tool allows the generation of XCPD requests from many parameters, which are : family name, given name, birthdate, patient id (id.root and id.extension), gender, address (street, city, country, zipcode), and mother maiden name. These parameters let to generate the request for a patient, and there are two others parameters which are sender homeCommunityId and receiverHomeCommunityId, which let to identify the message's actors. The homeCommunityId used by the simulator is 2.16.17.710.812.1000.990.1 .

          XCPD Request Generator


          • Communication with Responding Gateway

          This tool allows sending XCPD request to the endpoint of an XCPD responding gateway. The endpoint of the IHE XCPD Responding Gateway is http://jumbo-2.irisa.fr:8080/XCPDRESPSimulator-XCPDRESPSimulator/RespondingGatewayPortTypeImpl?wsdl. This tool lets to generate request and send it to the endpoint, or copy directly the XCPD request message, and send it.

          XCPD sender

          This page allows also to validate the generated or the uploaded message before sending it to the responder endpoint. The validation is done by communication with the EVSClient. The validation done is a schema validation and a schematron validation, using IHE and epSOS schematrons.

          Validation with EVSClient


          Messages Transaction

          All messages sent via this simulator are saved on its database. This simulator can be used by two way : using gazelle driven from tests launched with this simulator, or using the GUI. On the two cases, all messages are saved, and can be viewed on http://gazelle.ihe.net/XCPDINITSimulator/transaction/messages.seam.

          List messages

          On this table, for each message sent, we can view it, we can validate it, we can view also the response of the responding gateway and validate its content. Also we can notice that we can choose to view web application messages or gazelle driven messages. We can also notice that for each couple of request/response, we have a permanent link, specified by a unique Id, the permanent link has this form : http://gazelle.ihe.net/XCPDINITSimulator/transaction.seam?id=ID.

          permanent link

          This permanent link contains the content of the request and the response, the date of the transaction, the responder endpoint, the message type, the transaction type, and the context of the transaction (GUI or gazelle driven message). We can also validate the request and the response directly from the permanent link.

          XCPD Initiating Gateway - Developer Guidelines

          Click here to enter the XCPD Initiating Gateway Simulator

          The XCPD Initiating Gateway Simulator has been developed to replace the Initiating Gateway actor of the XCPD (Cross Community Access) integration profile in connectathon (or pre-connectathon) tests when needed. This tool can participate as an initiator in many tests like XCPD_Patient_Discovery thanks to its web service methods which provide to Gazelle a mean to communicate with it. A Web GUI is also available and enables the users to test their XCPD responding gateway outside of a connectathon context. From this GUI, connecthaton participants can sends HL7V3 XCPD request to a specified responding gateway web service. Note that this tool is able to send requests using TLS.

          This simulator also supports the XUA (Cross Enterprise User Authentication) profile and can act as a X-Service User actor.

          First developed for epSOS purposes, the epSOS instance of this simulator sends signed-body SOAP messages. 

          Transactions and Messages supported

          As an Initiating Gateway for XCPD, this simulator supports the ITI-55 transaction.

          Communication between the simulator and Gazelle

          All simulators developed for interacting with Gazelle are built on the same model. The following diagram represents the different steps performed during a test instance.


          How to write tests involving XCPD Initiating Gateway actor

          When a test instance is created with the XCPD Initiating Gateway Simulator as one of the test instance participants, Gazelle needs some additional information to be able to communicate with the tool. 

          When you edit a test definition, for each step in which the XCPD INIT_GATEWAY actor acts as the initiator of the transaction, you are expected to give the following information:

          • Transaction must be ITI-55
          • You also need to fill the contextual information according the rules defined in the table present at the end of this page.
          • If the communications have to be secured, make sure you have checked the TLS option.
          • If the communications is xua, you have to add a contextual information "isxua" to the testSteps.

          Installation and Documentation

          You can download sources of the XCPDINITSimulator project from the INRIA Forge. This project required two additional modules: GSCommon-ejb and GSCommon-ui. Links to those sources are:

          https://scm.gforge.inria.fr/svn/gazelle/branches/simulators/GSCommon-ejb

          https://scm.gforge.inria.fr/svn/gazelle/branches/simulators/GSCommon-ui

          https://scm.gforge.inria.fr/svn/gazelle/branches/simulators/XCPDINITSimulator

          Javadoc relative to the XCPDINITSimulator will be soon available.


          Contextual Informations

          This table lists the input and output contextual informations that Gazelle is expected to send to the simulator for each step, during a test instance. For each test instance, the simulator stores the contextual informations so that it can retrieve them for the next steps. Information extracted from the responding gateway response are also stored. If XUA is used, you only need to fill the contextual informations for the first step.

          Output Contextual Informations
          label path description possible values
          is XUA isxua indicates whether the simulator must turn
          XUA mode on or off
          true or false
          family family optional : indicate the value of the family request, if no contextual informations about the request are specified, a default patient request will be used. family name
          given given

          optional: the given of the patient request , if no contextual informations about the request are specified, a default patient request will be used.

          given name
          birthdate birthdate

          optional: the birthdate of the patient request , if no contextual informations about the request are specified, a default patient request will be used.

          birthdate of the patient request
          root root

          optional: the root of the patient request , if no contextual informations about the request are specified, a default patient request will be used.

          The root of hte patient
          gender gender

          optional: the gender of the patient request , if no contextual informations about the request are specified, a default patient request will be used.

          Male or Female
          extension extension
           

          optional: the extension of the patient request , if no contextual informations about the request are specified, a default patient request will be used.

          the extension of the patient
          street street

          optional: the street of the patient request , if no contextual informations about the request are specified, a default patient request will be used.

          The street
          city city

          optional: the city of the patient request , if no contextual informations about the request are specified, a default patient request will be used.


          postalcode postalcode

          optional: the postalcode of the patient request , if no contextual informations about the request are specified, a default patient request will be used.

           
          maidenname maidenname

          optional: the postalcode of the patient request , if no contextual informations about the request are specified, a default patient request will be used.


          XDR document Recipient simulator (Now integrated in XD* Client)

          The XDR Document Recipient  Simulator has been developed to replace the Document Recipient actor of the XDR integration profile in connectathon (or pre-connectathon) tests when needed.  Thanks to this tool web service methods which provide to Gazelle a mean to communicate with it. A Web GUI is also available and enables the users to see their message sended to this simulators.

          First developed for epSOS purposes, the epSOS instance of this simulator validate the assertion.


          Transactions and Messages supported

          As a Document Recipient actor, this simulator supports the ITI-41 transaction.

          Communication between the simulator and Gazelle

          All simulators developed for interacting with Gazelle are built on the same model. The following diagram represents the different steps performed during a test instance.


          Contextual Informations

          There are no input and output contextual informations that Gazelle is expected to send to the simulator .


          Installation and Documentation

          You can download sources of the XDRFrontEnd project from the INRIA Forge. This project required two additional modules: GSCommon-ejb and GSCommon-ui. Links to those sources are:

          https://scm.gforge.inria.fr/svn/gazelle/trunk/simulators/GSCommon-ejb

          (svn co svn+ssh://scm.gforge.inria.fr/svn/gazelle/trunk/simulators/GSCommon-ejb)

          https://scm.gforge.inria.fr/svn/gazelle/trunk/simulators/GSCommon-ui

          (svn co svn+ssh://scm.gforge.inria.fr/svn/gazelle/trunk/simulators/GSCommon-ui)

          https://scm.gforge.inria.fr/svn/gazelle/trunk/simulators/XDRFrontEnd

          (svn co svn+ssh://scm.gforge.inria.fr/svn/gazelle/trunk/simulators/XDRFrontEnd)

          Javadoc relative to the XDRFrontEnd will be soon available.

          • Installation of XDRFrontEnd

           You have first to create a database on postgreSQL named xdr-front-end.

          Command :   createdb -e xdr-front-end  -U gazelle -E UTF8 -W gazelle

          Then you add the ear of XDRFrontEnd Simulator to the deploy folder of jboss-5.1.0.GA.

          XDR Document Source Simulator (Now integrated in XD* Client)

          The XDR Document Source Simulator has been developed to act as the actor Document Source for the profile XDR in tests.

          This tool can participate as an initiator in many tests like Multi Document Submission thanks to its web service methods which provides to Gazelle a mean to communicate with it. A Web GUI is also available and enables the users to test their XDR responding register. From this GUI, connecthaton participants can retrieve the messages sent and received, documents uploaded during a test instance they have initiated. Note that this tool is able to send requests using TLS.

          This simulator also supports the XUA (Cross Enterprise User Authentication) profile and can act as a X-Service User actor. First developed for epSOS purposes, the epSOS instance of this simulator sends signed-body SOAP messages.

          Installation of the XDR Document Source Simulator

          You can download sources of the XDRSRCSimulator project from the INRIA Forge. This project required two additional modules: GSCommon-ejb and GSCommon-ui. Links to those sources are:


          https://scm.gforge.inria.fr/svn/gazelle/trunk/simulators/GSCommon-ejb 

          (svn co svn+ssh://scm.gforge.inria.fr/svn/gazelle/trunk/simulators/GSCommon-ejb)

          https://scm.gforge.inria.fr/svn/gazelle/trunk/simulators/GSCommon-ui

          (svn co svn+ssh://scm.gforge.inria.fr/svn/gazelle/trunk/simulators/GSCommon-ui)

          https://scm.gforge.inria.fr/svn/gazelle/trunk/simulators/XDRSRCSimulator

          (svn co svn+ssh://scm.gforge.inria.fr/svn/gazelle/trunk/simulators/XDRSRCSimulator)

          Javadoc relative to the XDRSRCSimulator will be soon available. 

          • Installation of XDRSRCSimulator

           You have first to create a database on postgreSQL named xdr-src-simulator.

          Command :   createdb -e xdr-src-simulator  -U gazelle -E UTF8 -W gazelle

          Then you add the ear of XDRSRC Simulator to the deploy folder of jboss-5.1.0.GA.

          Documentation

          You access to the User manual here.

          Transactions and Messages supported

          As an Document Source for XDR, the simulator supports the ITI-41  transaction.

          Provide and register Document Source (ITI-41)

          The following message types can be sent Provide and Register document source.

          When you select  the document type "eDispensation" or "eConsent", the simulator send two files the CDA file and the pdf (represents the copy of the CDA File).

          When you select the document type "Pdf", the simulator send the Pdf file.

          This simulator also supports the XUA (Cross Enterprise User Authentication) profile and can act as a X-Service User actor. You can't use the XUA if the XDS server recipient doesn't support XUA. 


          Communication between the simulator and Gazelle

          All simulators developed for interacting with Gazelle are built on the same model. The following diagram represents the different steps performed during a test instance.


          Gazelle / Simulator interactions

          Contextual Informations


          This table lists the input and output contextual informations that Gazelle is expected to send to the simulator for each step, during a test instance. For each test instance, the simulator stores the contextual informations so that it can retrieve them for the next steps. 


          Input Contextual Informations
          label path description possible values
          useXUA null indicates whether the simulator must turn 
          XUA mode on or off
          true or false
          patientUniqueId $XDSDocumentEntryPatientId id of a patient known by the Responding 
          Register
          normalized patient unique id
          typeDocument null Type document generate to sent eDispensation, eConsent, Pdf
          Output Contextual Informations 
          label path description possible values
          soapResponse

          soapResponse

          XDR Recipient Soap Response


          XDR SRC Simulator FAQ

          This page responds to the following questions :

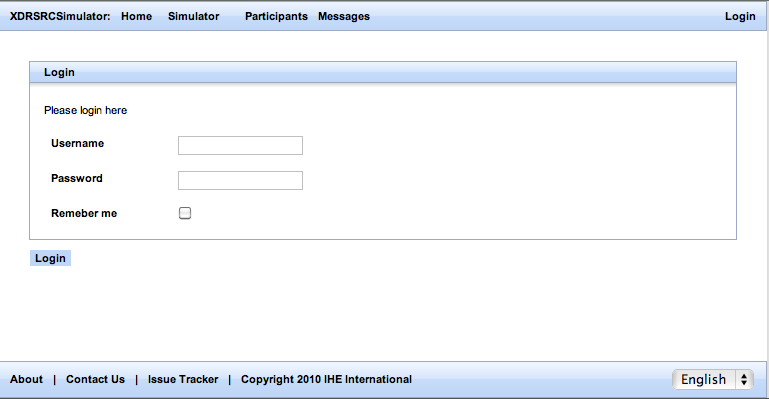
             How to connect to theSimulator interface?

            If you wan't to connect to the simulator, You click on "Login" button on the top of right display. You fill the userName and the password and clic on "Login" button. 


            How to add and configure a target end point (Document Recipient) for XDR Document Source Simulator?


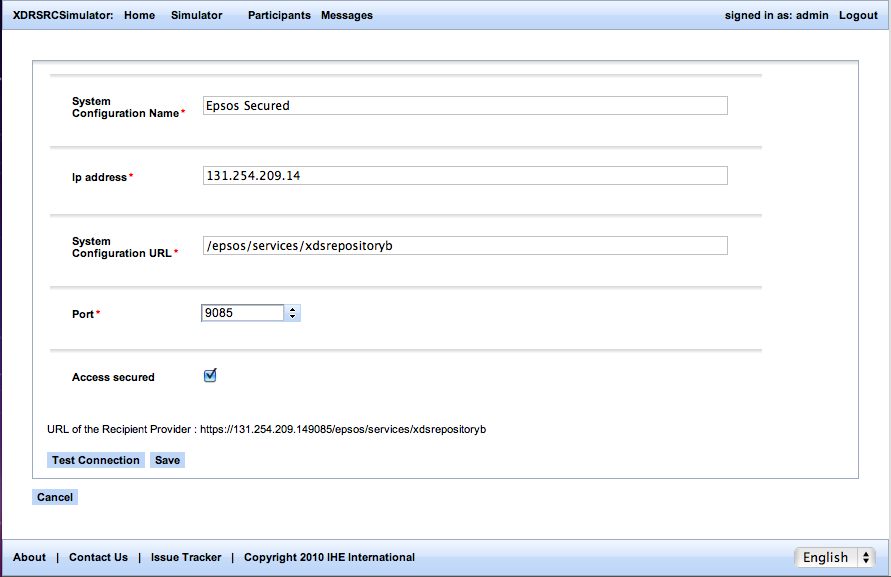
            If you wan't to configure a System Document Recipient, you must be log as admin.

            To configure the System Recipient, you have to go to System Configuration panel on the XDRSRC Simulator home page. Then you have to specify all attributes: System Configuration name,IP, Port, URL, UseXUA.. 

            When you filled the ip address, Url, port and is secure, you can see on the bottom of the panel the build of the webservice url (URL of the recipient provider).

            The "Test connection" button permit to know if the simulator can connect with this system. It tests the Http response code return by the Webservices.  


            How to use to perform a "Provide and Register" transaction from the XDR Document Source simulator?

            You can use this tool as a XDR Document Source actor. The simulator allows you to send eDispensation, eConsent or Pdf File to a selected XDR document recipient.


            You must to specify  the document Type : eDispensation, eConsent or Pdf. When you choose to upload your files : 

            - Document Type eDispensation : you can upload more than one eDispensation File.

            - DocumentType eConsent : you can upload one eConsent.

            - DocumentType Pdf : you can upload more than one pdf file.

              You must select if you want to upload your file :

              - Using existing file and the DocumentType eDispensation or Pdf : The simulator send all uploaded files.

              - Using existing file and the DocumentType eConsent : The simulator send one file.

              - Generate document and the DocumentType eConsent or eDispensation : The simulator send two generate files , Cda file and the pdf file (copy of the cda file).

              - Generate document and the documentType Pdf : The simulator send one generate pdf file. This file was filled by the patient ID, the document ID, file date and time create.

              You must to select your XDR recipient provider  and if you want to use XUA or not. If you use XUA, you must to filled the assertion provider and health care provider.

              How to show if the request is successful? 

              When you Provide and register a document with the simulator you can see the result in the bottom of the navigator. 


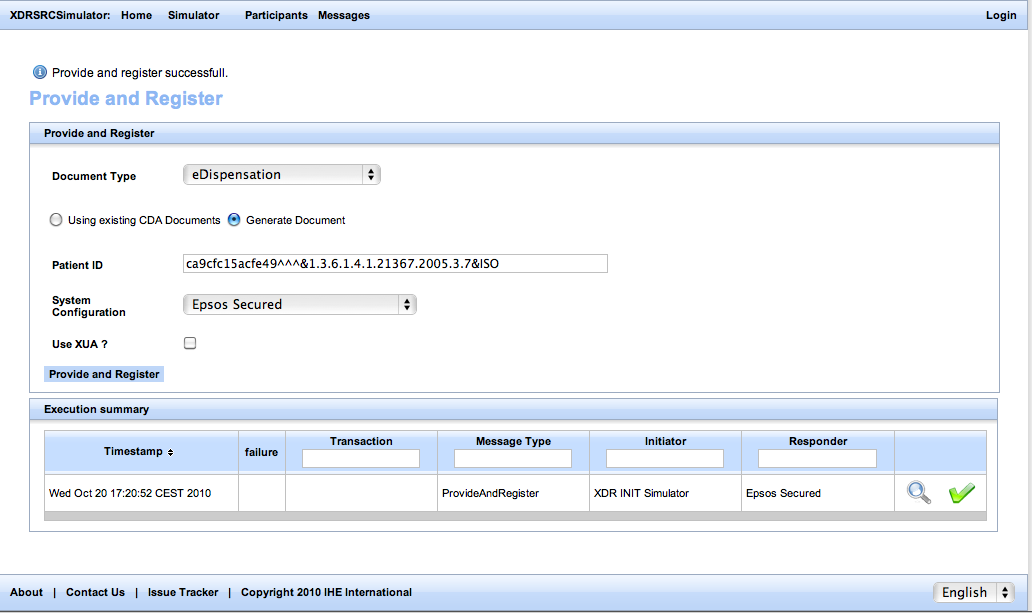
              You clic on the edit icon. You see the detail of the request :  the demand, the response and all files send to the recipient system. In this example, the simulator sends two documents.

              Request Detail

              How to list all requests log send by the simulator or execute with gazelle?

              You can see all requests logs. You clic on the "Messages" in the menu. You can see messages sent by the simulator(clic on Web Application option) or sent and driven by Gazelle (clic on Gazelle driven option).

              List of request


              The demand and the response in Gazelle driven Logs messages list is divided in two parts. The first line correspond to the demand message and the second line correspond to the response message.


              Gazelle driven messages


              How to use the XDR Document Source Simulator using its web service interface?

              XDRSRC Simulator has a wsdl which lets you to communicate with this tool. The wsdl is here. The web service of XDRSRC Simulator contains all methods needed to communicate beetween gazelle and this simulator. These methods let gazelle to start communication with the XDRSRC Simulator, to send configuration of the XDR recipient server , and to order the XDRSRC Simulator to send a file to the XDR recipient server .

              [Deprecated] XCPD Responding Gateway

              This tool is only to be used in the context of the eHDSI project. For the IHE implementation, use the Patient Manager tool.

              Introducing the XCPD Responding Gateway Simulator

              The XCPD Responding Gateway simulators emulates a test partner that supports the following IHE Integration profiles: 

              Integration ProfileActorOption
              XCPD Responding Gateway  
              XUA X-Service User  
              ATNA Secure Application  

               The simulator supports the ATNA/SA and XUA X-Service User actors. Both ATNA and XUA can be disabled when using the simulator. See the User Manual pages for more information on how to use it. 

              Access to the XCPD Responding Gateway simulator

              Release Notes

              Roadmap

              XCPD Responding Gateway - Developer Guide

              Click here to enter the XCPD Responding Gateway Simulator

              The web service responder of this simulator is http://gazelle.ihe.net/XCPDRESPSimulator-XCPDRESPSimulator/RespondingGatewayPortTypeImpl?wsdl.

              Configuration of the simulator

              You can configure the XCPD Responding Gateway Simulator if you connect as admin, then you can see a new menu, administration, that contains two others sub-menus, XCPD-RESP Configuration and Users Management. The menu Users Management lets you to configure users and roles. The menu Users Management lets you to configure parameters of the simulator. The homeCommunityID is very important to be specified, because the responding XCPD webservice  uses this value to filter messages which are not destinated to it. This page lets you also to configure the XUA behavior.

              How to write tests involving XCPD Responding Gateway actor

              When a test instance is created with the XCPD Responding Gateway Simulator as one of the test instance participants, Gazelle needs some additional information to be able to communicate with the tool. 

              When you edit a test definition, for each step in which the XCPD Responding Gateway actor acts as the initiator of the transaction, you are expected to give the following information:

              • Transaction must be ITI-55
              • If the communications have to be secured, make sure you have checked the TLS option.

              Communication with gazelle

              This simulator can communicate with gazelle using webservices. This web service is http://jumbo-2.irisa.fr:8080/XCPDRESPSimulator-XCPDRESPSimulator/XCPDRESPSimulatorWS?wsdl. Each time a new testInstance began with this simulator, a webmethod from this simulator is called : startTestInstance, so the simulator can initiate a new TestInstance. The an other webMethod is called:  setTestPartnerConfigurations, the simulator can so know which system is communicating with it, and for what actor integration profile. At the end of the testInstance, an other webmethod is called : stopTestInstance. This allows the simulator to close the testInstance in its database, and set its status to completed.

              Installation and Documentation

              You can download sources of the XCPDRESPSimulator project from the INRIA Forge. This project required two additional modules: GSCommon-ejb and GSCommon-ui. Links to those sources are:

              https://gforge.inria.fr/scm/viewvc.php/branches/simulators/XCPDRESPSimulator/?root=gazelle

              https://gforge.inria.fr/scm/viewvc.php/branches/simulators/GSCommon-ejb/?root=gazelle

              https://gforge.inria.fr/scm/viewvc.php/branches/simulators/GSCommon-ui/?root=gazelle


              You can download these project using svn tool, as described here. The svn link to these projects are :

              https://scm.gforge.inria.fr/svn/gazelle/branches/simulators/GSCommon-ejb

              https://scm.gforge.inria.fr/svn/gazelle/branches/simulators/GSCommon-ui

              https://scm.gforge.inria.fr/svn/gazelle/branches/simulators/XCPDINITSimulator

              Javadoc relative to the XCPDRESPSimulator will be soon available.

              XCPD Responding Gateway - User Manual

              Click here to access the XCPD Responding Gateway Simulator

              Introduction

              The XCPD Responding Gateway simulator is developed in conformance with the IHE Technical Framework. It also implements the epSOS extension to the profile. It has been developed to simulate the Responding Gateway actor of the XCPD (Cross Community Access) integration profile in connectathon (or pre-connectathon) tests when needed. This tool can participate as a responder in many tests like XCPD_Patient_Discovery thanks to its web service methods which provide to Gazelle a mean to communicate with it. A Web GUI is also available and enables the users to see their message sended to this simulators. Also, we can via the GUI request directly the database of XCPD Responding simulator by XCPD request message. Note that this tool is able to respond to requests using TLS, using the port 8443.

              This simulator also supports the XUA (Cross Enterprise User Authentication) profile and can act as a X-Service User actor.

              First developed for epSOS purposes, the epSOS instance of this simulator validate the assertion.


              Transactions and Messages supported

              As a Responding Gateway for XCPD, this simulator supports the ITI-55 transaction.


              HomeCommunityId of th XCPD Responding Simulator

              To communicate with the web service of the simulator responding gateway, the HL7V3 request must contain the following homeCommunityId : 2.16.17.710.812.1000.990.1 

              The homeCommunityId is the sending and receiving device and organization.


              Users can access to the XCPD Responding simulator by its web services, or by its GUI.

              1. Responding Gateway simulator webservices

              The web service responder of this simulator is http://gazelle.ihe.net/XCPDRESPSimulator-XCPDRESPSimulator/RespondingGatewayPortTypeImpl?wsdl.

              For the TLS use, the web service of the simulator is https://131.254.209.20:1443/xcpd?wsdl.

              Here is an example of a soap-ui project that use the unsecured webservice.

              2. User Interface

              The user can access to the responding gateway simulator Here .

              This interface contains a page to describe the list of messages received by the simulator. For each transaction via the webservice of the simulator, we save the request, the response, the date of creation and the ip address of the initiating gateway.

              list messages

              On this table, for each message received, we can view it, we can validate it, we can view also the response and validate its content.  We can also notice that for each couple of request/response, we have a permanent link, specified by a unique Id, the permanent link has this form : http://gazelle.ihe.net/XCPDRESPSimulator/transaction.seam?id=ID, exactly like it was done for XCPDINITSimulator.

              permanent link


              On this permanent link, we specify the date of receiving the XCPD request, the IP of the sender and its country if we have this information, the type of the current trensaction, and the received message type. We can directly validate the received and the response messages from the current permanent link.

              The GUI contains also a page on tools menu that lets to execute XCPD request directly within the use of the webservice, you have only to set the PRPAIN201305UV02 messages. The menu TestInstance which is common to all simulators contains list of TestInstance executed using gazelle with this simulator.