Gazelle developers guide
Gazelle developers, those pages gathered tips, rules ... you may want to know
Development support tools
Information about the tools we use to develop the gazelle tools (Crowdin, Eclipse, Jboss, Drupal, TestLink and so on)
Development tips
Knowledge sharing about
- How to use common modules
- How to use third-part library
- Defintion of the APIs exposed by the tool + tips about how to call them
Guidelines for developing new Gazelle tools (in progress)
The purpose of those pages would be to define a common way to develop Gazelle tools (Technology/GUI contraints, coding rules and so on)
Calibration tests with SoapUI
Creation of SoapUI calibration scripts
gazelle-calibration Installation
Installation
Install gazelle-calibration
If you don't have already a zip of the project create one with :
- icons/
- scripts/
- site/
- admin.php
- calibrate.php
- calibrate_fork.php
- getCalibrationExecutions.php
- getCalibrationResult.php
- index.php
- installation.sh
- pom.xml
- settings.xml
Send the zip to the VM :
scp /path/to/the/zip.zip gazelle@<VM>/tmp/
Connect to the VM and extract the zip :
unzip /tmp/gazelle-calibration.zip -d /tmp/gazelle-calibration
Edit installation.sh and make sure the variable APACHE_ROOT is correct. Execute the script :
sudo chmod +x installation.sh sudo /tmp/gazelle-calibration/installation.sh
Install xmllint :
sudo apt-get install libxml2-utils
Install maven :
sudo apt-get install maven
Install soapui :
cd /tmp wget https://s3.amazonaws.com/downloads.eviware/soapuios/5.4.0/SoapUI-x64-5.4.0.sh chmod +x SoapUI-x64-5.4.0.sh ./SoapUI-x64-5.4.0.sh
Install php DOM extension
Check the php version installed on the server :
php --version
Depending on the version, the package is different :
-
php-5 :
sudo apt-get install php5-dom -
php-7.0 :
sudo apt-get install php7.0-xml -
php-7.1 :
sudo apt-get install php7.1-xml
Configuration
Gazelle-calibration
Check that the values in ~/gazelle-calibration/html/scripts/calibrate.sh are correct, especially INDEX_PATH and REFERENCES_PATH.
Htaccess
Create or add an existing htpasswd.users in /home/gazelle/gazelle-calibration/html. To add a new user type :
sudo htpasswd /home/gazelle/gazelle-calibration/html/htpasswd.users <user>
Add the following to the configuration file in /etc/apache2/site-enable :
<Directory /var/www/html/gazelle-calibration>
Options +Indexes +FollowSymLinks +MultiViews
Order allow,deny
Allow from all AuthName
"Calibration Access" AuthType Basic AuthUserFile /home/gazelle/gazelle-calibration/html/htpasswd.users Require valid-user </Directory><domain\>
/gazelle-calibration is now password protected.
Development support tools (tips for Drupal, Eclipse, Jboss, Linux and so on)
Gazelle team members use various tools for different purposes, here are the links to those tools and what they stand for.
Tools available online
Jenkins: Continous integration systems. The trunk of each project is built every night, if changes have been committed during the last 24 hours
Jira: Bug Tracking System. Each Gazelle tool has its own Jira project (link is available in the footer of the application). The team also uses Tempo and Greenhoper (Agile methodology) plug-ins to respectively log working time and manage Agile sprints.
Nexus: Gazelle projects are built using Maven. Nexus is both a proxy for third-party dependencies and a repository for the releases and snapshots produced in the context of the Gazelle project
Crowdin: Gazelle applications are designed to be displayed in several languagues. Crowdin is an online translation management service. Users and developers work together to translate the applications into several languagues (Engligh, French, Japanese, German, Suomi...)
Sonar: Static analysis of the Java code. Analysis is run each time a job runs in Jenkins.
Testlink: Tests and Requirements management tool used by the Gazelle project
Tools that you may want to install on your computer
Eclipse: Prefered IDE for Java. You may also want to use the following plug-ins
- CodePro
- Maven
- SVN
- Sonar
Oxygen: Edit XML, XSL, XSD, perform validation using Saxon, etc...
PgAdmin III: Access your postgresQL database
plantUML: Develop sequence diagram, class diagram
jEdit: good text editor with advanced features
HL7 Inspector: Send and receive HL7 messages
SoapUI: SOAP webservice client
Virtual Box: Container for virtual machines
Set up your development environment
Execute :
wget http://gazelle.ihe.net/jenkins/job/gazelle-public-RELEASE/ws/gazelle-tm-ear/src/main/scripts/setup.sh
chmod +x setup.sh
./setup.sh
install mvn svn
sudo apt-get install maven subversion
Configure Maven
edit ~/.m2/settings.xml file, configure your username and password
<?xml version="1.0"?>
<settings xmlns="http://maven.apache.org/SETTINGS/1.0.0" xmlns:xsi="http://www.w3.org/2001/XMLSchema-instance" xsi:schemaLocation="http://maven.apache.org/SETTINGS/1.0.0 http://maven.apache.org/xsd/settings-1.0.0.xsd">

  <mirrors>
    <mirror>
      <id>nexus</id>
      <mirrorOf>*</mirrorOf>
      <url>http://gazelle.ihe.net/nexus/content/groups/public</url>
    </mirror>
  </mirrors>
</settings>
Fetch Sources
You can browse project on: https://gforge.inria.fr/scm/viewvc.php/Maven/?root=gazelle
It is strongly recommended to work from a tagged version of the application.
Gazelle-tm: https://scm.gforge.inria.fr/svn/gazelle/Maven/gazelle-tm/tag
Pickup-up the tagged version of gazelle-tm you would like to build. Then select run the maven build command
mvn -Ppublic clean package
In case you would also like to compile the dependencies, find in the master pom.xml file the tagged version used for each of the dependencies. You can then pick up that version to recompile it.
Gazelle-tm-tools: https://scm.gforge.inria.fr/svn/gazelle/Maven/gazelle-tm-tools/tag
Gazelle-model: https://scm.gforge.inria.fr/svn/gazelle/Maven/gazelle-model/tag
Gazelle-tools: https://scm.gforge.inria.fr/svn/gazelle/Maven/gazelle-tools/tag
Install your favorite IDE (Eclipse or Intellij Idea)
Adding content in Drupal
Gazelle website is now running on Drupal 7. This page describes how the content is organized and how to add a new page (right content type in the right place)
Menus
Menus can be configured from Structure > Menus. Four menus are used in this web site
- Quick links which is displayed on the left side bar
- Main menu which is displayed at the top of the page (Home, Blog...)
- Kereval team menu is available only to the users from the team based at Kereval
- epSOS menu is available only to the users involved in the epSOS project
Books
Switching to the new website, we have restricted the number of books, each new page you create must be part of one of the following books. Otherwise, you may want to create a blog entry.
- Gazelle developers guide is mained to contain all the informations a developer of Gazelle may need
- IHE Connectathon gatheres the general information about the connectathon process
- Gazelle user guides is the entry point for all the pages which teach the user how to use the Gazelle tools. This book is organized in different chapters matching the type of tool: Core, External Validation Services, Simulators
- Installation guides gathers all the tutorials to install such or such tool
- Product Registry is the documentation of the tool Product Registry
- Quality Manual is maintained by Quality insurance body of the Gazelle platform
- [ARCHIVES] Deprecated projects is used to store all the pages relative to tools which have been deprecated or replaced
- [ARCHIVES] European connectathons is used to store all the pages relative to the past connectathons in Europe
- Pre-connectathon tests contains the description of the pre-connectathon tests which are run "against" Gazelle tools; those tests are referenced within GMM and sorted by tool.
Each time you want to create a new content which aim to be added to one of those books, use the book page (new) content type. Then, in edit mode, at the bottom of the page, go to the Book outline section and select first the book in which you want to add the page and then its parent item (it may be the root of the book).Once it's done, the fastest way to put the page where you want in the book is to go to Content and then under the Book tab. A quicker manner is to go on the parent of the new page and hit the "Add child page" link.
Blog post
The blog content type must be used to publish a news in the blog section of the website. When you create a new blog entry, you can tick the Announce this post on Twitter checkbox so that a new tweet containing the link to this new blog entry will be posted by @IHE_Gazelle account
Archives
The archives section is used to stored the pages which are no more relevant but that we want to keep as an history of your work. Select the page you want to archive, edit it and, in the book outline section, select one of the [ARCHIVES] book. If the page you move has children, they will be moved also.
Home page
The home page is automatically built. All the contents of type "frontpage-block" which is set as "published" and "sticky to front page" is used to build the page, organized in two columns and sorted by ascending "order in home page" (a field available in edition mode).
Page for Kereval only
This type of content is configured to be accessible only by the users which are in the group "Kereval". When you create such a page, to not forget to tick the "Provide a menu link" check box. In this way, the link to this new page will be displayed under the Kereval team menu displayed in the left-hand column
Page for epSOS only
This type of content is configured to be accessible by users which are in the group "epSOS" (and others since not all epSOS staff may be registered in Gazelle and known as an epSOS user). If you tick the "Provide a menu link" check box, a link to this page will be created under the epSOS menu.
Configure Chrome for Nagios monitoring
This short tutorial presents how to configure the chrome web browser in order to monitor the services deployed for the gazelle test bed.
- You first need to install the nagios checker plugin in your chrome browser. The plugin can be obtained from the following URL : https://chrome.google.com/webstore/detail/nagios-checker/oghnfiojdffbaihbdlcjkcefiblbdmch?hl=en
- Configure the plugin to access the nagios server : MAKE SURE that the status.cgi path is set to : /nagios3/cgi-bin/status.cgi?host=all&limit=1000

- Then you will be able to view the services that are giving problem directly from your chrome browser.

Configure Eclipse
Configure Eclipse to view Sonar reports
- Install sonar plug-in:
- marketplace
- site update: http://dist.sonar-ide.codehaus.org/eclipse/
- Configure the connection to sonar:
- Go to Window -> Preferences -> Sonar -> Servers
- Add new server:
- url= http://gazelle.ihe.net/sonar
- Then, for each project you need to activate the sonar plug-in:
- Right-click on project -> configure -> Associate with sonar...
- (Optional) Add a Sonar view
- Window -> Show view -> sonar -> violations
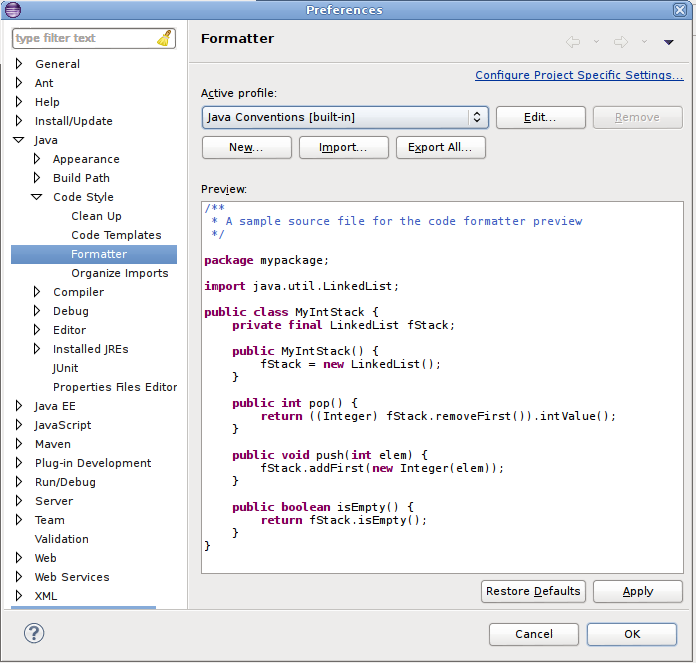
Java code formatting in Eclipse
Download the formatting file available here and add it to your Eclipse configuration. Go to Window --> Preferences. Then select Java --> Code Style --> Formatter and click on the Import... button.
To format all the sources of a given project, right-click on the src/main/java directory and select Sources --> Format
Auto-completion of XHTML tags
If you want Eclipse to auto-complete the tags of your XHTML files and to give you the list of available attributes for a tag, read this tutorial. In addition, to have the rich and a4j tags listed, you can create a user library and add richfaces-api, richfaces-impl et richfaces-ui. You will find those binaries in your .m2 repository in /org/richfaces/framework and /org/richfaces/ui folders.
Template for loggers
We recommand to use sl4j for logging information in JBoss logs. Download the file available here and add it as a template in Eclipse (see the screenshot below). Then, each time you want to insert a logger in your Java class, type "logg" and ctrl-space for completion. A static field will be created and the logs will be redirected to log4j in JBoss.

Crowdin and Gazelle integration
Crowdin is a complete solution to make your website or software universally accessible through translation. Crowdin advanced editor helps translators to work faster and more efficiently with our innovative translation approach." https://crowdin.com/
A Maven plugin allows crowdin integration into our projects (https://github.com/ValentinLorand/crowdin-plugin). You can use it by adding the latest gazelle-seam version (from 2.1.0) in your pom.xml.
Global setup
To authenticate yourself to Crowdin, you need to configure your ~/.m2/settings.xml.
Your personal API key need to be generated from Crowdin server interface (https://crowdin.com/settings#api-key).
Once you have your API key, you can add the following in the settings.xml file :
<settings>
 <servers>
	<server>
		<id>crowdin-gazelle</id>
		<username>4960</username>  <!-- The crowdin project id -->
		<password><!-- insert here you personal API key --></password>
	</server>
 </servers>
 <!-- ... -->
 <pluginGroups>
	<pluginGroup>com.googlecode.crowdin-maven</pluginGroup>
 </pluginGroups>
</settings>
Managing and adding translations to a project. Ex : gazelle-tm-war
1. The pom.xml of the war module must contains the following plugin. It is provided by default by gazelle-tools or simulator-common :
<plugin>
  <groupId>org.codehaus.mojo</groupId>
  <artifactId>gazelle-plugins</artifactId>
</plugin>
2. Open the pom.xml of your project, under the <properties></properties> section, add
<messages.mode>crowdin</messages.mode>
3.Keep your project updated with crowdin server :
mvn crowdin:pull
4. Edit the XHTML files with untranslated messages.
5. Build your project,
mvn clean package
And look for messages in logs such as:
[WARNING] Missing translation in list.xhtml (line:20,col:51) : New simulator
If there is parameters that must not be translated, add their name in the gazelle-plugins configuration (pom.xml)
<plugin>
   <groupId>org.codehaus.mojo</groupId>
   <artifactId>gazelle-plugins</artifactId>
   <configuration>
      <ignoredParamNames>
          <ignoredParamName>displayActorFilter</ignoredParamName>
      </ignoredParamNames>
   </configuration>
</plugin>
6. When you are ready to extract new messages from xhtml, run the following command. You need to add the keyPrefix argument to the maven command. As an example you might want to run :
mvn gazelle:xhtml-messages -DkeyPrefix=net.ihe.gazelle.tm
7. A new .properties file has been added to the src/main/messages folder. This file is temporary and contains only new elements. Copy the content into the existing properties file. Then delete the temporary .properties file.
Usage of crowdin plugin
1. Push new messages on Crowdin server with :
mvn crowdin:push
2. If you pushed a new file on Crowdin server (new project), the encoding may be broken on translated file (later pull). See Jira issue MCA-27 on how to fix it.
3. Translate messages in Crowdin GUI. Messages that are not translated into another language will keep the original message value (english).
4. Then, you can retrieve the translations executing the command :
mvn crowdin:pull
If there are new translation, the server will need to rebuild the packge of translations. This can takes 1 minutes and after it will download the translations that your project need depending on the depencencies declared in your project poms.
Detailed informations
src/main/messages contains properties that you want to be translated. Translations are used there only for initialization.
When new files/keys have been added to src/main/messages, you can push them to crowdin using mvn crowdin:push . It is Maven first, all elements in crowdin not in src/main/messages will be deleted from crowdin.
When translations are done on crowdin, it is needed to update package on crowdin. It can be done using mvn crowdin:export but it doesn't look to export it everytime (API throttle). So you can also update the package using "Build fresh package" on https://crowdin.com/project/gazelle/settings , "Downloads" tab.
Finally, you will have to pull new translations into your project by executing mvn crowdin:pull . It creates src/main/crowdin folder, storing used translations. Files in this folder should not be edited, it is just there for being able to build project without connecting to crowdin.
When the project is packaged, messages are aggregated and made available to the application as before (automatically done via gazelle-seam profiles).
Project migration from xml files to crowdin
- Use latest gazelle-seam as parent (>= 2.1.0).
- Package your application.
- For each module, store properties from target/generated-resources/messages-generated in a temporary folder.
- Copy english version (en.properties) into src/main/messages, and rename it with a meaningful name.
- Delete old xml file.
- From project root, execute mvn crowdin:push .
- For each already translated langage, go to translation pages (https://crowdin.com/project/gazelle/fr for french). Click on upload matching the new file, and select the backuped file. Translated elements will be added to crowdin.
- Log in to post comments
How to configure Eclipse to run with a proxy connection
First you have to
configure eclipse :
go to menu --> windows --> preferences
select General --> network connection
configure the proxy manally on this preference.
configure maven
go to .m2/settings.xml.
Add the following:
<proxies>
   <proxy>
      <active>true</active>
      <protocol>http</protocol>
      <host>192.168.235.40</host>
      <port>80</port>
    </proxy>
  </proxies>
Network configuration
you may also, under Windows, configure the LAN network (http://answers.oreilly.com/topic/675-how-to-configure-proxy-settings-in-windows-7/ )
How to create an HL7 message profile with Messaging Workbench (MWB)
Pre-Requisites
- Install MWB (see section of this tutorial named "How install Messaging Workbench" for further details about the MWB installation.)
- To correctly use Messaging Workbench, you should have good knowledge of the HL7 standard.
- This tutorial will help you to generate your own HL7 message profiles according to IHE. Please read the IHE Technical Framework first of all.
- It is very important to follow this tutorial without skip steps.
Notes: This tutorial can help you to create new HL7 Message Profile. This is not a tutorial to understand all functionalities of Messaging Workbench.
How to install Messaging Workbench.
First at all, MWB runs only on Windows.
MWB installation:
- First at all, you will need to install the Messaging Workbench software. You will find it at this location: http://www.hl7.org/participate/toolsandresources.cfm, in the "V2 Tools" section.
- Get our MWB librairies and pojects at this location: http://sumo.irisa.fr/~epoiseau/IHE_Messaging_Workbench_Lib_And_Project.zip. It will present to you as a zip file.
- Unzip the file named “IHE_Messaging_Workbench_Lib_And_Project.zip”. In the unzipped folder, you should find :
- The IHE Libraries folder, named "IHE_Lib_2012".
- The IHE Projects folder, named "IHE_Projects_2012".
- The IHE XSLT files, in the "xslTransformTools" folder. See the last part of this tutorial for further details about theses files.
- Enter in the "IHE_Lib_2012" folder, move all files and folders to the Lib folder of MWB (default "C:\program files\Messaging Workbench\Lib"). (Windows will ask you if you desire replace files and folders, say YES).
- Enter in the "IHE_Projects_2012" folder, move all files to the Projects folder of MWB (default "C:\program files\Messaging Workbench\Projects").
- When it is finished, you can begin to use Messaging Workbench.
Create DataType specific to your profile
If for the IHE domain there is specific data type, you should create a specific data type file from the default data type files defined by MWB.
If not, you can use the default data type file defined by MWB.
To create your own data type file :
On MWB choose on the Menu the tab:
Maint --> Datatypes --> Add/Edit datatype File

In the frame open, choose the tab:
File --> Open
Choose the data type default file chich is stored in the directory: MessagingWorkbench_Home/lib/

Open the data type file specific to your HL7 version, then choose the tab :
Datatype --> Edit

Select the specific data type you want to change, make the changes and save the new data type file with another Name (By convention, the name should indicate which domain changes is stored in the data type file: for example «LTW-DT-2.5.mdf »).
Attention, try to not modify the source data type file.
Create library with the previous DataType file
On MWB choose on the Menu the tab:
Maint --> Libraries --> Edit library File
You can choose for example « HL7 2-5.mcf » in the directory “MessagingWorkbench_Home/lib/“. You must choose an existing library to construct your own.

In the frame, change the current Data type with your own (for example « LTW-DT-2.5.mdf »). To do that, hit the “Attach DT” button and choose the corresponding DT file.
Then, press the “Compile” button and “Save as” the compile file as a new library in a file called for example «LTW-HL7 2-5.mcf ».

At least, close the library configuration window by hitting the “Done” button.
This library represents the base of the creation of your profile. If the IHE Technical Framework doesn’t define specific Data Types, you can use the IHE libraries present in the “PHARMA”, “ITI_LIB”, “LTF_LIB” or “PCD-LIB” folders in the “MessagingWorkbench_Home/lib” folder.
Set the specific library which will be used
On MWB choose on the Menu the tab:
Maint --> Options...
- Go to the “General” tab.
- You can set the library you want to use by default. To do that, at the bottom of the page, hit the “…” button corresponding to the “Select Default Conformance File” section and choose your desire library.
- You can also set the HL7 Table file to use. To do that, at the bottom of the page, hit the “…” button corresponding to the “HL7 Table file” section and choose your desire HL7 table file. Try to choose an HL7 table file according your HL7 version. Find these file in the “MessagingWorkbench_Home/Lib” folder.
- Now, Go to the “Directories” tab.
- Just verify that the “Current Projects directory” is set, for example to “Messaging Workbench_HOME\Projects” and that the “Current library directory” is set to “MessagingWorkbench_HOME\Lib”.
- At least, hit the “OK” button.

On MWB choose on the Menu the tab:
Maint --> Librairies --> Select Conformance Files
- The “Prioritized Conformance” panel references all selected libraries. Your library must appears in this panel. To do that, select the library in the “Msg Library Files” panel and hit the “>” button. Attention, this panel only shows the libraries which have been saved in the directory “MessagingWorkbench_HOME\Lib”.
- When you have finished, press “OK”.

Create the HL7 message profile from the library
If you have some segments which are defined commonly in the TF for the all domain, you may create a specific library which have this definition for the segment.
To construct your HL7 message profile :
- Go to the Menu: File --> New
- Fill the header of the file. See the example below :
- Specification: “RGV_O15”
- Msg Type: “RGV”
- Event Type: “O15”
- Ord Cntrl: “”
- StructID: “RGV_O15”
- Organization: “IHE”
- Event Description: “RGV - Pharmacy/treatment give”
- HL7 version: “2.6”
- Structure: See the section below to get further information on this field.
- Status: “DRAFT”
- Spec Version: “TRIAL”
- Role: “Sender”
- Conformance Type: “Constrain”
In the “Structure” field, you must write the structure of your HL7 message. See the example below :
MSH,{[SFT]},[UAC],{[NTE]}[(PATIENT),PID,{[NTE]},{[AL1]}[(PATIENT_VISIT),PV1,[PV2]]]{(ORDER),ORC[{(TIMING),TQ1,{[TQ2]}}][(ORDER_DETAIL),RXO[(ORDER_DETAIL_SUPPLEMENT),{NTE},{RXR}[{(COMPONENTS),RXC,{[NTE]}}]]][(ENCODING),RXE{(TIMING_ENCODED),TQ1,{[TQ2]}},{RXR},{[RXC]}]{(GIVE),RXG{(TIMING_GIVE),TQ1,{[TQ2]}},{RXR},{[RXC]}{(OBSERVATION),[OBX],{[NTE]}}}}

Then press the COMPILE MESSAGE button (represented by a yellow wheel) which is between the “save file” button and the “+F” button in MWB tool bar.
A message panel should open at the end of the compilation.
You may select all the items and select the “Not Supported” Option. Then hit the “Make Change” button.
This will change in the profile all “Backward” usage by “Not Supported”.
Close the panel.

Finally, hit the “Save” button to save your project in “MessagingWorkbench_HOME\Projects\Your_Message_Name.mwb”
Now, click on the Menu : Tools --> Select Conformance Lib
- The “Prioritized Conformance” panel references all selected libraries. Your library must appears in this panel. To do that, select the library in the “Msg Library Files” panel and hit the “>” button. Attention, this panel only shows the libraries which have been saved in the directory “MessagingWorkbench_HOME\Lib”.
- When you have finished, press “OK”.
Then choose the tab : Display/Reports
- In the bar tool menu, on the right of the printer button, select “Spec XML” in the list.
- The generation will run automatically.

At the end of the generation, on the “HL7” button (on the right). A message panel will be appear. Say “NO” and hit the “save” button (on the left). Your HL7 message profile will be saved as an XML file.
If some of the segment used are empty you should add a segment and set the previous library you create for the domain or the default one by HL7 version for example : “MessagingWorkbench_Home/lib/IHE-HL7 2.5.mcf “
Make the XSL transform to get a correct profile
The XML file generates by MWB is not correct, and it is necessary to do some transformations. Return to the unzipped folder (See the step 2 of the section "How install Messaging Workbench.") You shoud find a folder named "xslTransformTools".
First at all, you will need to download the Xalan parser at this location: http://xalan.apache.org/index.html
Xalan is an XSLT processor for transforming XML documents into HTML, text, or other XML document types.
We will use Xalan to apply the XSL style sheets to our HL7 message profile.
To copy the xmlfile to his specific profile directory in“Data/Hl7MessageProfiles”, you may:
- CREATE all the PATH directories conform to this structure for the message: Actor/Transaction/Message_Profile/profile, table, result, sample, work, done
- COPY the file C:\Data\HL7\Message_Profiles\2.3\Transaction\Specification_msgType_eventType.xml in the directory “Data_HOME/Hl7MessageProfiles/Actor/Transaction/Message_Profile/profile”
Now check you should execute this xsl transform:
- xsltproc Data_HOME/outils/XsltProfileTransformer.xsl Data_HOME\HL7\Message_Profiles\2.3\Transaction\Specification_msgType_eventType.xml > Data_HOME\HL7\Message_Profiles\2.3\Transaction\Specification_msgType_eventType-CorrectGenericError.xml
- xsltproc Data_HOME/outils/predicate_transform.xsl Data_HOME\HL7\Message_Profiles\2.3\Transaction\Specification_msgType_eventType-CorrectGenericError.xml > Data_HOME\HL7\Message_Profiles\2.3\Transaction\Specification_msgType_eventType-PredicateTransform.xml
- xsltproc Data_HOME/outils/correction_schema.xsl Data_HOME\HL7\Message_Profiles\2.3\Transaction\Specification_msgType_eventType-PredicateTransform.xml > Data_HOME\HL7\Message_Profiles\2.3\Transaction\Specification_msgType_eventType-SchemaError.xml
- xsltproc Data_HOME/outils/correct_table.xsl Data_HOME\HL7\Message_Profiles\2.3\Transaction\Specification_msgType_eventType-SchemaError..xml > Data_HOME\HL7\Message_Profiles\2.3\Transaction\Specification_msgType_eventType-CorrectTable.xml
At least, replace all “Usage="B"” in the corrected HL7 message profile by “Usage="X"”.
Nexus (update, configuration)
Nexus is used to manage the Maven artifacts both the third-part ones required by our applications and the ones developed by the team. Our repository is available at http://gazelle.ihe.net/nexus and is currently installed on Sumo and owned by user nexus.
Updating Nexus
- Download the lastest version of the tool (tgz archive named Nexus OSS) and uncompress it in /opt/nexus
- In the new directory, change the configuration. Depending on the various releases, some properties have changed, but by now, we only need to change the port :
- nexus-2.3.1-01/conf/nexus.properties : application-port=9080
- Then, stop nexus as root
/etc/init.d/nexus stop
- and execute the following commands:
su nexus
cd /opt/nexus
rm nexus-oss-webapp
ln -s nexus-2.3.1-01 nexus-oss-webapp
exit
/etc/init.d/nexus start
Creating a new proxy in Nexus
- Logged onto the tool
- Go to Repositories, click on the "add' button and select "Proxy repository"
- Fill out the form; the provider of the artifact must provide the "Remote storage location" to specify. Basically, it's the root of the maven repository.
- Click on the save button
- Then, select "Public repositories" and go to the "Configuration tab"
- The repository you have created shall be displayed in the "Available repositories" column, move it to the "Ordered Group Repositories" column
Add a jar in nexus
- Logged on to http://gazelle.ihe.net/nexus/index.html#view-repositories;thirdparty~browseindex
- Create a pom like this :
<dependency>
  <groupId>com.pixelmed</groupId>
  <artifactId>dicom</artifactId>
  <version>20140326</version>
</dependency>
- Click on "Artifact upload"
- Select GAV definition : From POM
- Select your new pom to upload it
- Add artificats : sourceFiles.jar and executable.jar
- To finish click on upload artifacts
Source repository
TestLink user guide
Testlink is an open source tool the purpose of which is to manage requirements, test specifications, test plans and test execution results. It is used by the Gazelle development team for quality insurance of our tools.
We are currently using TestLink 1.9.7, available here. If you do not have an account and you need one, please contact Anne-Gaëlle Bergé.
The following pages give you some tips for writing assertions, configuring the tools, specifying your tests and so on.
TestLink - Configuring an issue tracker
How to configure an issue tracker
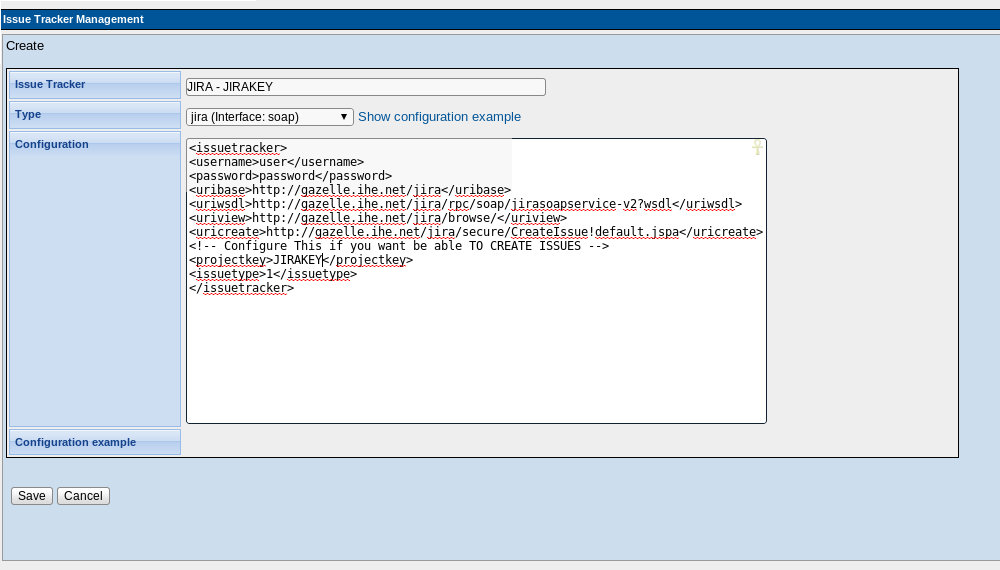
As we maintain a JIRA project and a Testlink project by Gazelle application, we need to configure a new Issue Tracker in Testlink for each new Testlink project. In this way, when executing the tests, we will be able to report the bugs directly from Testlink with a reference to the test case.
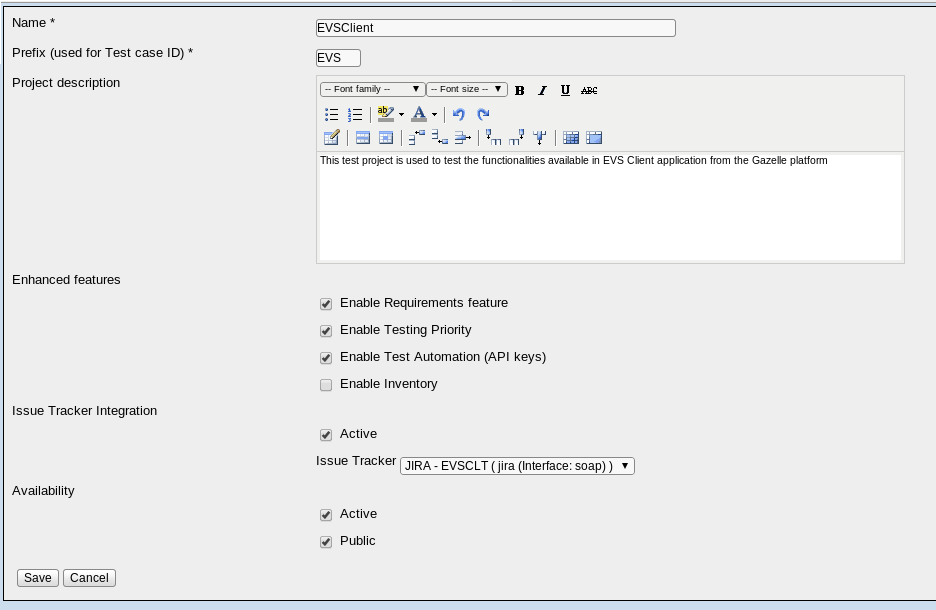
In the Desktop part of Testlink, click on "Issue Tracker Management" in the System panel (top-left corner). Then it the "create" button and configure the tool as shown in the screenshot below. For security reason, we have hidden the username and password parameters. Refer to another Issuer Tracker definition or ask the Gazelle administrator to get them. The JIRAKEY refers to key which uniquely identified a project in JIRA. Then, to link the Issue Tracker to your Testlink project, edit your project configuration
The screenshot below shows the basic definition of a test project in TestLink.
TestLink - Requirements management
Requirements quality criterias
Quality of requirement
- A requirement must be :
- Valid,correct
- Feasible, realizable
- Useful, necessary
- Prioritized
- Not ambiguous
- Verifiable, testable
- Atomic, unique
- Independent from the implementation
Quality of requirements specification
- A requirement specification must be
- Complete
- Coherent
- Editable
- Traceable
- In compliance with standards
How to write requirements
Requirement workflow

Requirement writing guideline
- IDs
- The id of the requirement is the prefix of the project followed by 4 digits.
- The id of the requirement must be coded independently of the section it belongs to.
- Roles
- The roles concerned by the requirement shall be defined in a specific field.
- If the requirement is concerned only by one role, it can appear in the scope and the title.
- If the requirement is concerned by several roles, they must not appear in the title and the scope.
- Priority
- The priority must be defined in a specific field accordingly to the following 4 levels :
- High
- Medium
- Low
- Optional
- The priority must be reflected in the scope and the title of the requirement using the muscow verb method :
- MUST
- SHOULD
- COULD
- WOULD
- Tests
- The number of required test must be 1 at least.
- If the requirement does not need at least 1 test, it means the requirement is unusefull or poorly draft.
Requirements specification building guideline
- Nesting
- Requirements must be grouped by sections.
- A requirement must NOT have child requirements. Only sections can have child requirements.
- Sections can have child sections.
- More than three level of nested sections should be avoided.
- ID
- The ID of the section must reflect its hierarchical location.
- Obsolete section
- As a requirement must not be deleted, the specification must have an section dedicated to receive obsolete requirements.
- Other attributes
- Priority and Roles must NOT be defined for sections.
TestLink - Test specification design
In accordance with the quality assurance team, we have chosen to use the same test specification design for all the projects manage within our instance of TestLink. This design matches the level of tests defined by ISTQB.
When you write your test specifications, please follow the principals enounced below:
- Three main test suites shall be created
- unit testing
- integration testing
- system testing
- Unit testing shall contains at least the two test cases:
- Static analysis (might ask to consult sonar analysis available at http://gazelle.ihe.net/sonar)
- Unit tests (might ask to consult the JUnit test results available in Sonar)
- Integration testing might be application dependant, there isn't a unique pattern which can be applied but you may need something like
- Web service interface (client side)
- Web service interface (server side)
- IHE interface (responder side)
- IHE interface (initiator side)
- ... other integration stuff
- System testing test suite shall be built based on the requirement specifications:
- On child test suite per requirement specification section
Below is an example taken from Gazelle HL7 Validator test project.

Attached is an XML export of the basic test specifications that you can import into your project as a basis for your test specification writing. Also available here.
For the "System testing" test suite you can save time by using a feature from TestLink. In the Requirements page, for each section, you have a button named "Create Test Cases". You will be asked to select the requirements for which you want to generate test cases and then a new test suite will be created in your Test Specification. You only have to drag and drop the newly created test suite to the "System testing" test suite and complete the test cases.
Upgrading jboss-ws-native
By default, when you install JBoss 5.1.0, Jboss WS native 3.1.2 is embedded. Unfortunately, this version of the module contains some bugs and we have been forced to update this framework to a more recent version: jbossws-native-3.4.0.GA. This is the most recent version of this module which is compatible with JBoss 5.1.0.GA. To upgrade JBoss WS native in your JBoss, please refer to the documentation available on Jboss’s web site:https://community.jboss.org/wiki/JBossWS-Installation. The archive to download is available here: http://download.jboss.org/jbossws/jbossws-native-3.4.0.GA.zip
Here is a summary of the steps to follow:
- Download and unzip the jbossws-native-3.4.0.GA.zip archive
- Make sure Ant is install on your system
- Open a terminal and go to the unzip archive jbossws-native-bin-dist
- Copy and paste the file ant.properties.example to ant.properties
- Edit this file and
- Update the location of your Jboss-5.1.0.GA instance to upgrade, might be /usr/local/jboss-5.1.0.GA
- Comment all the lines not relative to Jboss 5.1.0
- Set property jbossws.integration.target to jboss510
- Set property jboss.server.instance to gazelle
- Save this file
- Run "sudo ant -Djboss.server.instance=gazelle deploy-jboss510"
Note that this update will change the location of the SOAP endpoints deployed in your JBoss. Go to http://localhost:8080/jbossws/services to get the list of services deployed within your instance of JBoss.
- Log in to post comments
Using Webex under Linux
Some of us have experienced troubles with having webex working fully and perfectly in our Linux environment. Thanks to several tutorials found on the Internet we managed to fix the various issues we encountered. Below is an "how to" for setting up your environment. We are using Ubuntu 14.04, 64-bit arch.
Webex is freezing / I can't see shared screens / I can't chat
Firstly, it seems that Webex is more willing to fully work and to be stable when starting a webex session from Firefox instead of Chrome. If you were using Chrome, give a try with Firefox before going deeper in this tutorial.
We started from this point : http://askubuntu.com/questions/368270/how-to-i-make-cisco-webex-work-with-13-10-64bit
As a summary :
Execute the following command lines
$> sudo apt-get install libmux6:i386
$> sudo apt-get install libgcj14-awt:i386
This will fix a first set of issues. Then to check that all the required librairies are available on your computer, execute the following:
$> ldd $HOME/.webex/1324/*.so | grep 'not found'
This will give you the list of the missing libraries. Find the packages in which they are available using apt-file (if it is not yet installed, run $> sudo apt-get install apt-file)
$> apt-file search libraryName
For each library, install the i386 package, you might need libpangox-1.0-0:i386 and/or libpangoxft-1.0-0:i386. You can then try to attend a webex meeting.
I have no sound
Typically, if you try to use your headset you might see a message like this : "Audio device is unaccessible now". This section will help you with using your PC for voice. The solution we found is to use the 32-bits version of Firefox.
Download jre7 32-bits here
$> sudo apt-get remove firefox #uninstall the 64-bit version of firefox
$> sudo apt-get install firefox:i386 #install the 32-bit version of firefox
#Download java jre 32 bit, use the tar for 32-bit from the official website
$> mkdir -p $HOME/opt/java32/
$> mv Download/jre-7u60-linux-i586.tar.gz  $HOME/opt/java32/
$> cd  $HOME/opt/java32/
$> tar -xzvf jre-7u60-linux-i586.tar.gz
$> cd ~/opt/java32/jre1.7.0_60
$> mkdir -p ~/.mozilla/plugins/
$>ln -sf $PWD/lib/i386/libnpjp2.so ~/.mozilla/plugins/
You can know try again to join a webex meeting and to use your computer for audio.
Subversion (SVN)
Branches
Creation of a branch
From a working copy you can directly copy the trunk to the branch and switch on it:
svn copy ^/Maven/gazelle-tm/trunk ^/Maven/gazelle-tm/branches/my-branch -m "Create my branch"
svn switch ^/Maven/gazelle-tm/branches/my-branch
If you had previous modification on your working copy they will be keeped locally during the switch. Your are now ready to commit on the branch.
svn commit -m "new feature"
It is important to give a clear log message when you create the branch to easily find its revision number.
Know your branching revision number
Inria's forge does not support the auto detection of branching points, so you have to know the revision number of the branch creation for all merge commands. To do so, display the history:
svn log
You can limit the number of the history to avoid getting all the history of the project
svn log -l 20
And you can also get all the history of your branch directly with
svn log --stop-on-copy
The last line will be the branch creation revision.
Keep your branch synchronized with the trunk
All along your work on the branch, to avoid a final painful merge, it is well advise to regularly getting modification from the trunk into your branch.
First commit your work to get a clean working copy. Then merge the trunk into your local working copy of the branch:
svn merge -r 57456:HEAD ^/Maven/gazelle-tm/trunk
57456 is the branch creation revision number.
Resolve the confilcts if so, verify compilation and test your project before committing on the branch.
Merging
When your work is finally done on the branch, commited and ready to be share, you will need to reintegrate all modifications back in the trunk.
First, perform a last trunk synchronization (see above paragraph) and commit on the branch.
Then get a clean working copy of the trunk, by performing a checkout in another directory
svn checkout https://.../Maven/gazelle-tm/trunk tm-trunk
or performing an svn switch
svn switch ^/Maven/gazelle-tm/trunk
Make sure your working copy is up to date
svn update
And merge your branch into the local copy of the trunk
svn merge -r 57456:HEAD ^/Maven/gazelle-tm/my-branch
Resolve the confilcts if so, verify compilation and test your project before committing on the trunk.
svn commit -m "merge new feature"
Once the merge is finished and you have verified it is completely integrated, you can delete the old branch
svn delete ^/Maven/gazelle-tm/my-branch -m "Delete merged branch"
Troubleshouting
Error E160013: '/svn/xxx/!svn/xxx' path not found*
Perform a checkout in a new directory to get clean working copies. If you're merging two branches, do it for both branches.
Go fetch a coffee
Congratulation you've masterized svn branching !
Development tips (Use of common-module, calls to API, knowledge sharing and so on)
Add restful service for assertions statistics in MBV
To add a restful service that will be used by the AssertionManager, you have to :
- add in the dependency of your project, the ejb module, the jar mbval-documentation-ejb, with the version 0.9 or later
- add in the dependency of your project, the war module, the jar mbval-documentation-war, with the version 0.9 or later
- you have to add also the two module into your ear configuration as ejb and web module
- finally you have to add on the web.xml of your war module :
  <!-- REST web service -->
    <context-param>
        <param-name>resteasy.jndi.resources</param-name>
        <param-value>${yourProjectContextName}/AssertionWSProvider/local</param-value>
    </context-param>
    <context-param>
        <param-name>resteasy.servlet.mapping.prefix</param-name>
        <param-value>/rest</param-value>
    </context-param>
    <context-param>
        <param-name>resteasy.use.builtin.providers</param-name>
        <param-value>true</param-value>
    </context-param>

    <!-- resteasy -->

    <listener>
        <listener-class>org.jboss.resteasy.plugins.server.servlet.ResteasyBootstrap</listener-class>
    </listener>

    <servlet>
        <servlet-name>Resteasy</servlet-name>
        <servlet-class>org.jboss.resteasy.plugins.server.servlet.HttpServletDispatcher</servlet-class>
    </servlet>

    <servlet-mapping>
        <servlet-name>Resteasy</servlet-name>
        <url-pattern>/rest/*</url-pattern>
    </servlet-mapping>
Example of use :
http://k-project.ihe-europe.net/XDStarClient/rest/testAssertion/coverage/all
http://k-project.ihe-europe.net/XDStarClient/rest/testAssertion/coverage/idScheme?idScheme=CLO
Add restfull webservice to get Version of tools
To add a restful service that will be used by all tools, you have to :
- Add in dependencies in your ejb if not already present :
<dependency>
	<groupId>net.ihe.gazelle.maven</groupId>
	<artifactId>version</artifactId>
	<version>1.0.2</version>
	<type>ejb</type>
</dependency>
<dependency>
	<groupId>org.jboss.resteasy</groupId>
	<artifactId>resteasy-jaxrs</artifactId>
</dependency>
<dependency>
	<groupId>org.jboss.resteasy</groupId>
	<artifactId>resteasy-jaxb-provider</artifactId>
</dependency>
<dependency>
	<groupId>org.jboss.seam</groupId>
	<artifactId>jboss-seam-resteasy</artifactId>
</dependency>
<dependency>
	<groupId>org.scannotation</groupId>
	<artifactId>scannotation</artifactId>
	<version>1.0.2</version>
</dependency>
- Create file in ejb/src/main/resources/gzl.version.properties with content :
buildVersion=${build.version}
- Finally you have to add in the web.xml :
<!-- Resteasy -->
	<context-param>
		<param-name>resteasy.jndi.resources</param-name>
		<param-value>gazelle-proxy/VersionProvider/local</param-value>
		<!--If you need to declare more than one resource, separate them by comas -->
	</context-param>
	<!-- The following lines are required only if you decide not to use the application base path as base URI for your REST services -->
	<context-param>
		<param-name>resteasy.servlet.mapping.prefix</param-name>
		<param-value>/rest</param-value>
	</context-param>
	<!-- end of optional lines -->
	<listener>
		<listener-class>org.jboss.resteasy.plugins.server.servlet.ResteasyBootstrap</listener-class>
	</listener>
	<servlet>
		<servlet-name>Resteasy</servlet-name>
		<servlet-class>org.jboss.resteasy.plugins.server.servlet.HttpServletDispatcher</servlet-class>
	</servlet>
	<servlet-mapping>
		<servlet-name>Resteasy</servlet-name>
		<url-pattern>/rest/*</url-pattern>
	</servlet-mapping>
You can verify with the url like this : http://gazelle.ihe.net/proxy/rest/version
Calling EVSClient from a remote application
EVSClient exposes a servlet to handle the validation requests from other applications. A new module entitled gazelle-evsclient-connector will help you with sending your validation queries to the EVSClient tool.
Module identification
| groupId | net.ihe.gazelle |
| artifactId | gazelle-evsclient-connector |
| type | jar |
| version | 1.0.0 |
Content
This module contains two main classes and an interface.
- net.ihe.gazelle.evsclient.connector.api.EVSClientResults : Queries the REST web service of the EVSClient tool to retrieve the validation results
- net.ihe.gazelle.evsclient.connector.api.EVSClientServletConnector : Sends your validation request to EVSClient
- net.ihe.gazelle.evsclient.conector.model.EVSClientValidatedObject : Must be implemented by the java object that you intent to send to EVSClient
Usage
First of all, the Java classes which defines objects that you want to send to the EVSClient shall implement EVSClientValidatedObject and override the 3 methods. Below is an example from gazelle-model-tm
public class TestStepsData extends AuditedObject implements Serializable, Comparable, EVSClientValidatedObject {

	// [...]

// this is the value used as externalId by EVSClient, the couple (externalId, toolOid) SHALL
// be unique through EVSClient to ensure the retrieval of results
	@Override
	public String getUniqueKey() {
		return "stepdata_" + id;
	}

	@Override
	public PartSource getPartSource() {
		String filepath = getCompleteFilePath();
		File fileToValidate = new File(filepath);
		if (fileToValidate.exists()) {
			String content = null;
			content = Base64.encodeFromFile(filepath);
			return new ByteArrayPartSource(getType(), content.getBytes(Charset.forName("UTF-8")));
		} else {
			return null;
		}
	}

	@Override
	public String getType() {
		return "stepdata";
	}
Then, simply call the sendToValidation method:
public void getValidationLink(TestStepsData tsd) {
		if (tsd.isFile()) {
			EVSClientServletConnector.sendToValidation(tsd, FacesContext.getCurrentInstance().getExternalContext(),
					getEvsClientUrl(), ApplicationPreferenceManager.getStringValue("app_instance_oid"));
		}
	}
or retrieve results by using one of the static methods from EVSClientResults
public String getLastResultStatus(String proxyId) {
		String result = EVSClientResults.getLastResultStatusByExternalId(proxyId,
				ApplicationPreferenceManager.getStringValue("gazelle_proxy_oid"), getEvsClientUrl());
		if (result == null) {
			result = "not performed";
		}
		return result;
	}

	public String getLastResultStatusByTmId(String tmId) {
		String result = EVSClientResults.getLastResultStatusByExternalId(tmId,
				ApplicationPreferenceManager.getStringValue("app_instance_oid"), getEvsClientUrl());
		if (result == null) {
			result = "not performed";
		}
		return result;
	}

	public String getValidationStatus(String oid) {
		String result = EVSClientResults.getValidationStatus(oid, getEvsClientUrl());
		if (result == null) {
			result = "not performed";
		}
		return result;
	}

	public String getValidationPermanentLink(String oid) {
		String result = EVSClientResults.getValidationPermanentLink(oid, getEvsClientUrl());
		if (result == null) {
			result = "not performed";
		}
		return result;
	}

	public String getValidationPermanentLinkByProxyId(String proxyId) {
		String result = EVSClientResults.getLastResultPermanentLinkByExternalId(proxyId,
				ApplicationPreferenceManager.getStringValue("gazelle_proxy_oid"), getEvsClientUrl());
		if (result == null) {
			result = "not performed";
		}
		return result;
	}
Nothing else to do !
EVSClient configuration
In EVSClient, you need to add an entry in the Calling Tool list (from Administration menu) in order to tell the tool from where the results come. In this way, the EVSClient will be able to send back the result of the validation to your tool (only the OID is sent and can be reused in the future to retrieve the status and link of the validation report).
If your tool is neither a Gazelle proxy nor a Gazelle Test Management instance and you want the EVSClient to send back the result, you need to update the sendBackResultToTool() method from XMLResultDisplayManager and AbstractResultDisplayManager classes.
Enable TM to access test reports in simulators
From version 1.25 of simulator-parent, a feature enables the simulator to offer a REST web service to other applications; the one returns an XML report for a given test performed between a SUT and the simulator. What we call a test here, is an exchange between the simulator and the SUT, that means a request and one (or more) response(s).
Actually, during the pre-connectathon testing period, connectathon managers need the vendor to return logs as evidence of their successful (or not) tests against tools. In order to enable the simulators to provide such a report, a REST web service has been put in place. Developers, in order to enable this feature in your simulator, you need to:
- extend the TestReport abstract class
- update the WEB-INF/web.xml file of your simulator
- check your database entries in app_configuration table
The report will be produced in respect with the xsd file available here.
Note that to produce such a report, your simulator must be able to perform the appropriate matching between request and responses.
1. extend the TestReport abstract class (package: net.ihe.gazelle.simulator.ws)
Your new class must extend TestReport and implement TestReportLocal. Do not forget to annotate your class with @Stateless (javax.ejb.Stateless).
Abstract methods to override are:
protected TestReport newInstance(String testId, String test);
This first method should return a TestReport object with at least all the required attributes populated. That means that this method should instanciate a new object, call the setTestResults() method and returns the newly created object. testId argument stands for the id of the test as defined by you and test is the kind of test (defined by you too) if your simulator support different kinds of test (for instance DICOM and HL7 exchanges might not be stored in the same table). Note that the "test" param is optionnal if your tool supports only one kind of test.
protected void setTestResults();
This second method is used to populate the attribute of the TestReport object using the information retrieved into the database using the testId and the test arguments given in the REST request. A Message structure is at your disposal to enter the different information retrieved for each message exchanged during the test.
protected EntityManager createEntityManager();
This last method is used to instanciate the EntityManager. As the REST web service is a stateless bean, you cannot use the EntityManager managed by Seam.
An example of such a class is available in the HL7Common-ejb module (see net.ihe.gazelle.HL7Common.ws.HL7v2TestReport).
2. Update the WEB-INF/web.xml file of your simulator
Add the following lines in the web.xml file of the WEB-INF directory of you WAR module:
<!-- REST web service -->
<context-param>
 <param-name>resteasy.jndi.resources</param-name>
 <param-value>${contextRoot}/${RESTServiceName}/local</param-value>
</context-param>
<context-param>
 <param-name>resteasy.servlet.mapping.prefix</param-name>
 <param-value>/rest</param-value>
</context-param>
<listener>
 <listener-class>org.jboss.resteasy.plugins.server.servlet.ResteasyBootstrap</listener-class>
</listener>
<servlet>
 <servlet-name>Resteasy</servlet-name>
 <servlet-class>org.jboss.resteasy.plugins.server.servlet.HttpServletDispatcher</servlet-class>
</servlet>
<servlet-mapping>
 <servlet-name>Resteasy</servlet-name>
 <url-pattern>/rest/*</url-pattern>
</servlet-mapping>
Replace ${contextRoot} by the root context of your application (you can retrieve it in the pom.xml file of your EAR module) and replace ${RESTServiceName} by the name of the class you have created which implements TestReportLocal. If you have already a REST web service deployed, only complete the resteasy.jndi.resources param by adding ${contextRoot}/${RESTServiceName}/local separate from the other parameterse by a coma.
3. check your database entries in app_configuration table
The methods implemented in TestReport abstract class require entries in your database. Before running the new feature, make sure the application_url and application_name values are stored in the app_configuration table of your application.
Finally, compile and deploy your application, if everything is OK you should be able to access http://localhost:8080/${contextRoot}/rest/Hello. Then you will be able to retrieve the test report using URL http://localhost:8080/${contextRoot}/rest/GetReport?id=3&test=DICOM for instance.
Last tip, a static method from the TestReport class (buildTestReportRestUrl(Integer testId, String test)) can be used to build the URL to use to access the REST web service for a given object (identified by its id) and test (is optionnal if only one kind of test is supported by your tool). As an example see http://gazelle.ihe.net/OrderManager/message.seam?id=11 and http://gazelle.ihe.net/OrderManager/rest/GetReport?id=11
EntityManager, HQL queries, HQL filters …
To easily retrieve the EntityManager
Create a new class in your project which extends AbstractEntityManagerProvider (this class comes from gazelle-seam-tools-jar)
create a new file at ${YOUR_EJB}/src/main/resources/META-INF/services/net.ihe.gazelle.hql.providers.EntityManagerProvider which contains the full name of the class (package + class name) of the class which extends AbstractEntityManagerProvider
How to use it ?
EntityManager entityManager = EntityManagerService.provideEntityManager();
Gazelle Tag Library
We have defined some JSF tags for our needs, find below what they do and how to use them.
Using Gazelle tags
Your project should have a dependency to gazelle-seam-tools module. You can choose gazelle-tools as the parent of your project:
<parent>
	<groupId>net.ihe.gazelle.maven</groupId>
	<artifactId>gazelle-tools</artifactId>
	<version>2.110</version>
</parent>
- Update the pom.xml file located in your UI project
 <dependency>
	<groupId>net.ihe.gazelle.maven</groupId>
	<artifactId>gazelle-seam-tools-war</artifactId>
	<type>war</type>
</dependency>
- Update the pom.xml file locate in your EJB project
<dependency>
	<groupId>net.ihe.gazelle.maven</groupId>
	<artifactId>gazelle-seam-tools-jar</artifactId>
	<type>ejb</type></dependency>
- Update the faces-config.xml file locate in your UI project (src/main/webapp/WEB-INF folder) by adding the following lines after the </application> tag
<component>
	<component-type>net.ihe.gazelle.common.tag.PDFFont</component-type>
	<component-class>net.ihe.gazelle.common.tag.PDFFont</component-class>
</component>
<component>
	<component-type>gazelle-link</component-type>
	<component-class>net.ihe.gazelle.common.tag.LinkComponent</component-class>
</component>

<component>
	<component-type>gazelle-imagelink</component-type>
	<component-class>net.ihe.gazelle.common.tag.ImageLinkComponent</component-class>
</component>

<component>
	<component-type>gazelle-date</component-type>
	<component-class>net.ihe.gazelle.common.tag.DateComponent</component-class>
</component>

<component>
	<component-type>gazelle-safehtml</component-type>
	<component-class>net.ihe.gazelle.common.tag.SafeHtmlComponent</component-class>
</component>
If you want to use one of those tags in your XHTML, add a reference to the tag library: xmlns:g="http://www.ihe.net/gazelle"
Available tags
| Tag | Description |
| g:date | Displays a date, time or timestamp according to the time zone set in the database |
| g:imagelink | Displays an image with a link embedded |
| g:link | Builds a permanent link to the specified object and displays a specific label |
| g:pdffont | Used in Seam PDF to set the font to be used (allows a correct display when values are in Japanese for instance) |
| g:safehtml | Displays a string containing HTML tags but only keeps a set of allowed tags |
| g:column | Extend rich:column to integrate a filtering and sorting shortcut (jboss7 only) |
Date (g:date)
Displays a date, time or timestamp according to the time_zone set in the database.
| Attribute name | Type | Description | Default |
| value | java.util.Date | The date to be displayed | NULL |
| date | boolean | Indicates if we must display the date | TRUE |
| time | boolean | Indicates if we must display the time | TRUE |
| tooltip | boolean | Indicates if a tooltip shall be displayed to give the time zone. If set to false the time zone is added at the end of the string | FALSE |
The value of the time zone is loaded from the database or the local is used.
You may have an entity which manage the preferences of your application. To know where to look for the time_zone property, the system needs to know how to access those properties. To do so, you need to create a new class which implements the PreferenceProvider interface and be annotated with @MetaInfProvider. Then, do not forget to create an entry in your preference table with key time_zone. (Example of value: Europe/Paris). If you are developing a simulator and use a recent version of simulator-parent, you do not need to create any class, only check the presence of time_zone variable in app_configuration table.
Image Link (g:imagelink)
This tag behaves like the h:outputLink component except that the value attribute refers to an object and that an icon is displayed. The targeted link will be created depending on the type of the object.
| Attribute name | Type | Description | Default |
| value | java.lang.Object | The object targeted by this link | NULL |
| icon | Text | The icon to display | NULL |
| fontIcon | Text | a font flat icon (ex: "fa fa-info-circle text-info") | NULL |
| width | Positive integer | Width of the icon (in pixels) | NULL |
| height | Positive integer | Height of the icon (in pixels) | NULL |
| target | Text | Where to open the link | NULL |
| styleClass | Text | css class to apply to this component | NULL |
| rendered | boolean | Indicates whether to render or not the component | TRUE |
To use this tag, you need to implement a class which will be used by the component to compute the URL of the object to display. To do so, create a new class which implements the LinkDataProvider interface (from package net.ihe.gazelle.common); annotate this class with @MetaInfServices(LinkDataProvider.class).
Below is an example from gazelle-x-validation module.
@MetaInfServices(LinkDataProvider.class)
public class CrossValidatorLinkDataProvider implements LinkDataProvider {

	public static final CrossValidatorLinkDataProvider instance(){
		return new CrossValidatorLinkDataProvider();
	}

	private static List<class<?>> supportedClasses;

	static {
		supportedClasses = new ArrayList<class<?>>();
		supportedClasses.add(GazelleCrossValidatorType.class);
		supportedClasses.add(Rule.class);
	}

	@Override
	public List<class<?>> getSupportedClasses() {
		return supportedClasses;
	}

	@Override
	public String getLabel(Object o, boolean detailed) {
		StringBuilder label = new StringBuilder();
		if (o instanceof GazelleCrossValidatorType){
			GazelleCrossValidatorType validator = (GazelleCrossValidatorType) o;
			label.append(validator.getName());
			label.append(" - ");
			label.append(validator.getAffinityDomain());
			if (detailed){
				label.append(" (");
				label.append(validator.getVersion());
				label.append(')');
			}
		} else if (o instanceof Rule){
			Rule rule = (Rule) o;
			label.append(rule.getKeyword());
			if (detailed){
				label.append(" (");
				label.append(rule.getVersion());
				label.append(')');
			}
		}
		return label.toString();
	}

	@Override
	public String getLink(Object o) {
		StringBuilder url = new StringBuilder();
		if (o instanceof GazelleCrossValidatorType){
			GazelleCrossValidatorType validator = (GazelleCrossValidatorType) o;
			url.append("/xvalidation/doc/validator.seam?id=");
			url.append(validator.getId());
		} else if (o instanceof Rule){
			Rule rule = (Rule) o;
			url.append("/xvalidation/doc/rule.seam?id=");
			url.append(rule.getId());
		}
		return url.toString();
	}

	@Override
	public String getTooltip(Object o) {
		// TODO Auto-generated method stub
		return null;
	}
Then, you can use the g:imagelink tag as follows:
 <g:imagelink value="#{rule}" icon="/img/icons64/kfind.gif" styleClass="tableIcon" height="22px" width="22px"/>
 <g:imagelink value="#{rule}" fontIcon="fa fa-info-circle text-info"/>
Note that either the icon (+ optionally height and width) or the fontIcon attribute is mandatory. fontIcon attribute is available from version 2.0.2 of gazelle-tools.
Link (g:link)
This tag behaves like the h:outputLink component except that the value attribute refers to an object and that the text displayed is a pre-defined label. The targeted link will be created depending on the type of the object.
| Attribute name | Type | Description | Default |
| value | java.lang.Object | The object targeted by this link | NULL |
| tooltip | boolean | Indicates whether to display or not a tooltip | FALSE |
| rendered | boolean | Indicates whether to render or not the component | TRUE |
| styleClass | Text | css class to apply to this component | NULL |
| detailed | boolean | Uses a longer label as displayed text | FALSE |
This component uses the same mecanisms as the g:imagelink component, that means that you need to implement the LinkDataProvider interface.
PDF Font (g:pdffont)
pdffont component is used in p:document to defined the font to be used. You can also use the p:font component of the PDF Seam library but we created this tag because we encountered some issues when displaying Japanese characters.
| Attribute name | Type | Description |
| size | Integer | The point size of the font |
| style | Text | The font styles. Any combination of: NORMAL, BOLD, ITALIC, OBLIQUE, UNDERLINE, LINE-THROUGH |
| color | Text | The font color |
| embedded | boolean | Indicates whether to embedd the font in the final PDF or not |
Safe HTML (g:safehtml)
Rendered HTML strings after removing a set of not allowed HTML tags and attributes. Owasp policy is also applied.
Allowed tags are "p", "div", "h1", "h2", "h3", "h4", "h5", "h6", "ul", "ol", "li", "blockquote", "caption", "center", "cite", "col", "colgroup", "em", "pre", "q", "table", "tbody", "td", "tfoot", "th", "thead", "tr"
Allowed attributes are
- "href" and "target" for "a" tag
- "alt", "src", "border", "height" and "width" for "img" tag
- "border", "height", "width", "cellspacing", "cellpadding", "bgcolor", "fgcolor", "valign"
| Attribute name | Type | Description |
| value | java.lang.String | The HTML string to be displayed (HTML tags will be interprated) |
Column (g:column)
Provides built-in sorting and filtering to richfaces4 dataTable column.
added attributes are
- "sortBy", "filterBy" and "sortOrder".
| Attribute name | Type | Description |
| sortBy | java.lang.String | Defines a bean property which is used for sorting of a column. |
| filterBy | java.lang.String | Defines iterable object property which is used when filtering performed. |
| sortOrder | java.lang.String | SortOrder is an enumeration of the possible sort orderings("ascending","descending","unsorted"). Default value is "unsorted" |
Insert (g:insert)
allows to insert and highlight the file from the application context into the page.
highlighting can be customized by overiding the css present in cdk-tags artifact.
Allowed attributes are
- "highlight", "content" and "src".
| Attribute name | Type | Description |
| content | java.lang.String | Defines the String, inserted with this component |
| highlight | java.lang.String |
Highlight is an enumeration of the possible highlighting ("groovy","java","beanshell","bsh","xml","xhtml","lzx","html","cpp","cxx","c++"). Default value is "xml" |
| src | java.lang.String | Defines the path to the file with source code.This attribute is alternative to "content" attribute. |
Spacer (g:spacer)
Spacer is a simple component that renders an invisible image with the given width, height. Usually it is used to separate elements of page design.
Allowed attributes are
- "height" and "width".
| Attribute name | Type | Description |
| height | java.lang.String | The height of the spacer. Default value is "1 px" |
| width | java.lang.String | The width of the spacer. Default value is "1 px" |
Generate Java server code from the wsdl
To generate the java code, server side, from the wsdl, the better way is to use the tool apache-cxf ( http://cxf.apache.org/download.html ) . Unzip this tool and go to the folder bin.
In this folder you will find the script wsdl2java.sh, use it for the generation.
example :
aboufahj@yaka:~/Applications/apache-cxf-2.7.6/bin$ ./wsdl2java -p net.ihe.gazelle.xdstar.validator.ws -all -d /home/aboufahj/tmp/xdsr2/ /home/aboufahj/Documents/workspace/ITI/wsdl/XCARespondingGatewayQuery.wsdl
After generating, there still missing annotations in the generated interfaces, add :
@BindingType(javax.xml.ws.soap.SOAPBinding.SOAP12HTTP_BINDING)
@Addressing(enabled=true)
and on the generated implementation class, you have to add :
@Stateless
HQLQueryBuilder
We can generate some Java classes to easily build HQL queries of type HQLQueryBuilder (this is a set of classes specific to the Gazelle project and available in gazelle-seam-tools module)
Three examples
private SystemActorProfiles getSap(String systemKeyword, String actor, String profile, String option){
	SystemActorProfilesQuery sapQuery = new SystemActorProfilesQuery(em);
	sapQuery.system().keyword().eq(systemKeyword);
	sapQuery.actorIntegrationProfileOption().actorIntegrationProfile().actor().keyword().eq(actor);
	sapQuery.actorIntegrationProfileOption().actorIntegrationProfile().integrationProfile().keyword().eq(profile);
	sapQuery.actorIntegrationProfileOption().integrationProfileOption().keyword().eq(option);
	return sapQuery.getUniqueResult();
}
TestRolesQuery trQuery = new TestRolesQuery(entityManager);
	trQuery.roleInTest().testParticipantsList().tested().eq(Boolean.TRUE);
	trQuery.test().testType().keyword().eq(TestType.TYPE_CONNECTATHON_STRING);
	trQuery.test().testStatus().keyword().eq("ready");
	trQuery.roleInTest().addFetch();
	trQuery.roleInTest().testParticipantsList().addFetch();
	trQuery.roleInTest().testParticipantsList().actorIntegrationProfileOption().addFetch();
	trQuery.roleInTest().testParticipantsList().aipo().addFetch();
	trQuery.roleInTest().testParticipantsList().aipo().systemActorProfiles().system().eq(system);
	trQuery.roleInTest().testParticipantsList().actorIntegrationProfileOption().eq(aipo);
	trQuery.test().keyword().order(true);
	List<TestRoles> roles = trQuery.getList();
}
@Override
public void appendFiltersFields(HQLQueryBuilder<TestInstance> queryBuilder) {
	super.appendFiltersFields(queryBuilder);
	TestInstanceQuery testInstanceQuery = new TestInstanceQuery(queryBuilder);
	if (testingSessionIsNull){
		testInstanceQuery.testingSession().isNull();
	}
	if (testType != null){
		testInstanceQuery.test().testType().eq(testType);
	}else{
		testInstanceQuery.test().testType().keyword().eq(TestType.TYPE_CONNECTATHON_STRING);
	}
}
- TestInstanceQuery
- Class used to execute queries
- Can be built "from scratch", with an entity manager
- Can built from a HQLQueryBuilder, to add constraints
- Implements HQLQueryBuilderInterface<TestInstance>, gathering all the public methods from HQLQueryBuilder
- Inherit from TestInstancePath
- TestInstancePath
- Allow to browse the attributes of the TestInstance entity
- Each attribute is mapped by a method which returns a path (ex : test(), lastStatus(), ...)
- The paths can be browsed by stringing the methods together (testInstanceQuery.test().testType().eq(testType);)
- Paths are strongly typed, we cannot discard it
- Inherit from HQLSafePathEntity (owned a method addFetch()), or from the class "Parent"Path, in order to inherit of its paths.
- A simple path (ex : HQLSafePathBasic<String> description()) is a HQLSafePathBasic, we allow to perform
- a like on String
- a comparison on dates/numbers
- an ordering (order(boolean ascending))
Usage
<build>
	<plugins>
		<plugin>
			<groupId>org.bsc.maven</groupId>
			<artifactId>maven-processor-plugin</artifactId>
		</plugin>
	</plugins>
</build>
Advantages
- Static analysis of the requests at compilation time : existing path, check the type of parameters (In the example above, the type of testType is checked)
drawbacks
- Longer compliation time (generation and compilation of generated classes)
Design
- The creation of an interface for the HQLQueryBuilder (HQLQueryBuilderInterface) shall enable the developer to handle the concept of "requestor" without using the class HQLQueryBuilder. This interface shall also, at the very end, containts the documentation of the API.
- The HQLQueryBuilder remains based on paths, the generated code shall uniquely allow to replace the String by stronly typed Java objects.
- A path always inherit from the HQLSafePath. This class is a path from the HQLQueryBuilder. A lot operations are already available on this path (list of distinct items, eq(), isNull(), ...)
- The paths to the basic types are of type HQLSafePathBasic, which include comparators (ge, like, ...) and the ordering (order).
- The paths to the entities are of type HQLSafePathEntity, the particularity of which is the capability to be fetched at runtime (storage at session level and later retrieval, to avoid the "lazy exception")
- by using the Processor API of JDK6
- with the pugin maven-annotation-plugin
- with code inspired by "jpamodelgen" from JBoss
How to configure jpa-identity-store
If there is this warning message when a Gazelle application is launching :
Warn :[IdentityManager] no identity store available - please configure an identityStore if identity management is required
You need to add in components.xml file of the WEB-INF directory of your main WAR, the following lines
<security:jpa-identity-store
	user-class="net.ihe.gazelle.users.model.User"
    role-class="net.ihe.gazelle.users.model.Role"/>
In user class, add annotations :
- @UserPrincipal on getUsername()
- @UserFirstName on getLastname()
- @UserLastName on getFirstname()
- @UserPassword on getPassword()
- @UserRoles on getRoles()
Make sure that you have the following setter methods: setUsername, setLastname, setFirstname, setPassword and setRoles.
In role class, add annotation :
- @RoleName on getname()
Now the warning message disappeared.
If you also get a warning concerning <security:identity/> and the authenticate method, add the following in your components.xml
<security:identity authenticate-method="#{authenticator.authenticate}"/> How to generate java classes for a specific HL7 v2 message with Hapi from HL7 Message Profile.
In some cases, when we use, for example, EVSClient tool to validate HL7v2 messages, it appears that the validation result is FAILED in spite of we are certain that this validation result should be PASSED.
This problem appears when the message structure defined by IHE is different from the initial message structure defined by HL7. The solution is to generate the message classes, used by Hapi for the validation.
This supposes to create, test, and update the Gazelle HL7 Validator project and the EVSClient project. Follow the steps below :
Generate the classes corresponding to the HL7 message using Hapi and the HL7 Message Profile.
- Get the Data project (gazelle/Data/trunk) from Gazelle's SVN repository, this project contains all the HL7 message profiles used by the Gazelle HL7 Validator tool.
- Get the gazelle-hl7-messagestructures project (Maven/gazelle-hl7-messagestructures/trunk). This is a Maven Project containing all the classes which have been overriden because the ones from Hapi were not correct.
- Check that the HL7 Message Profile you need is available in the Data project; copy the path to this file and go to Gazelle Master Model or Gazelle HL7 Validator to retrieve its OID.
- You will need to generate the package corresponding to this message profile; to do so, open the pom.xml file under the gazelle-hl7-messagestructure project and process as follows :
- In the plugins part, you may either add your new classes to an existing package or create a new package. specify the message profile to use.
Add the generated classes in the Gazelle HL7 Validator project.
- A new version of gazelle-hl7-messagestructures is available in your local Maven repository. To perform some testing, we will first update the dependency of the Gazelle HL7 Validator to match the new SNAPSHOT version of the gazelle-hl7-messagestructures module. Open the pom.xml file available at the root of the Gazelle HL7 Validator project and update the version of the module in the properties (gazelle.hl7.messagestructures.version)
- Compile this new version
- Some unit tests are available in the test forder of the Gazelle HL7 Validator project that you can use to make sure that generating a new version of the classes fixed the issues.
- Once you are fine with the generated class, you can release the gazelle-hl7-messagestructures module and update the Gazelle HL7 Validator to make use of this newly released version of the module.
- Finally, when you update Gazelle HL7 Validator on your server, do not forgot to apply the database updates available in gazelle-hl7-messagestructures/target/import.sql, this will automatically fix the name of the package to be used when calling one of the HL7 message profiles for which classes have been overriden.
Add the generated classes in the EVSClient project. (Used for the HL7 tree)
- You will need to add the library in the EVSClient project. This library will be used by Hapi to construct the HL7 Tree. See the Message Content part in the validation report of the EVSClient.
- To add this library, only update the version of the dependency in EVSClient-ejb/pom.xml.
How to launch Unit tests in project
To explain this, i take gazelle-proxy-ejb as example.
Frist of all, you need to create a class which contains your tests in src/test/java.
In this class you must create methods which execute your tests with @Test above your methods.
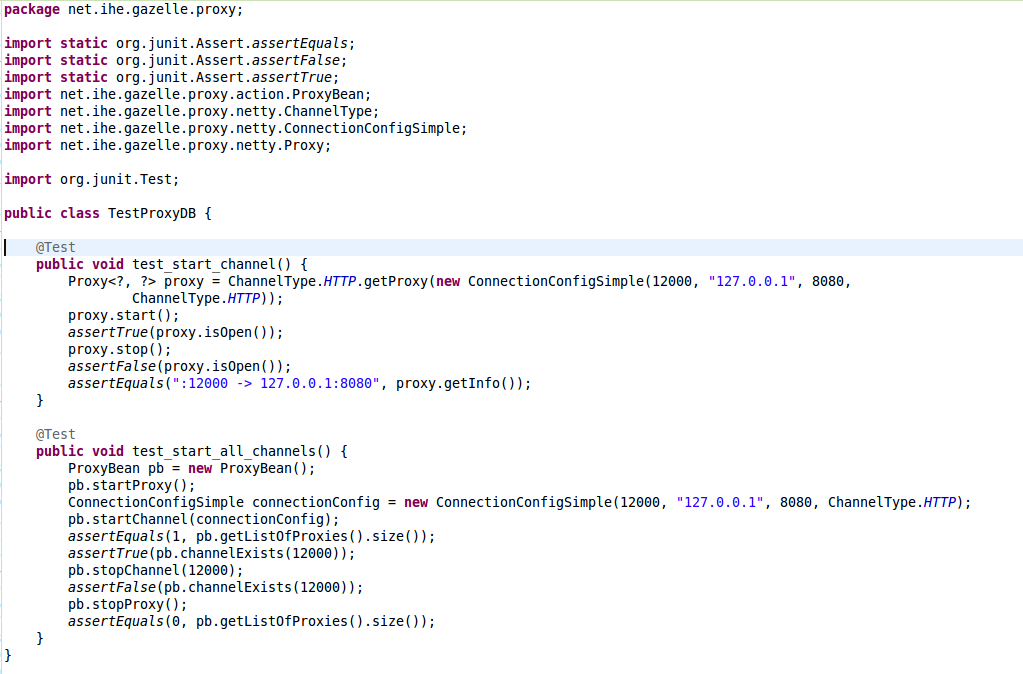
After, you nedd to create a class named AllTests.java in which you add @SuiteClasses({ YourTestsClass.class }):

To finish, you open pom.xml and add maven-surefire-plugin like this :
<plugin>
	<groupId>org.apache.maven.plugins</groupId>
	<artifactId>maven-surfire-plugin</artifactId>
	<version>2.16</version>
	<configuration>
		<forkMode>once</forkMode>
		<argLine>-enableassertions</argLine>
	</configuration>
</plugin>
Your tests will be executed when you launch mvn clean package or mvn test
How to properly call REST web services using resteasy
If you want to easily call a REST web services as the ones we describe in the article entitled "RESTful webservices running on JBoss", you may use Resteasy. Be very careful when you use it because we noticed that the default behaviour of Resteasy does not correctly close the connections (we experienced the issues with resteasy-jaxrs/2.0-beta-2).
We used to write the following code:
ClientResponse<String> response = null;
ClientRequest request = new ClientRequest("http://monurl");
request.queryParameter(idName, id);
response = request.get(String.class);
ClientRequest uses an executor to obtain the response. Without any parameter, a new executor is created for each new request and the connections are not automatically closed. A proposed fix is to use a unique executor that you can defined like this:
private static final ClientExecutor CLIENT_EXECUTOR = new ApacheHttpClientExecutor(new HttpClient(new MultiThreadedHttpConnectionManager()));
[...]
ClientRequest request = new ClientRequest("http://monurl", CLIENT_EXECUTOR);
Internally, ApacheHttpClientExecutor will reuse the same HttpClient for each request with an automatic connection pool.
How to use the C3P0 JDBC connection pool in your Maven Project.
How use the C3P0 JDBC connection pool in your Maven Project.
See the link below for more details about the C3P0 JDBC connection pool :
In the "pom.xml" file of your ejb project :
Add the dependencies below:
<dependency>
 <groupId>c3p0</groupId>
 <artifactId>c3p0</artifactId>
 <version>0.9.1.2</version>
</dependency>
<dependency>
 <groupId>org.hibernate</groupId>
 <artifactId>hibernate-c3p0</artifactId>
 <version>4.2.20.Final</version>
</dependency>
In the "persistence.xml" file of your ejb project, in the <properties> tag, add the property below:
<property name="hibernate.connection.url" value="${jdbc.connection.url}" />
<property name="hibernate.connection.driver_class" value="${jdbc.driver.class}" />
<property name="hibernate.connection.username" value="${jdbc.user}" />
<property name="hibernate.connection.password" value="${jdbc.password}" />
<property name="hibernate.connection.provider_class" value="org.hibernate.connection.C3P0ConnectionProvider" />
<property name="hibernate.c3p0.min_size" value="${min.pool.size}" />
<property name="hibernate.c3p0.max_size" value="${max.pool.size}" />
<property name="hibernate.c3p0.max_statements" value="50" />
<property name="hibernate.c3p0.acquire_increment" value="1" />
<!-- new values for fixing the DB issues with Jboss7 -->
<property name="hibernate.c3p0.idle_test_period" value="40" />
<property name="hibernate.c3p0.timeout" value="30" />
<!-- new properties that fix the DB issues we have in Jboss 7 -->
<property name="hibernate.c3p0.unreturnedConnectionTimeout" value="400"/>
<property name="hibernate.c3p0.debugUnreturnedConnectionStackTraces" value="true"/>
In the parent POM of your project, be sure to have, In the <properties> tag of each <profile> :
<jdbc.connection.url>jdbc:postgresql:your-data-base-name</jdbc.connection.url>
<jdbc.driver.class>org.postgresql.Driver</jdbc.driver.class>
<jdbc.user>username</jdbc.user>
<jdbc.password>password</jdbc.password>
<min.pool.size>1</min.pool.size>
<max.pool.size>3</max.pool.size>
Java interface generation
From gazelle-seam-tools-jar:2.13 the following annotation @GenerateInterface is available, it allows the generation of the Interface from the signature of the class.
The name of the Interface to be generated as to be given as parameter (the package used in the same as the one of the class)
By default, the @Local (from Seam) annotation is added in the interface, if you rather want an interface with the @Remote annotation, it is possible.
Examples
- @GenerateInterface("TotoLocal") -> generates an interface named TotoLocal and annotated with @Local
- @GenerateInterface(value = "TotoRemote", isLocal = false, isRemote = true) -> generates an interfaced named TotoRemote and annotated with @Remote
- @GenerateInterface(value = "TotoLocal2", extendsInterface = "toto.Titi") -> generates an inteface anmed TotoLocal2, annontated @Local and which extends the Titi interface from the toto package
RESTful webservices running on JBoss
JBoss provides a simple way to implement REST webservices, this page explains how to use the RestEasy library.
What is REST ?
REST stands for REpresentational State Transfer, it is based on HTTP/1.1.
A RESTful web service is a simple web service implemented using HTTP and the principles of REST. It is a collection of resources, with three defined aspects:
- the base URI for the web service, such as http://gazelle.ihe.net/RetrieveValueSet
- the Internet media type of the data supported by the web service.
- the set of operations supported by the web service using HTTP methods (e.g., POST, GET, PUT or DELETE).
Pre-requisites
Implementing RESTful web services with RestEasy for a use on JBoss requires JBoss-seam 2.2 or higher and JBoss 5 or higer.
Using RestEasy in a maven project
If you are about to use ReastEasy into a Gazelle maven project, a good way to proceed is to use gazelle-seam Maven project as a parent for your project. Note that version 1.11 of gazelle-seam artifact requires Jboss-seam 2.2.1.Final.
<parent>
<groupId>net.ihe.gazelle.maven</groupId>
<artifactId>gazelle-seam</artifactId>
<version>1.11</version>
</parent>
You EJB module needs to be dependant of jaxrs-resteay, a module from the JBoss community. You will also need to add a dependency to scannotation package. Add the following lines in the pom.xml file of your EJB module.
<dependency>
 <groupId>org.jboss.resteasy</groupId>
<artifactId>resteasy-jaxrs</artifactId>
<version>${version.resteasy}</version>
</dependency>
<dependency>
<groupId>org.scannotation</groupId>
<artifactId>scannotation</artifactId>
<version>1.0.2</version>
</dependency>
Using ${version.resteasy} instead of a static version number maintains the consistency between your project and the libraries supported by the version of JBoss-seam you use.
Implementation
As we do when implementing SOAP web services, adding some annotations in Java classes and interfaces is quitly enough to declare REST services. In addition of these annotations, some updates need to be done in the WEB-INF/web.xml file of your WAR module.
The most basic annotations are exposed here.
First of all, you can choose to customize the URI in which the service will be reachable using the @Path annotation. Note that the base URI ("/") is the base URL of the WAR module. That means that it refers to the main directory of your WAR archive. Then, for each method you will be able to customize the different parameters using either @QueryParam or @PathParameter.
Let's take an example. The project is named TestRest and the web interface will be reachable at http://localhost:8080/TestRest. We will first create a local interface to define two services (Test1 and Test2), the base URI of which will be /resteasy. Consequently, the service will be reachable at http://localhost:8080/TestRest/resteasy/Test1.
import javax.ejb.Local;
import javax.ws.rs.GET;
import javax.ws.rs.Path;
import javax.ws.rs.Produces;
import javax.ws.rs.QueryParam;

@Local
@Path("/") // base URI will be defined in the web.xml file
public interface TestLocal {
/**
* This method will return "Hello username" where username is the string given as parameter
* To call this method the URL to use is http://localhost:8080/TestRest/resteasy/Test1?username=toto
*/
@GET // HTTP GET method
@Path("/Test1") // path of the service
public String test1(@QueryParam("username") String username);

/**
 * This method will return "Welcome username" where username is the string given as parameter
 * To call this method, the URL to use is http://localhost:8080/TestRest/resteasy/Test2/toto
*/
@GET
@Path("/Test2")
public String test2(@PathParam("username") String username);
}
Then, you have to create the stateless bean wich implements this interface as you can show it below.
import javax.ejb.Stateless;

@Stateless
public class Test implements TestLocal {

public String test1(String username)
{
return "Hello " + username;
}

public String test2(String username)
{
return "Welcome " + username;
}
}
Finally, you will have to update the web.xml file contained in your WAR module in order to bind this service and to declare filters. The lines to append to your file are available below.
<context-param>
<param-name>resteasy.jndi.resources</param-name>
<param-value>TestRest/Test/local</param-value>
<!--If you need to declare more than one resource, separate them by comas -->
</context-param>
<!-- The following lines are required only if you decide not to use the application base path as base URI for your REST services -->
<context-param>
<param-name>resteasy.servlet.mapping.prefix</param-name>
<param-value>/resteasy</param-value>
</context-param>
<!-- end of optional lines -->
<listener>
<listener-class>org.jboss.resteasy.plugins.server.servlet.ResteasyBootstrap</listener-class>
</listener>
<servlet> <
servlet-name>Resteasy</servlet-name>
<servlet-class>org.jboss.resteasy.plugins.server.servlet.HttpServletDispatcher</servlet-class>
</servlet>
<servlet-mapping>
<servlet-name>Resteasy</servlet-name>
<url-pattern>/resteasy/*</url-pattern>
</servlet-mapping>
Compile and deploy your application. You should be able to access the web interface at http://localhost:8080/TestRest and the RESTful webservices at http://localhost:8080/TestRest/resteasy
Further documentation
Full JBoss documentation concerning RestEasy is available here.
- Log in to post comments
Gazelle SSO clients for CAS 5.1.5
This article explains how to connect our application with the "new" version of Apereo CAS 5.1.5.
Maven dependencies
In your ejb pom.xml you need to have cas-client-core as dependency.
<dependency>
   <groupId>net.ihe.gazelle</groupId>
   <artifactId>gazelle-cas-client</artifactId>
   <version>1.0.0</version>
</dependency>
Warning, if you have a parent that include the previous cas-client (3.1.10.IHE.1), you must exclude it. Example with simulator-common as parent, you must add the following in you ejb pom.xml :
<dependency>
    <groupId>net.ihe.gazelle.simulators</groupId>
    <artifactId>simulator-common-ejb</artifactId>
    <type>ejb</type>
    <exclusions>
        <exclusion>
            <groupId>org.jasig.cas</groupId>
            <artifactId>cas-client-core</artifactId>
        </exclusion>
    </exclusions>
</dependency>
Web deployment descriptor
Now you need to update the WEB-INF/web.xml file in your war module.
First remove all previous filters and properties that concern the CAS, then add the followings elements :
<context-param>
		<param-name>configurationStrategy</param-name>
		<param-value>PROPERTY_FILE</param-value>
	</context-param>

	<context-param>
		<param-name>configFileLocation</param-name>
		<param-value>/opt/gazelle/cas/file.properties</param-value>
	</context-param>

	<filter>
		<filter-name>CAS Single Sign Out Filter</filter-name>
		<filter-class>org.jasig.cas.client.session.SingleSignOutFilter</filter-class>
	</filter>
	<filter-mapping>
		<filter-name>CAS Single Sign Out Filter</filter-name>
		<url-pattern>/*</url-pattern>
	</filter-mapping>
	<listener>
		<listener-class>org.jasig.cas.client.session.SingleSignOutHttpSessionListener</listener-class>
	</listener>

	<filter>
		<filter-name>Gazelle CAS Authentication Filter</filter-name>
		<filter-class>net.ihe.gazelle.cas.client.authentication.AuthenticationFilter</filter-class>
	</filter>
	<filter-mapping>
		<filter-name>Gazelle CAS Authentication Filter</filter-name>
		<url-pattern>/cas/login</url-pattern>
	</filter-mapping>

	<filter>
		<filter-name>Gazelle CAS logout filter</filter-name>
		<filter-class>net.ihe.gazelle.cas.client.authentication.LogoutFilter</filter-class>
	</filter>
	<filter-mapping>
		<filter-name>Gazelle CAS logout filter</filter-name>
		<url-pattern>/cas/logout.seam</url-pattern>
	</filter-mapping>

	<filter>
		<filter-name>CAS Validation Filter</filter-name>
		<filter-class>org.jasig.cas.client.validation.Cas30ProxyReceivingTicketValidationFilter
		</filter-class>
	</filter>
	<filter-mapping>
		<filter-name>CAS Validation Filter</filter-name>
		<url-pattern>/*</url-pattern>
	</filter-mapping>

	<filter>
		<filter-name>CAS HttpServletRequest Wrapper Filter</filter-name>
		<filter-class>org.jasig.cas.client.util.HttpServletRequestWrapperFilter</filter-class>
	</filter>
	<filter-mapping>
		<filter-name>CAS HttpServletRequest Wrapper Filter</filter-name>
		<url-pattern>/*</url-pattern>
	</filter-mapping>
Then add, still in web.xml the following configuration properties:
<context-param>
    <param-name>configurationStrategy</param-name>
    <param-value>PROPERTY_FILE</param-value>
</context-param>
<context-param>
    <param-name>configFileLocation</param-name>
    <param-value>/opt/gazelle/cas/file.properties</param-value>
</context-param>
The last one indicates where the gazelle-cas-client will find information to connect with the CAS server.
Navigation configuration
You also need to configure your page.xml file to:
- Configure correctly the logout action (logout from CAS not only from the application)
- Keep the URL parameters when user logged in
To do so, configuration the navigation section as shown below
 <page view-id="*">
		<navigation from-action="#{identity.logout}">
			<rule if="#{!applicationConfigurationManager.isWorksWithoutCas()}">
				<redirect view-id="/cas/logout.xhtml"/>
			</rule>
			<rule if="#{applicationConfigurationManager.isWorksWithoutCas()}">
				<redirect view-id="/home.xhtml"/>
			</rule>
		</navigation>
	</page>
	<page view-id="/cas/login">
		<navigation>
			<redirect view-id="/home.xhtml"/>
		</navigation>
	</page>
Menu bar configuration
The links in your menu bar shall look like the following:
<h:panelGroup rendered="#{identity.loggedIn}">
        <li class="dropdown"><a href="#" class="dropdown-toggle"
                                data-toggle="dropdown" role="button" aria-expanded="false">
            <h:outputText
                    id="menuWelcomeId" value="#{credentials.username}"/> <span
                class="caret"/> </a>
            <ul class="dropdown-menu" role="menu">
                <li>
                    <s:link id="menuLogoutId" view="/home.seam"
                            action="#{identity.logout()}"
                            value="#{messages['net.ihe.gazelle.simulators.Logout']}"
                            propagation="none"/>
                </li>
            </ul>
        </li>
    </h:panelGroup>
    <h:panelGroup>
        <li>
            <a4j:commandLink
                    value="#{messages['gazelle.simulator.Login']}"
                    action="#{applicationConfiguration.loginByIP()}"
                    rendered="#{not identity.loggedIn and applicationConfigurationManager.isWorksWithoutCas()}"/>
        </li>
        <li>
            <s:link id="menuLoginCasId" view="/cas/home.seam"
                    value="#{messages['gazelle.simulator.loginCAS']}"
                    rendered="#{not identity.loggedIn and not applicationConfigurationManager.isWorksWithoutCas()}"
                    propagation="none">
<f:param name="request" value="#{request.requestURL}" disable="#{request.queryString != null}"/>
<f:param name="request" value="#{request.requestURL}?#{request.queryString}" disable="#{request.queryString == null}"/>
</s:link> </li> </h:panelGroup>
Configuration
Next step is to create the configuration file declared in your deployment decriptor.
On the system where the application is deployed, create the file /opt/gazelle/cas/file.properties containing:
serverName=http://localhost
casServerUrlPrefix=https://sso.ihe-europe.net/cas
casServerLoginUrl=https://sso.ihe-europe.net/cas/login
casLogoutUrl=https://sso.ihe-europe.net/cas/logout
Clean up
The application preference cas_url is no longer required, think about removing it with an update.sql script in the next release.
Extensions of AuthenticationFilter and Cas20ProxyReceivingTicketValidationFilter classes are no longer requeried, do not forget to remove them.
Gazelle SSO clients for CAS 5.1.5 (Double CAS authentication)
Maven dependencies
Add as dependency in your ejb
<dependency>
<groupId>net.ihe.gazelle</groupId>
<artifactId>gazelle-cas-client</artifactId>
<version>${gazelle.cas.client.version}</version>
</dependency>
Web deployment descriptor
Now you need to update the WEB-INF/web.xml file in your war module.
First remove all previous filters and properties that concern the CAS, then add the followings elements
<filter>
<filter-name>CAS Single Sign Out Filter</filter-name>
<filter-class>org.jasig.cas.client.session.SingleSignOutFilter</filter-class>
</filter>
<filter-mapping>
<filter-name>CAS Single Sign Out Filter</filter-name>
<url-pattern>/*</url-pattern>
</filter-mapping>
<listener>
<listener-class>org.jasig.cas.client.session.SingleSignOutHttpSessionListener</listener-class>
</listener>
<filter>
<filter-name>CAS Validation Filter</filter-name>
<filter-class>net.ihe.gazelle.atna.questionnaire.authentication.GSSDoubleCasTicketValidationFilter</filter-class>
</filter>
<filter-mapping>
<filter-name>CAS Validation Filter</filter-name>
<url-pattern>/*</url-pattern>
</filter-mapping>
<filter>
<filter-name>Gazelle CAS logout filter</filter-name>
<filter-class>net.ihe.gazelle.atna.questionnaire.authentication.GSSDoubleLogoutFilter</filter-class>
</filter>
<filter-mapping>
<filter-name>Gazelle CAS logout filter</filter-name>
<url-pattern>/cas/logout</url-pattern>
</filter-mapping>
<filter>
<filter-name>Gazelle Main CAS Authentication Filter</filter-name>
<filter-class>net.ihe.gazelle.cas.client.authentication.AuthenticationFilter</filter-class>
<init-param>
<param-name>cas</param-name>
<param-value>main</param-value>
</init-param>
</filter>
<filter-mapping>
<filter-name>Gazelle Main CAS Authentication Filter</filter-name>
<url-pattern>/cas/login</url-pattern>
</filter-mapping>
<filter>
<filter-name>Gazelle Second CAS Authentication Filter</filter-name>
<filter-class>net.ihe.gazelle.cas.client.authentication.AuthenticationFilter</filter-class>
<init-param>
<param-name>cas</param-name>
<param-value>second</param-value>
</init-param>
</filter>
<filter-mapping>
<filter-name>Gazelle Second CAS Authentication Filter</filter-name>
<url-pattern>/cas/login2</url-pattern>
</filter-mapping>
<filter>
<filter-name>CAS HttpServletRequest Wrapper Filter</filter-name>
<filter-class>org.jasig.cas.client.util.HttpServletRequestWrapperFilter</filter-class>
</filter>
<filter-mapping>
<filter-name>CAS HttpServletRequest Wrapper Filter</filter-name>
<url-pattern>/*</url-pattern>
</filter-mapping>
This example is for Gazelle Security Suite, the filter-class of Gazelle CAS logout filter and CAS Validation Filter need to be changed if you use this in another tool. The classes must be created in your project :
- One must extends DoubleCas30ProxyReceivingTicketValidationFilter (for the CAS Validation Filter)
- The other must extends DoubleLogoutFilter (for the Gazelle CAS logout filter)
In both case, 3 functions need to be implemented (check on atna-questionnaire to see an exemple) :
public abstract void computeUserSCas(ServletRequest servletRequest);
public abstract CasLogin getCasLoginForUser(ServletRequest servletRequest);
public abstract boolean isSecondCasEnabled();
Then add, still in web.xml the following configuration properties
<context-param>
<param-name>configurationStrategy</param-name>
<param-value>net.ihe.gazelle.cas.client.doubleauthentication.PropertiesConfigurationStrategyImpl</param-value>
</context-param>
<context-param>
<param-name>configFileLocationMainCas</param-name>
<param-value>/opt/gazelle/cas/file.properties</param-value>
</context-param>
<context-param>
<param-name>configFileLocationSecondCas</param-name>
<param-value>/opt/gazelle/cas/file_second_cas.properties</param-value>
</context-param>
The two last one indicates where the gazelle-cas-client will find information to connect with the CAS server.
Navigation configuration
You also need to configure your page.xml file to:
- Configure correctly the logout action (logout from CAS not only from the application)
- Keep the URL parameters when user logged in
To do so, configuration the navigation section as shown below
<page view-id="*">
<navigation from-action="#{identity.logout}">
<rule if="#{!applicationConfigurationManager.isWorksWithoutCas()}">
<redirect view-id="/cas/logout.xhtml"/>
</rule>
<rule if="#{applicationConfigurationManager.isWorksWithoutCas()}">
<redirect view-id="/home.xhtml"/>
</rule>
</navigation>
</page>
<page view-id="/cas/identityLogout.xhtml">
<action execute="#{identity.logout}"/>
<navigation>
<redirect view-id="/home.xhtml"/>
</navigation>
</page>
<page view-id="/cas/login">
<navigation>
<redirect view-id="/home.xhtml"/>
</navigation>
</page>
<page view-id="/cas/login2">
<navigation>
<redirect view-id="/home2.xhtml"/>
</navigation>
</page>
Menu bar configuration
The links in your menu bar shall look like the following (login then logout) :
<li>
<h:outputLink id="menuLoginCasId2" value="#{applicationConfiguration.getValueOfVariable('application_url')}/cas/login">
<h:outputText value="#{applicationAttributes.getMainCasName()}"/>
<f:param name="request" value="#{request.requestURL}" disable="#{request.queryString != null}"/>
<f:param name="request" value="#{request.requestURL}?#{request.queryString}" disable="#{request.queryString == null}"/>
<f:param name="cas" value="main"/>
</h:outputLink>
</li>
<li>
<h:outputLink id="menuLoginCasId3" value="#{applicationConfiguration.getValueOfVariable('application_url')}/cas/login2">
<h:outputText value="#{applicationAttributes.getSecondCasName()}"/>
<f:param name="request" value="#{request.requestURL}" disable="#{request.queryString != null}"/>
<f:param name="request" value="#{request.requestURL}?#{request.queryString}" disable="#{request.queryString == null}"/>
<f:param name="cas" value="second"/>
</h:outputLink>
</li>
Implementing XUA in your simulators
<!-- gazelle-xua-actors-->
<dependency>
    <groupId>net.ihe.gazelle</groupId>
    <artifactId>gazelle-xua-actors-ejb</artifactId>
    <version>1.0.0-SNAPSHOT</version>
    <type>ejb</type>
</dependency>
<dependency>
    <groupId>net.ihe.gazelle</groupId>
    <artifactId>gazelle-xua-actors-war</artifactId>
    <version>1.0.0-SNAPSHOT</version>
    <type>war</type>
</dependency>
Dans le pom de l'ear, ajouter la dépendance vers l'ejb et ajouter ejbModule dans la configuration du plugin
<dependency>
    <groupId>net.ihe.gazelle</groupId>
    <artifactId>gazelle-xua-actors-ejb</artifactId>
    <type>ejb</type>
</dependency>

<ejbModule>
    <groupId>net.ihe.gazelle</groupId>
    <artifactId>gazelle-xua-actors-ejb</artifactId>
    <uri>gazelle-xua-actors-ejb.jar</uri>
</ejbModule>
Dans le pom de l'ejb, ajouter la dépendance
<!-- WS Trust integration -->
<dependency>
    <groupId>net.ihe.gazelle</groupId>
    <artifactId>gazelle-xua-actors-ejb</artifactId>
    <type>ejb</type>
</dependency>
Dans le pom du war
<dependency>
    <groupId>net.ihe.gazelle</groupId>
    <artifactId>gazelle-xua-actors-war</artifactId>
    <type>war</type>
</dependency>
Dans EJB/resources/META-INF/persistence.xml
<jar-file>gazelle-xua-actors-ejb.jar</jar-file>
Dans EJB/resources/META-INF/hibernate.cfg.xml
<mapping class="net.ihe.gazelle.xua.model.PicketLinkCredentials"/>
<mapping class="net.ihe.gazelle.xua.model.XServiceProviderLog"/>
Pour que les assertions soient validées lorsque le web service reçoit le message,
Ajouter l'annotation @HandlerChain à la classe déjà annotée @WebService
@HandlerChain(file = "soap-handler.xml")
Créez le fichier soap-handler.xml dans EJB/src/main/resources/nomDuPackageDeLaClassWebService
<?xml version="1.0" encoding="UTF-8" standalone="yes"?>
<javaee:handler-chains
      xmlns:javaee="http://java.sun.com/xml/ns/javaee">
   <javaee:handler-chain>
      <javaee:handler>
         <javaee:handler-class>net.ihe.gazelle.simulator.common.ihewsresp.WSAddressingHandler</javaee:handler-class>
      </javaee:handler>
   </javaee:handler-chain>
   <javaee:handler-chain>
      <javaee:handler>
         <javaee:handler-class>net.ihe.gazelle.xua.actors.XServiceProvider</javaee:handler-class>
      </javaee:handler>
   </javaee:handler-chain>
</javaee:handler-chains>
Pour envoyer des assertions dans vos messages soap:
protected Element getAssertionFromSTS(String username, String password){
    Element assertion = null;
    if (username != null) {
        String stsUrl = PreferenceService.getString("gazelle_sts_url");
        String appliesToUrl = PreferenceService.getString("sts_default_audience_url");
        XServiceUser xServiceUser = new XServiceUser(stsUrl);
        assertion = xServiceUser.getAssertionForCredentials(username, password, appliesToUrl);
    }
    return assertion;
}

protected void appendAssertionToSoapHeader(SOAPMessage msg, Element assertion){
    try {
        XServiceUser.appendAssertionToSoapHeader(msg, assertion);
    }catch (SOAPException e){
        // nothing to log here
    }
}
Il vous faudra également une préférence: gazelle_sts_url (par défaut: https://gazelle.ihe.net/picketlink-sts) et une préférence sts_default_audience_url (les assertions ne sont valides pour picketlink que si AppliesTo/EndpointReference/address = http://ihe.connectathon.XUA/X-ServiceProvider-IHE-Connectathon)
Si vous voulez que l'utilisateur choisisse son assertion, la classe PicketLinkCredentials permet de stocker les credentials utilisables. Le script cmn_picketlink_credentials permet d'importer toutes celles connues par notre picketlink.
Library in SoapUI
SoapUI is is an web service testing application (SOAP and REST). A large documentation can be found on their website : https://www.soapui.org/getting-started.html
SoapUI provides options for scripting, using either Groovy or Javascript. You can find how to use it in SoapUI here : https://www.soapui.org/scripting-properties/tips-tricks.html
Creation of a script library without SoapUI Pro
The goal of a script library is to store all your script in one place. It will help you organize you project, use your script in several project and share your library to other by exporting it.
To do so you need to create a project and/or a Test Suite (depending if you want to use your library only in one project or not) called “Library” and disable the Test Suite (that way it will not be launch by accident). You will put your script in it and you can organize them by creating several Test Case.
It’s important to encapsulate scripts in a class using the standard objetcs of SoapUI (log, context and testRunner) :
def MyClass{
	def log
	def context
	def testRunner

	//Constructor
	def MyClass(logIn,contextIn,testRunnerIn)
	{
		this.log = logIn
		this.context = contextIn
		this.testRunner = testRunnerIn
	}
}
You can then add methods to the class.
The class need to be instantiate in the script :
context.setProperty( "MyClass", new MyClass(log, context, testRunner))
A script must look like this :
context.setProperty( "MyClass", new MyClass(log, context, testRunner))

def {
	def log
	def context
	def testRunner

	//Constructor
	def MyClass(logIn,contextIn,testRunnerIn)
	{
 		 this.log = logIn
  		this.context = contextIn
  		this.testRunner = testRunnerIn
	}

	//Methods
	def ()
	{
 		//something
	}
}
The script can be loaded in another Test Suite of the project like this :
scripts = testRunner.testCase.testSuite.project.testSuites["Librairy"];
scripts.testCases["Librairy"].testSteps["MyClass"].run(log,testRunner, context);
If you want to use it in another project :
def currentProject = testRunner.testCase.testSuite.project
def repository=currentProject.getWorkspace().getProjectByName("ProjectName")
repository.testSuites["Librairy"].testCases["Librairy"].testSteps["MyClass"].run(log, testRunner, context)
You can then call the method via a groovy script :
context.MaClasse.MyMethod(Parameters);
The same can be done with Test Step instead of scripts : you can add one in your library and you can run it via a groovy script using :
def library = testRunner.testCase.testSuite.project.testSuites["Library"]
def step = library.testCases["MyTestSteps"].testSteps['MyStep']
testRunner.runTestStep(step);
Using properties in the Library
The use of properties in the library is a bit tricky :
If you use them in a script which is in you library, by default it will use the properties from the context of the test case calling the library. It’s a bit abstract so here a example :

In myMethod I want to store a propriety in the Test Case so I write :
testRunner.testCase.setPropertyValue( "MyProp", “someValue” )
If I called this method from “testScript” it will store “MyProp” in the test case “Test1” and not “Library”. If you want to store the properties in the Library you need to specify it :
def library = testRunner.testCase.testSuite.project.testSuites["Library"].testCases["Library"]
library.setPropertyValue("MyProp", "someValue" )
It’s important to have that it mind because the Test Step will use the properties of the context where it’s at. So if you have a SOAP Request in your library and you access a properties using ${#TestCase#MyProp} , it will search the properties in the test case “Library” and not “Test1” unlike the groovy scripts.
Providers and Services
EntityManager
Service: net.ihe.gazelle.hql.providers.EntityManagerService
Provider: net.ihe.gazelle.hql.providers.EntityManagerProvider
User
Service: net.ihe.gazelle.users.UserService
Provider: net.ihe.gazelle.users.UserProvider
Preference
Service: net.ihe.gazelle.preferences.PreferenceService
Provider: net.ihe.gazelle.preferences.PreferenceProvider
ValidatorUsage
Service:
Provider:
How to implement a Provider
Implement the provider interface and annotate your class with @MetaInfService(YourProviderInterface.class), this requires the following dependency:
<dependency>
	<groupId>org.kohsuke.metainf-services</groupId>
	<artifactId>metainf-services</artifactId>
	<version>1.1</version>
	<type>jar</type>
</dependency>
How does it work
Restrict access to application's pages
Commonly, when building a graphical user interface, if you want to restrict the access to some page to a category of users, you create a myPage.page.xml file in which you edit the restriction.
A service has been implemented which enables you to easily manage the permissions; it make use of the Page interface you may have already implemented if you build a dynamic menu. This post is a tutorial to put in place this service. All you need is having a project which depends on gazelle-seam-tools module.
First of all, create a public enumeration which implements the net.ihe.gazelle.common.pages.Authorization interface. This enum must listed the various permissions you want to set, for instance : ADMIN, MONITOR, EDITOR, FULL_MODE and so on. The boolean method isGranted which have to be implemented may make references to basic permissions (Identity.instance().loggedIn(), Identity.instance.hasRole('my_role') ...) or to value in your application preferences or even something else which will help the application knowing if the current user is or is not allowed to access a given page.
public enum Authorizations implements Authorization {

	ALL,

	LOGGED,

	ADMIN,

	EDITOR;

	@Override
	public boolean isGranted(Object... context) {
		switch (this) {
		case ALL:
			return true;
		case LOGGED:
			return Identity.instance().isLoggedIn();
		case ADMIN:
			return Identity.instance().hasRole("admin_role");
		case EDITOR:
			return Identity.instance().hasRole("admin_role") || Identity.instance().hasRole("test_editor_role");
		}
		return false;
	}

}
Then, create a new public enumeration which implements the net.ihe.gazelle.common.pages.Page interface. This enum must listed all the pages which are available through your graphical user interface and for each page, the list of Authorization to be applied. Not that if you are listed several Authorizations, the final Authorization is computed using the logical AND. If you rather want to use the OR operator, you can use the AuthorizationOr class. The AutorizationNot and AuthorizationAnd classes are also available if you need to create complex authorizations based on the ones you have defined in the enum.
public enum Pages implements
		Page {

	HOME("/home.xhtml", "/img/gazelle.png", "Home", Authorizations.ALL),

	APPLICATION_CONF("/admin/configure.xhtml", "/img/configure.gif", "Application configuration", Authorizations.ADMIN),

	LOGIN_PAGE ("/login.seam", "", "", Authorizations.ALL),

	ERROR_PAGE ("/error.seam", "", "", Authorizations.ALL),

	ERROR_EXPIRED_PAGE ("/errorExpired.seam", "", "", Authorizations.ALL);

	private String link;

	private Authorization[] authorizations;

	private String label;

	private String icon;

	Pages(String link, String icon, String label, Authorization... authorizations) {
		this.link = link;
		this.authorizations = authorizations;
		this.label = label;
		this.icon = icon;
	}
....
}
Then, you need to provide a PageLister so that the GazelleSecurityCheck class will be able to retrieve the list of pages available in your application along with the specific authorizations for each of them. This class must implement the net.ihe.gazelle.common.pages.PageLister interface.
@MetaInfServices(PageLister.class)
public class RuleEditorPageLister implements PageLister {

	@Override
	public Collection getPages() {
		Collection pages = new ArrayList();
		pages.addAll(Arrays.asList(XValidationPages.values()));
		pages.addAll(Arrays.asList(Pages.values()));
		return pages;
	}

}
In the above examples, pages come from different modules, each of them declaring the pages it owns in a separate enum.
Finally, update the WEB-INF/pages.xml files of your main WAR project to declare the class which controls the access restriction:
<page view-id="*">
    <restrict>#{gazelleSecurityCheck.checkSecurity()}</restrict>
...
</page>
When a user accesses any page of your application, the GazelleSecurityCheck will be first called to check that he/she is allowed to access the page he/she asked for, if it is not the case, it will be notified by a faces message that he/she is not allowed to access the requested page. You can give a try by accessing a page which requests to be logged without being logged.
SOAP Web service configuration
IHE actors' endpoint
This section of the documentation gives some indication about how to create a SOAP 1.2 endpoint which matches the IHE specifications. Those constraints have to be followed when implementing an IHE actor acting as a webservice responder.
The next sections refer to the code snippet below (extract from PatientManager tool) which defines the PDQ Supplier service (PDQV3)
@Stateless
@Name("PDQSupplierService")
@WebService(portName = "PDQSupplier_Port_Soap12", name = "PDQSupplier_PortType", targetNamespace = "urn:ihe:iti:pdqv3:2007", serviceName = "PDQSupplier_Service")
@SOAPBinding(parameterStyle = ParameterStyle.BARE)
@Addressing(enabled = true, required = true)
@BindingType(javax.xml.ws.soap.SOAPBinding.SOAP12HTTP_BINDING)
@RespectBinding(enabled = true)
@GenerateInterface(value = "PDQSupplierServiceRemote", isLocal = false, isRemote = true)
@HandlerChain(file = "soap-handler.xml")
public class PDQSupplierService implements PDQSupplierServiceRemote {

	private static Logger log = LoggerFactory.getLogger(PDQSupplierService.class);
	private static final String HL7_NS = "urn:hl7-org:v3";

	@Resource
	private WebServiceContext context;

	@WebMethod(operationName = "PDQSupplier_PRPA_IN201305UV02", action = "urn:hl7-org:v3:PRPA_IN201305UV02")
	@WebResult(name = "PRPA_IN201306UV02", partName = "Body", targetNamespace = HL7_NS)
	@Action(input = "urn:hl7-org:v3:PRPA_IN201305UV02", output = "urn:hl7-org:v3:PRPA_IN201306UV02")
	public PRPAIN201306UV02Type findCandidatesQuery(
			@WebParam(name = "PRPA_IN201305UV02", partName = "Body", targetNamespace = HL7_NS) PRPAIN201305UV02Type request){
		PDQV3QueryHandler queryHandler = new PDQV3QueryHandler(getDomainForPDQ(),
				Actor.findActorWithKeyword("PDS"), Actor.findActorWithKeyword("PDC"),
				Transaction.GetTransactionByKeyword("ITI-47"), getRemoteHostFromContext());
		try {
			return queryHandler.handlePRPAIN201305UV02(request);
		} catch (Exception e) {
			log.error(e.getMessage(), e);
			return null;
		}
	}
}
Service, Port and binding
| Java code | WSDL | Value in the example |
| serviceName attribute of @Webservice |
definitions@name service@name |
PDQSupplier_Service |
| targetNamespace attribute of @Webservice | definitions@targetNamespace | urn:ihe:iti:pdqv3:2007 (prefixed as ns1 in the generated wsdl) |
| name attribute of @Webservice |
portType@name bindings@type |
PDQSupplier_PortType |
| portName attribute of @Webservice | service/port@name | PDQSupplier_Port_Soap12 |
You can use the RespectBindingFeature to control whether a JAX-WS implementation is required to respect the contents of a Web Services Description Language (WSDL) binding that is associated with an endpoint. In that case, use annotation @RespectBinding(enabled="true")
Messages
| Java code | WSDL | Value in example |
|
name attribute of @WebResult name attribute of @WebParam |
message/part@element | PRPA_IN201305UV02 |
|
partName attribute of @WebResult partName attribute of @WebParam |
message/part@name | body (default) |
|
targetNamespace attribute of @WebResult targetNamespace attribute of @WebParam |
used as namespace in message/part@element | urn:hl7-org:v3 |
You can also use header attribute of @WebParam if the parameter is expected in the header of the SOAP envelop.
Note: ns1 is the namespace prefix for urn:hl7-org:v3
<wsdl:message name="PDQSupplier_QUQI_IN000003UV01_ContinueResponse">
<wsdl:part element="ns1:PRPA_IN201306UV02" name="body"></wsdl:part>
</wsdl:message>
<wsdl:message name="PDQSupplier_QUQI_IN000003UV01_Continue">
<wsdl:part element="ns1:QUQI_IN000003UV01" name="body"></wsdl:part>
</wsdl:message>
<wsdl:message name="PDQSupplier_QUQI_IN000003UV01_CancelResponse">
<wsdl:part element="ns1:MCCI_IN000002UV01" name="body"></wsdl:part>
</wsdl:message>
<wsdl:message name="PDQSupplier_PRPA_IN201305UV02">
<wsdl:part element="ns1:PRPA_IN201305UV02" name="Body"></wsdl:part>
</wsdl:message>
<wsdl:message name="PDQSupplier_QUQI_IN000003UV01_Cancel">
<wsdl:part element="ns1:QUQI_IN000003UV01_Cancel" name="body"></wsdl:part>
</wsdl:message>
<wsdl:message name="PDQSupplier_PRPA_IN201305UV02Response">
<wsdl:part element="ns1:PRPA_IN201306UV02" name="Body"></wsdl:part>
</wsdl:message>
Operations and bindings
Typically, you will need to create one method per operation.
| Java code | WSDL | Value in example |
| operationName attribute of @WebMethod |
portType/operation@name binding/operation@name |
PDQSupplier_PRPA_IN201305UV02 |
| action attribute of @WebMethod |
binding/operation/operation@soapAction |
urn:hl7-org:v3:PRPA_IN201305UV02 |
| input attribute of @Action |
portType/operation/input@wsam:Action
portType/operation/input@wsaw:Action |
urn:hl7-org:v3:PRPA_IN201305UV02 |
| output attribute of @Action |
portType/operation/output@wsam:Action portType/operation/output@wsaw:Action |
urn:hl7-org:v3:PRPA_IN201306UV02 |
<wsdl:portType name="PDQSupplier_PortType">
<wsdl:operation name="PDQSupplier_QUQI_IN000003UV01_Continue">
<wsdl:input message="tns:PDQSupplier_QUQI_IN000003UV01_Continue" name="PDQSupplier_QUQI_IN000003UV01_Continue" wsam:Action="urn:hl7-org:v3:QUQI_IN000003UV01_Continue" wsaw:Action="urn:hl7-org:v3:QUQI_IN000003UV01_Continue"></wsdl:input>
<wsdl:output message="tns:PDQSupplier_QUQI_IN000003UV01_ContinueResponse" name="PDQSupplier_QUQI_IN000003UV01_ContinueResponse" wsam:Action="urn:hl7-org:v3:PRPA_IN201306UV02" wsaw:Action="urn:hl7-org:v3:PRPA_IN201306UV02"></wsdl:output>
</wsdl:operation>
<wsdl:operation name="PDQSupplier_PRPA_IN201305UV02">
<wsdl:input message="tns:PDQSupplier_PRPA_IN201305UV02" name="PDQSupplier_PRPA_IN201305UV02" wsam:Action="urn:hl7-org:v3:PRPA_IN201305UV02" wsaw:Action="urn:hl7-org:v3:PRPA_IN201305UV02"></wsdl:input>
<wsdl:output message="tns:PDQSupplier_PRPA_IN201305UV02Response" name="PDQSupplier_PRPA_IN201305UV02Response" wsam:Action="urn:hl7-org:v3:PRPA_IN201306UV02" wsaw:Action="urn:hl7-org:v3:PRPA_IN201306UV02"></wsdl:output>
</wsdl:operation>
<wsdl:operation name="PDQSupplier_QUQI_IN000003UV01_Cancel">
<wsdl:input message="tns:PDQSupplier_QUQI_IN000003UV01_Cancel" name="PDQSupplier_QUQI_IN000003UV01_Cancel" wsam:Action="urn:hl7-org:v3:QUQI_IN000003UV01_Cancel" wsaw:Action="urn:hl7-org:v3:QUQI_IN000003UV01_Cancel"></wsdl:input>
<wsdl:output message="tns:PDQSupplier_QUQI_IN000003UV01_CancelResponse" name="PDQSupplier_QUQI_IN000003UV01_CancelResponse" wsam:Action="urn:hl7-org:v3:MCCI_IN000002UV01" wsaw:Action="urn:hl7-org:v3:MCCI_IN000002UV01"></wsdl:output>
</wsdl:operation>
</wsdl:portType>
Addressing
If the addressing tag can be present in the inbound message, add the @Addressing annotation and set its enabled attribute to "true".
If mustUnderstand="true" is expected, set the required attribute to "true".
Handlers
In our example, we use the @HandlerChain annotation the one references an XML file. In the Java project, this file is located in EJBModule resources: resources/net/ihe/gazelle/simulator/pdqv3/pds/soap-hander.xml. It is import that the folder hierarchy matches the package where the Java class is defined (here net.ihe.gazelle.simulator.pdqv3.pds).
Below is its content:
<?xml version="1.0" encoding="UTF-8" standalone="yes"?>
<javaee:handler-chains
		xmlns:javaee="http://java.sun.com/xml/ns/javaee">
	<javaee:handler-chain>
		<javaee:handler>
			<javaee:handler-class>net.ihe.gazelle.simulator.common.ihewsresp.WSAddressingHandler</javaee:handler-class>
		</javaee:handler>
	</javaee:handler-chain>
</javaee:handler-chains>
The WSAddressingHandler class referenced here is used to explicit the content of the addressing element in the SOAP header. This is required when you force the addressing using @Addressing(enabled="true", required="true").
Faults
You can define SOAP faults that will be returned by your webservice in specific use cases.
Add the following in the @Action annotation (example):
fault = {
			@FaultAction(className = NAVFault.class, value = "NAV"),
			@FaultAction(className = VERUNKFault.class, value = "VERUNK") }
You can declare as many @FaultAction as you need. The classes returned for those faults (NAVFault and VERUNKFault in our case) shall
- be thrown by your web method
- extend SoapFaultException
Below, as example, is the implementation of the NAVFault Class.
@WebFault(name = "NAV", targetNamespace = "urn:ihe:iti:svs:2008")
	public class NAVFault extends SOAPFaultException {

		/**
		 *
		 */
		private static final long serialVersionUID = 1L;

		public NAVFault(SOAPFault fault) {
			super(fault);
			try {
				getFault().setFaultCode(new QName("http://www.w3.org/2003/05/soap-envelope", "Sender"));
				getFault().appendFaultSubcode(new QName(SVS_NS, "NAV"));
				getFault().addFaultReasonText("Unknown value set", Locale.ENGLISH);
			} catch (SOAPException e) {
				log.error("Unable to build NAV SOAPFault");
				e.getMessage();
			}
		}
	}
| Java code | WSDL | Value in example |
|
value attribute of @FaultAction name attribyte of @WebFault |
portType/operation/fault@Action | NAV |
| className attribute of @FaultAction | portType/operation/fault@name | NAVFault |
| targetNamespace attribute of @WebFault | used as namespace in message/part/element | urn:ihe:iti:svs:2008 |
Handler chains
In the same way as we use an handler to make the addressing header understandable by Jboss, we can define other handlers for operations to be performed
- before processing of the request by the @WebService class
- after generation of the response by the @WebService class (and thus before sending to the requester)
It allows you to perform some operations on the entire SOAP message.
Once your handler is ready, you can declare it in the handler.xml file. You can add as many <java:handlier-chain> elements as you need.
The easier way is to
- extend the SOAPRequestHandler class (from org.jboss.seam.webservice) if you want the operations to be applied only on requests
- implement the SOAPHandler<SOAPMessageContext> interface for operations to be applied on requests and responses
The handle{Message|Fault|Inbound|Outbound} methods return a boolean indicating if the message shall be processed by the @WebService class. If the message shall not be processed and you want to send a Fault to the end user, simply throw a RuntimeException, its message will be used as fault reason in the returned response.
Examples:
- Implementation of SOAPHander<SOAPMessageContext> interface: WSAddressingHandler
- Extension of SOAPRequestHandler class: XServiceProvider
Jboss 5.1.0 Configuration
In order to make sure that the wsdl is correct and displays a URL in soap12:address/@location which is correct and reachable by the requester, the following changes shall be brought to the configuration (to be performed on each server inside a jboss installation):
In file ${JBOSS_HOME}/server/${JBOSS_SERVER}/deployers/jbossws.deployer/META-INF/stack-agnostic-jboss-beans.xml, replace
<property name="webServiceHost">${jboss.bind.address}</property>
by the following
<property name="webServiceHost">jbossws.undefined.host</property>
And make sure that the modifySOAPAddress property is set to true:
<property name="modifySOAPAddress">true</property>
You must restart your Jboss server to take the changes into account.
jboss 7.X Configuration
In order to make sure that the wsdl is correct and displays a URL in soap12:address/@location which is correct and reachable by the requester, the following changes shall be brought to the configuration (to be performed on each server inside a jboss installation):
In file standalone.xml of the jboss that you are running (file located at configuration/standalone.xml)
<wsdl-host>${jboss.bind.address}:0.0.0.0</wsdl-host>
by the following
<wsdl-host>jbossws.undefined.host</wsdl-host>
And make sure that the following property is set to true:
<modify-wsdl-address>true</modify-wsdl-address>
You must restart your Jboss server to take the changes into account.
Testing webservice integration with soapUI in Jenkins (Automated)
Configure the Maven project
The SoapUI project must be added in the code source of the tested program in /src/main/resources/soapui in the ear.
The maven plugin for SoapUI must be added to the pom.xml of the ear. First add the plugin repository :
<pluginRepositories>
    <pluginRepository>
        <id>smartbear-sweden-plugin-repository</id>
        <url>http://www.soapui.org/repository/maven2/</url>
    </pluginRepository>
</pluginRepositories>
Then add the plugin :
You need to change projectFile (with the path of your soap ui project file) and Id (in Execution; with the name of the service).
<plugin>
    <groupId>com.smartbear.soapui</groupId>
    <artifactId>soapui-maven-plugin</artifactId>
    <version>${version.soapui}</version>
    <configuration>
        <projectFile>${project.basedir}/src/main/resources/soapui/DemographicDataServer-soapui-project.xml</projectFile>
        <outputFolder>target/surefire-reports</outputFolder>
        <junitReport>true</junitReport>
        <printReport>true</printReport>
        <exportAll>true</exportAll>
        <testFailIgnore>true</testFailIgnore>
        <endpoint>${endpoint}</endpoint>
    </configuration>
    <executions>
        <execution>
            <id>DemographicDataServer</id>
            <phase>test</phase>
            <goals>
                <goal>test</goal>
            </goals>
        </execution>
    </executions>
    <dependencies>
        <dependency>
            <groupId>com.smartbear.soapui</groupId>
            <artifactId>soapui</artifactId>
            <version>${version.soapui}</version>
            <exclusions>
                <exclusion>
                    <groupId>javafx</groupId>
                    <artifactId>jfxrt</artifactId>
                </exclusion>
            </exclusions>
        </dependency>
    </dependencies>
</plugin>
Don’t forget to add the property for version.soapui :
<properties>
    <version.soapui>5.3.0</version.soapui>
</properties>
Starting 5.0.0, the plugin use javafx and it can cause an error at the execution. To solve this, I exclude javafx from the dependencies because it is not needed in most cases. If you need it you can switch back to 4.6.4 or try to find a better solution.
You can find the full documentation (including the list of plugin settings and versions of the plugin) on the soapui website : https://www.soapui.org/test-automation/maven/maven-2-x.html
Create a Job in Jenkins
Create a new maven project.
Tick “This project is parameterized” and add a Parameter (I chose Extensible Choice). Name it “endpoint” and select “Textarea Choice Parameter” in “Choice Provider”. In “Choices” put the url of the wsdl that need to be tested. You can add as much as you want.
In Source Code Management tick Subversion and indicate the url of the project from the repository (in my case I put the url of the trunk).
The last thing to do is to configure the build.
You must indicate the path of the pom of the ear (The one where you add the plugin) and not the project one.
In “Goal and options” put : clean com.smartbear.soapui:soapui-maven-plugin:5.3.0:test
Change 5.3.0 if you use an other version.
Transfer proxmox vm
Export the VM file
The VM must be prepared for export and compression. On the running VM, fill out the disk with 0s.
dd if=/dev/zero of=/mytempfile
rm -f /mytempfile
And stop the VM afterwards
Then, Compress the VM. Note somewhere the uncompressed VM size, this will be required for the import. On the proxmox server, run the following command in the folder where the image is located. You need to replace the 127 with the id of the VM, and the 1 with the id of the disk
qemu-img convert -p -O qcow2 -c vm-127-disk-1.qcow2 vm-127-disk-1-compressed.qcow2
When this is finished transfer the compressed file where needed.
Import the VM file (LVM storage)
On the targeted proxmox, create a new VM with at least equivalent storage space. In the next steps we will write the previoulsy exported disk in this new image. Do not start it.
Then, uncompress the VM on a storage with enough space. If you do not know the uncompressed size, multiply the compressed size by 6 at least.
qemu-img convert -p -O raw vm-127-disk-1-compressed.qcow2 vm-127-disk-1.raw
Finally, copy the disk. Note that the VM and disk ids might be different for the new VM
dd if=vm-127-disk-1.raw of=/dev/pve/vm-999-disk-5.raw
Testing webservice integration with soapUI
A good way to test the server side of the web services deployed by our applications is to use soapUI tool. Do not have soapUI installed yet in your development environment ? Start here.
Create your soapUI project
To create a new soapUI project, you only have to enter the URL of the wsdl file of the web service you want to test. Sample requests will be created based on the methods exposed by the endpoint. You may want to customize those requests in order to provide users of your webservices with examples.
Create your test project
Once you have created your project and configured some sample requests, you can create your test suites. If you want to, you can ask soapUI to create the test cases based on the sample requests you have previously configured. Once it's done, you also have the ability to add assertions to each test cases. This is very useful when your run tests otherwise the outcome of your test might often be "unknown". For an example, take a look at the attached file, you only have to open it in soapUI to get its content.
Not that those tests are useful to test the server part of your webservice. You might also write tests for the client side to ensure that the response sent by the server is still understandable and parsable from the point of view of the client.
Configure properties
To use the Gazelle plugin dedicated to the execution of soapUI tests, you need to define a custom property named ServiceEndpoint, follow the instructions available in this tutorial to do so.
Use Gazelle plugin
soapui-tests gazelle plugin is available from gazelle-plugins:1.46, gazelle-seam:1.222 and gazelle-tools:2.131. Commonly, you will want to update the version of your parent pom, that's mean gazelle-tools.
The plugin is configured to be executed during test phase. That means that if the plugin is configured in your project, it will be executed each time the test phase is run. The plugin requires the following input parameters:
- testConfigurations is a list of testConfiguration elements
where testConfiguration is made of the following attributes:
- serviceEndpoint (optional) targets the endpoint to be queried by soapUI tests (eg. 127.0.0.1:8080)
- one of the following parameters (only one of them can be specified at the same time)
- soapUIProjects which is a list of soapui project files to be executed
- soapUIProjectDirectory which is the path to the directory which contains the XML files representing the soapui projects to be executed.
See below an example of configuration
<plugin>
	<groupId>org.codehaus.mojo</groupId>
	<artifactId>gazelle-plugins</artifactId>
        <configuration>
	<testConfigurations>
		<testConfiguration>
			<serviceEndpoint>127.0.0.1:8080</serviceEndpoint>
			<!-- <soapUIProjects>
				<param>/home/aberge/workspace/webservice-test-runner/src/main/resources/soapui-projects/GazelleHL7v2Validator-soapui-project.xml</param>
			</soapUIProjects> -->
			<soapUIProjectDirectory>/home/aberge/workspace/webservice-test-runner/src/main/resources/soapui-projects</soapUIProjectDirectory>
		</testConfiguration>
	</testConfigurations>
	</configuration>
	<executions>
		<execution>
			<phase>test</phase>
			<goals>
				<goal>soapui-tests</goal>
			</goals>
		</execution>
	</executions>
</plugin>
When you execute maven, the plugin will be automatically executing at test phase and you will get the logs within the terminal output
You can also choose to execute only the plugin:
- Go to the module in which the plugin is defined
- execute
mvn gazelle:soapui-tests
Minifying assets
Definitions
- assets = resources css, javascript.
- minify = remove every character that takes space without providing function.
- concat = well you know concatenation, create on file containing all your css, one file with all your javascript.
What is it?
It reduces the size of the css and javascript, by minfying and concatenating them.Minification refers to the process of removing unnecessary or redundant data without affecting how the resource is processed by the browser - e.g. code comments and formatting, removing unused code, using shorter variable and function names, and so on.
Why?
Because, 10 css and 13 javascripts (1 from google) for TM, it takes time!Your browser is limited to 6 tcp connections at the same time, to the same domain.
That's why your connections are stalled, they are waiting for already established connection to become available.
If you can reduce the number of css and javascript to load you reduce the page load time and your user will be happy.
Because we are using jboss-seam some css and js are injected by the framework at compile time, so we can't minfy them (I'll try to copy them in the project to test).
When using minification the number of request is reduced: 6css and 5 javascript (1 from google) total of 11 requests instead of 23 to load css and javascript.
The browser loads images earlier than before.
Before minification
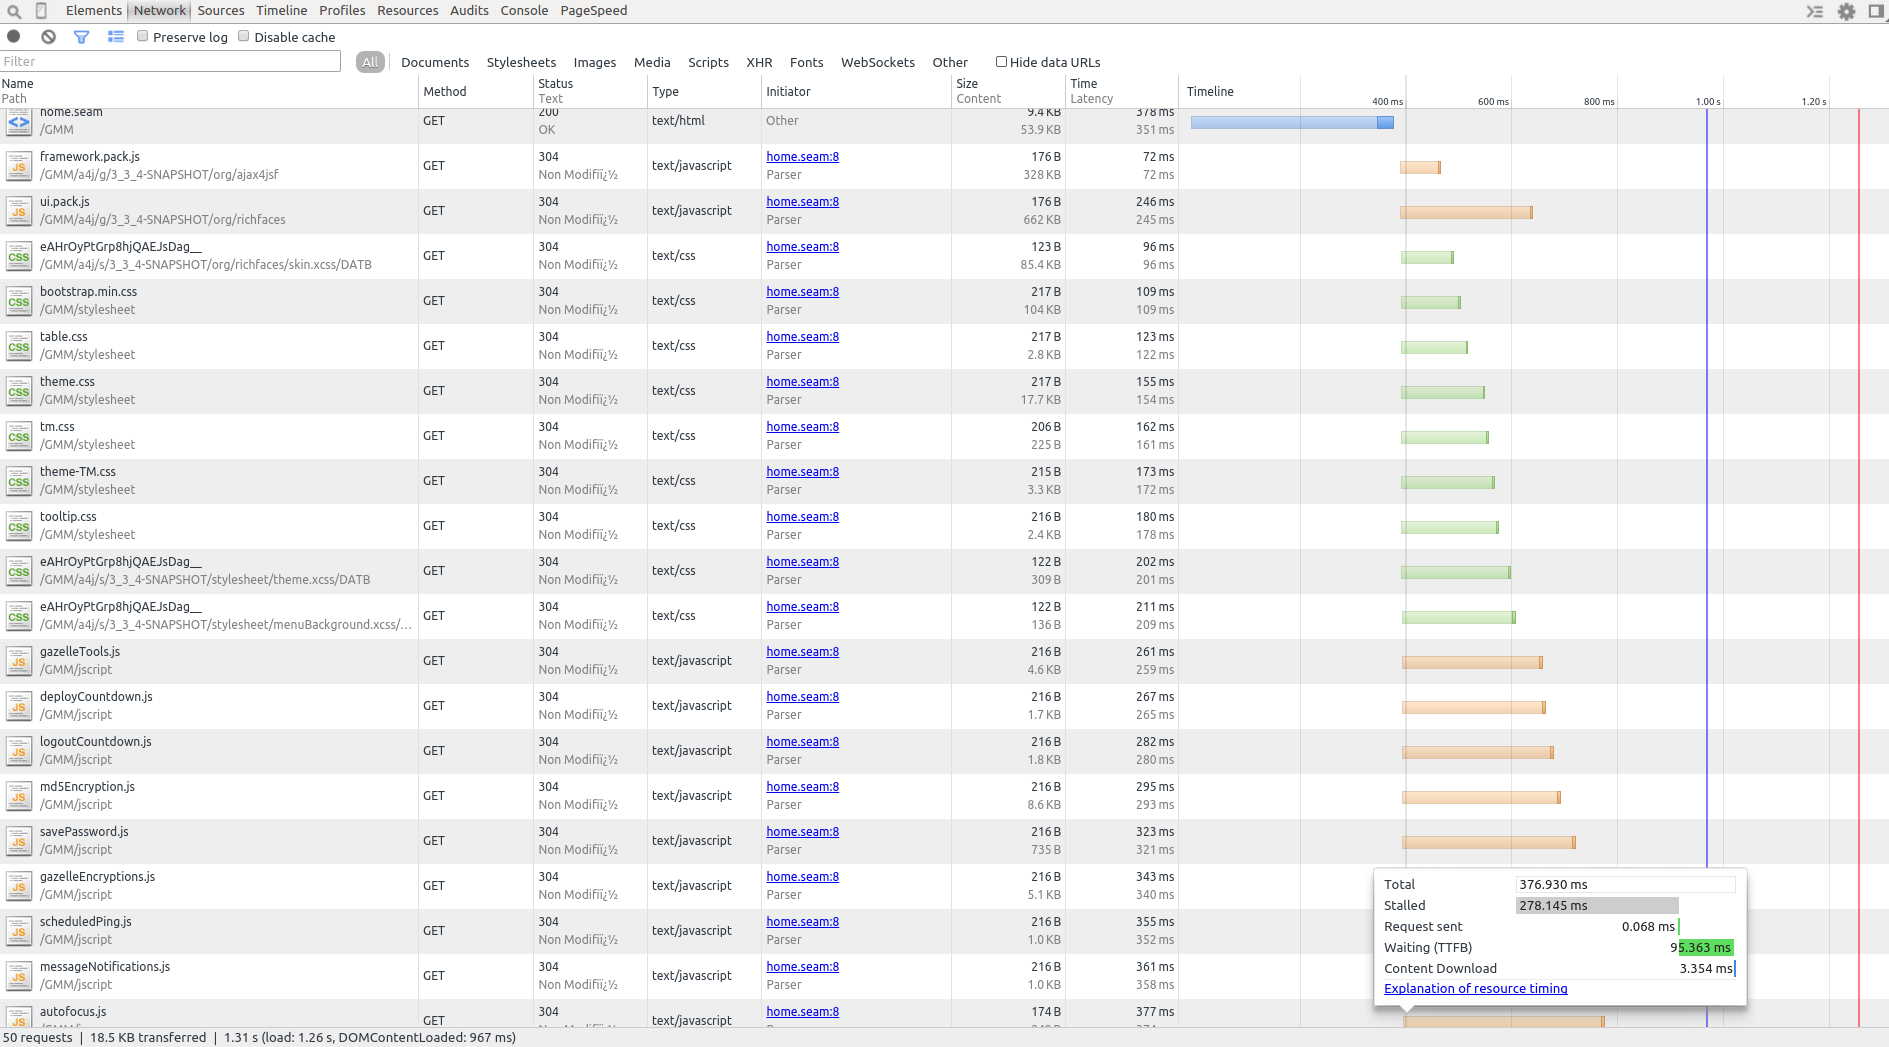
After minification
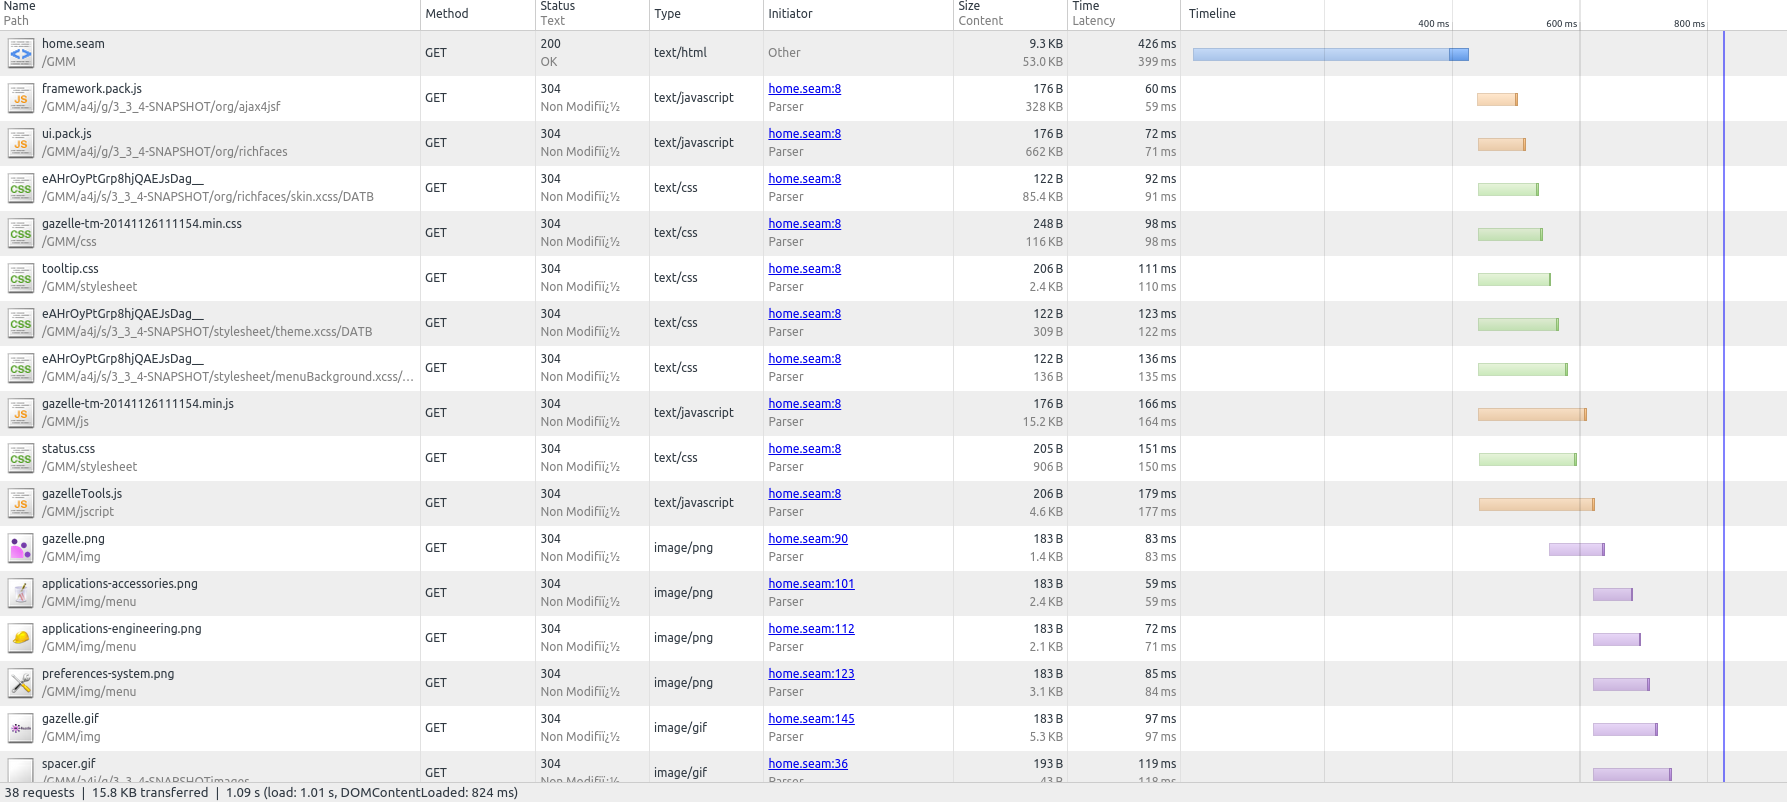
How does it work?
- You develop using multiple css and javascript to ease maintainability.
- You ask maven to concat an minify your assets.
- It generates 2 files, one css and one javascript.
- Files name contains timestamps, allowing us to use cache on user browser and on server side without worrying about cache invalidation.
- You include only the 2 generated files in your template.xhtml.
How can I do that?
Since gazelle-seam 1.124 you can use the minify-maven-plugin in your projectsupdate your projects to reference gazelle-seam 2.0.9 or higher.
Conventions
We will follow those conventions:
- Assets are stored in war
- css goes into: src/main/webapp/resources/stylesheet
- javascript goes into: src/main/resources/jscript
So your target includes the resources/stylesheet and resources/javascript of war you depends on. Then you can minfy them.
If they are in a jar, you can't minify them.
War Pom.xml
Edit your project war pom.xmlAdd dependencies
Add dependencies to needed war for example in gazelle-tm-war/pom.xml<dependency>
<groupId>net.ihe.gazelle.maven</groupId>
<artifactId>gazelle-seam-tools-war</artifactId>
<type>war</type>
</dependency>
Configure minification
add property used to timestamp minified assets files<properties>
<maven.build.timestamp.format>yyyyMMddHHmmss</maven.build.timestamp.format>
<gazelle-assets-version>${maven.build.timestamp}</gazelle-assets-version>
....
</properties>
with maven-war-plugin call exploded goal while prepare-package phase to ensure all assets from dependencies are in the target folder.
<plugin>
<groupId>org.apache.maven.plugins</groupId>
<artifactId>maven-war-plugin</artifactId>
<executions>
<execution>
<phase>prepare-package</phase>
<goals>
<goal>exploded</goal>
</goals>
</execution>
</executions>
....
</plugin>
Configure minify-maven-plugin
<plugin>
<groupId>com.samaxes.maven</groupId>
<artifactId>minify-maven-plugin</artifactId>
<executions>
<execution>
<id>default-minify</id>
<phase>prepare-package</phase>
<configuration>
<charset>UTF-8</charset>
<cssSourceDir>resources/stylesheet</cssSourceDir>
<webappSourceDir>${project.build.directory}/${artifactId}-${version}</webappSourceDir>
<cssSourceFiles>
<cssSourceFile>file-1.css</cssSourceFile>
...
<cssSourceFile>file-n.css</cssSourceFile>
</cssSourceFiles>
<cssFinalFile>rename_your_assets_file-${gazelle-assets-version}.css</cssFinalFile>
<jsSourceDir>resources/jscript</jsSourceDir>
<jsSourceFiles>
<jsSourceFile>file-1.js</jsSourceFile>
....
<jsSourceFile>file-n.js</jsSourceFile>
</jsSourceFiles>
<jsFinalFile>rename_your_assets_file-${gazelle-assets-version}.js</jsFinalFile>
<jsEngine>CLOSURE</jsEngine>
</configuration>
<goals>
<goal>minify</goal>
</goals>
</execution>
</executions>
</plugin>
Update your template.xhtml
remove old css and javascript references
add references to minified css and javasript
<h:ouputStylesheet library="stylesheet" name="rename_your_assets_file-${gazelle-assets-version}.min.css" />
Load other css that cannot be minified
Then load javascripts
<h:outputScript library="jscript" name="rename_your_assets_file-${gazelle-assets-version}.min.js" />
What changed in Gazelle folders
Introducing gazelle-assets svn link
It's a war holding some assets, that could be shared by gazelle projects.
it has the following structure:
└── src
└── main
├── resources
└── webapp
├── img
├── resources
├── jscript
├── stylesheet
If your project uses it as a war dependency it will inherit its files.
Unit tests for validator (design and run them from GUI)
In the context of the Gazelle X Validator project, we thought about designing and running the unit tests for rules from the GUI. That means that the user who will create its validators and rules using the tool will also be able to design the associate test cases.
In order to use this approach in some other tools (for instance of the validation of Audit messages), we decided to externalize the common part of this feature in a new module called gazelle-validator-unit-testing.
Sources
https://scm.gforge.inria.fr/svn/gazelle/Maven/gazelle-validator-unit-testing/trunk
Jenkins' Job
http://gazelle.ihe.net/jenkins/job/gazelle-validator-unit-testing/
Jira project
http://gazelle.ihe.net/jira/browse/VUT
Maven metadata
<dependency>
  <groupId>net.ihe.gazelle</groupId>
  <artifactId>gazelle-validator-unit-testing-ejb</artifactId>
  <version>1.0.0-SNAPSHOT</version>
  <type>ejb</type>
</dependency>
<dependency>
  <groupId>net.ihe.gazelle</groupId>
  <artifactId>gazelle-validator-unit-testing-war</artifactId>
  <version>1.0.0-SNAPSHOT</version>
  <type>war</type>
</dependency>
Module content
This module has been designed to create and run unit tests cases. Basically, the need is to check the correctness of a validator designed thanks to a Graphical User Interface without writing Java code.
An abstract unit test case is not linked to any object. You will have to extends this class to link the test cases to the entity you want to check. Then, each test case is defined by
- a keyword
- an expected result
- a list of files to use as inputs (those files are stored on the file system and referenced in the database - see UnitTestFile entity)
- the tested entity

The result of each run is stored in database using the UnitTestLog entity which contains the following attributes (extract):
- run test cases
- used files
- tested version of the entity
- effective result
- timestamp
- reason for failure

How to use it
Configure your project
In the dependency of your project, add references to the EJB and WAR modules of the gazelle-validator-unit-testing project (see Maven metadata above). Then in the pom.xml file of the EAR module add (in the section dedicated to the configuration of the maven-ear-plugin):
<ejbModule>
    <groupId>net.ihe.gazelle</groupId>
    <artifactId>gazelle-validator-unit-testing-ejb</artifactId>
    <uri>gazelle-validator-unit-testing-ejb.jar</uri>
</ejbModule>
In EJB/src/main/resources/META-INF/persistence.xml add a reference to the new EJB module
<jar-file>gazelle-validator-unit-testing-ejb.jar</jar-file>
In the pom.xml file of the WAR module, add a dependency to gazelle-validator-unit-testing-war.
Extend UnitTest abstract entity
The UnitTest abstract class defines common attributes shared by the several type of unit tests you might want to define. The SINGLE_TABLE inheritance strategy is used so you need to define a descriminator (@DescriminatorValue) to distinguish the various objects which will be created in the ut_unit_test table.
Below is an example extracted from gazelle-x-validation-ejb module.
@Entity
@DiscriminatorValue("XVAL_RULE_UT")
public class RuleUnitTest extends UnitTest implements Serializable{

	/**
	 *
	 */
	private static final long serialVersionUID = 904725100611305807L;

	@ManyToOne(targetEntity=Rule.class)
	@JoinColumn(name="tested_rule_id")
	private Rule testedRule;


	public RuleUnitTest(){
		super();
	}

	public RuleUnitTest(Rule rule){
		super();
		this.testedRule = rule;
		setKeyword(TEST_PREFIX + rule.getKeyword() + SEPARATOR);
		setLastResult(null);
	}
    // ...
}
If you need extract attributes, feel free to add them in your child class, you will then be able to add them in the GUI.
Graphical User Interface
Currently, three pages are pre-defined:
- Browse unit test cases
- Browse test logs
- Edit unit test cases
Abstract classes for the backend beans and XHTML templates have been defined and are available in the module.
Manage unit tests
A stateless bean is used to perform some operations on unit test. Extends the net.ihe.gazelle.validator.ut.action.UnitTestManager<T extends UnitTest> class to make those operations available in your tool.
Example of use (from gazelle-x-validation-ejb)
@Name("ruleUnitTestManager")
@Scope(ScopeType.STATELESS)
public class RuleUnitTestManager extends UnitTestManager<RuleUnitTest> {

	/**
	 *
	 */
	private static final long serialVersionUID = -3258729114956565360L;

	public void executeAllTests(Rule rule) {
		List<RuleUnitTest> unitTests = RuleUnitTestDAO.instanceWithDefaultEntityManager().getUnitTestsForRule(rule);
		executeList(unitTests);
	}

	public String createNewTest(Rule rule) {
		return XValidationPages.ADMIN_RULE_UNIT_TEST.getSeamLink() + "?rule=" + rule.getKeyword();
	}

	public String displayUnitTest(RuleUnitTest unitTest) {
		return XValidationPages.ADMIN_RULE_UNIT_TEST.getSeamLink() + "?unitTest=" + unitTest.getKeyword();
	}
    //...
}
Browse unit tests
Abstract class: net.ihe.gazelle.validator.ut.action.UnitTestBrowser<T extends UnitTest, Q extends UnitTestAttributes<T>>: for the basic features provided by the template, you only need to implement the abstract methods declared in this class. Use a PAGE scope.
XHTML template: /unittesting/browseUnitTestsTemplate.xhtml
The following parameters are expected:
- managedBean : reference to the bean which extends UnitTestBrowser, eg. #{ruleUnitTestBrowser}
- unitTestManagerBean: reference to the bean which extends UnitTestManager, eg. #{ruleUnitTestManager}
In addition, you can add:
- filters in the search criteria panel : moreFilters (<ui:define name="moreFilters">your components here</ui:define>)
- columns to the table gathering the unit tests: moreColumns
Browse unit test logs
Abstract class: net.ihe.gazelle.validator.ut.action.UnitTestLogBrowser: for the basis features provided by the template, you only need to implement the abstract methods declated in the class. Use a PAGE scope.
XHTML template: /unittesting/unitTestLogsTemplate.xhtml
The following parameters are expected:
- managedBean : reference to the bean which extends UnitTestLogBrowser, eg. #{ruleUnitTestLogBrowser}
- utManagerBean: reference to the bean which extends UnitTestManager, eg. #{ruleUnitTestManager}
In addition, you can add:
- filters in the search criteria panel : moreFilters (<ui:define name="moreFilters">your components here</ui:define>)
- columns to the table gathering the logs: moreColumns
<!DOCTYPE composition PUBLIC "-//W3C//DTD XHTML 1.0 Transitional//EN"
    "http://www.w3.org/TR/xhtml1/DTD/xhtml1-transitional.dtd">
<ui:composition xmlns="http://www.w3.org/1999/xhtml"
	xmlns:s="http://jboss.com/products/seam/taglib"
	xmlns:ui="http://java.sun.com/jsf/facelets"
	xmlns:f="http://java.sun.com/jsf/core"
	xmlns:h="http://java.sun.com/jsf/html"
	xmlns:a4j="http://richfaces.org/a4j"
	xmlns:rich="http://richfaces.org/rich"
	xmlns:g="http://www.ihe.net/gazelle" template="/layout/template.xhtml">

	<ui:param name="pageName" value="Unit test logs" />
	<ui:param name="pageNameUrl"
		value="/xvalidation/testing/ruleUnitTestEditor.seam" />
	<ui:param name="pageNameTitle" value="Unit test logs" />

	<ui:define name="header">
		<a4j:loadStyle src="/stylesheet/unittest-style.css" /> <!--imports specific CSS classes used by the template-->
	</ui:define>

	<ui:define name="body">
		<s:decorate template="/unittesting/unitTestLogsTemplate.xhtml">
			<ui:param name="managedBean" value="#{ruleUnitTestLogBrowser}" />
			<ui:param name="utManagerBean" value="#{ruleUnitTestManager}" />
			<ui:define name="moreFilters">
				<ui:include src="/filter/filterSuggest.xhtml">
					<ui:param name="filterWidth" value="240" />
					<ui:param name="filter" value="#{ruleUnitTestLogBrowser.filter}" />
					<ui:param name="filterId" value="validator" />
					<ui:param name="filterName" value="Tested validator" />
					<ui:param name="filterForm" value="globalDiv" />
				</ui:include>
				<ui:include src="/filter/filterSuggest.xhtml">
					<ui:param name="filterWidth" value="240" />
					<ui:param name="filter" value="#{ruleUnitTestLogBrowser.filter}" />
					<ui:param name="filterId" value="rule" />
					<ui:param name="filterName" value="Tested rule" />
					<ui:param name="filterForm" value="globalDiv" />
				</ui:include>
			</ui:define>
			<ui:define name="moreColumns">
				<rich:column>
					<f:facet name="header">Tested rule</f:facet>
					<g:link value="#{entry.unitTest.testedRule}" />
					<h:outputText value=" (#{entry.testedVersion})" />
				</rich:column>
			</ui:define>
		</s:decorate>
	</ui:define>
</ui:composition>
Create/Edit unit tests
Abstract class: net.ihe.gazelle.validator.ut.action.UnitTestEditorManager <T extends UnitTest>: implements the abstract methods and append the @Create annotation on the init() method. This init method shall be used to retrieve the unit test to edit (if no parameter is given in the URL, instanciate a new unit test). Use a PAGE scope. How files are appended to the test case is to be defined by you.
XHTML template: /unittesting/unitTestEditorTemplate.xhtml
The following parameters are expected:
- managedBean : reference to the bean which extends UnitTestEditorManager, eg. #{ruleUnitTestEditorManager}
- utManagerBean: reference to the bean which extends UnitTestManager, eg. #{ruleUnitTestManager}
In addition, you can add:
- a panel containing information about the object of the unit test : infoOnValidatedObject
- extract components to render the additional attributes of your unit tests: extraUnitTestAttributes
- a panel to create a new input file: newInputCreation
- the button to create a new file: buttonToCreateNewFile
Examples
This module is used in GazelleXValidatorRuleEditor (classes and xhtml files are respectively in gazelle-x-validation-ejb and gazelle-x-validation-war modules).
Extra tips
On the Unit test log browser page, you may want to add filters to search by tested entity. This entity is not an attribute of the UnitTest abstract class, as a consequence, you will have to implement the addPathToCriteria abstract method declared in UnitTestLogBrowser using the HQLSafePathEntityCriterion constructor. An example is given below.
@Override
	protected void addPathToCriteria(HQLCriterionsForFilter<UnitTestLog> criteria) {
		criteria.addCriterion(new HQLSafePathEntityCriterion(Rule.class, "rule", "unitTest.testedRule"));
		criteria.addCriterion(new HQLSafePathEntityCriterion(GazelleCrossValidatorType.class, "validator", "unitTest.testedRule.gazelleCrossValidator"));
	}
This way, two new suggest filters are available with filterId equals to rule and validator.
Web service for validation
Numerous validation services exposed by Gazelle only needs two methods :
- to list the avalaible validators (might be restricted by a distinguisher attribute)
- to perform the validation itself (uses the file to validate and the name of the validator to use)
When those two methods can be the basis of your validation SOAP web service, you can use the new module net.ihe.gazelle:gazelle-validation-ws. It embeds an interface to declre the web service, an abstract implementation of this interface and classes to store statistics about the usage of the tool.
Maven information
<dependency>
    <groupId>net.ihe.gazelle</groupId>
    <artifactId>gazelle-validation-ws</artifactId>
    <version>1.0.0</version>
    <type>jar</type>
</dependency>
Then you can create your web service as follows
@Stateless
@Name("ModelBasedValidationWS")
@WebService(name = "ModelBasedValidationWS", serviceName = "ModelBasedValidationWSService", portName = "ModelBasedValidationWSPort", targetNamespace = "http://ws.mb.validator.gazelle.ihe.net")
public class GazelleHL7v3ValidationWS extends AbstractModelBasedValidation {
   ....
}
Finally, to store the statistics in the database of your application, implement the ValidatorUsageProvider interface and annotate this new class with @MetaInfService(ValidatorUsageProvider.class)
Gazelle style guidelines
Guidelines for developing new Gazelle tools
This page is currently under construction. Contact the team for further information.
All you need to know when developing a new tool for the Gazelle testbed...
gazelle-tools as parent
what it is ? dependencies ?
features ? HQLQueryBuilder ...
plugins ? crowdin ...
which classes are required to be implemented ?
Properties to be set in pom.xml
ciManagement
issueManagement
scm
...
profiles (two by default: dev + prod)
Entities and data tables naming conventions
sequence generator, name of tables, name of columns ...
Code formatting
may refer to the Configure Eclipse page
GUI template
set of icons
meaning of icons
displaying a dataTable (footer, filter, column titles, action column ...)
h:form (s:token)
Installing Syslog tools (MIR)
Out of connectathon periods, we use the SyslogBrowser available on WUSTL server at http://gazelle-gold.wustl.edu/SyslogBrowser-eu. We need this tool to be locally installed in the connectathon floor in order to use it from there.
Here are the steps to install and configure the tools.
First, you need to ask Ralph for the latest versions of the tools (SyslogCollector and SyslogBrowser). It will come in one ZIP file enclosing the syslog collector and a WAR to be installed in Tomcat for the Syslog Browser part.
SyslogCollector
Unzip the archive in your /opt directory.
SyslogBrowser
The Syslog Browser run under tomcat7.
Simulator Developer Guide (use of modules shared by simulators)
Introduction
This section is aimed at developers who'd like to contribute to the Gazelle Project and develop new simulators.
What is a simulator ?
A simulator is a stand alone application that mimics one (or more) IHE actors for a given set of IHE profiles. The simulator may implement a web service interface that it used for the communication between Gazelle and the Simulator. The simulator shall also implement the functionality specific to the actors it is simulating. The simulator must to store the messages exchanged with the system under test and it's strongly recommend that it is bound to a validation service to check the conformity of the messages exchanged.
How to create a new simulator project ?
All the simulators of the Gazelle platform are built on the same model using a Maven archetype. This ensures that the layout will remain the same and it avoids wasting time in developing a new template and classes which can be common to several tools.
If the simulator you are about to create will implement HL7v2 based transaction, please read the HL7v2 based simulator section of this guide.
Below, we explain how to create a new Maven project using Eclipse new project configuration feature. Before starting this tutorial, make sure that you have the Maven plug-in installed (see Development support tools section of the developer guide for the list of plug-ins to install)
- Start Eclipse and create a new Maven Project: File --> New --> Project ... The New project pop-up will appear.
- Select the wizard entitled Maven Project (under the Maven folder) and click on the Next > button.

- On the New Maven Project page, verify that "Create a simple project (skip archetype selection)" is not checked and click on the Next > button

- Then, you are asked to select an archetype. Select the Nexus Indexer catalog and then Filter with net.ihe.gazelle. You should see an archetype named simulator-archetype. Make sure you have the latest version by checking the Nexus repository of Gazelle. If the latest version does not match the one displayed by Eclipse, you will be able to change it during the next step. Click on the Next > button.

- On the next page, enter the following informations
- Group Id: net.ihe.gazelle.simulators
- Artifact Id: the name of your simulator
- Version: might be 1.0-SNAPSHOT
- Package: net.ihe.gazelle.yoursimulatorpackage (prefer lower case)
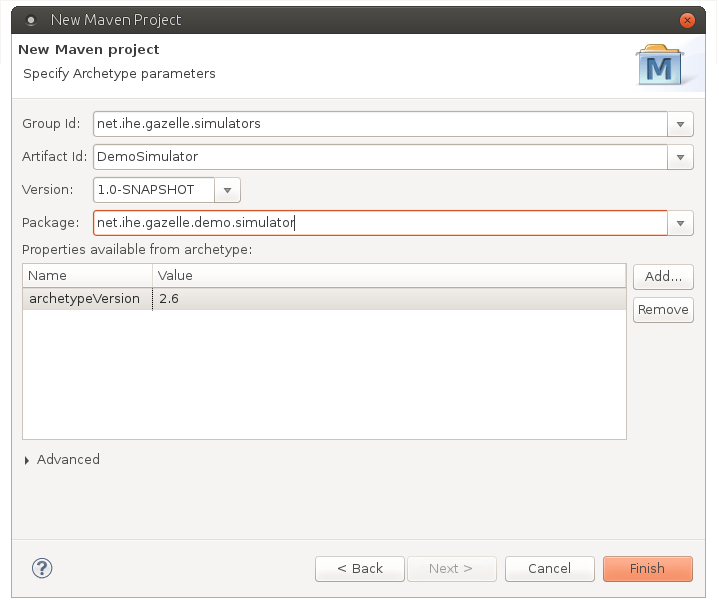
- Finally, click on the Finish button
- Creating the simulator might take a while, once the project is build, it will appear in your list of projects under the Java view. You can now start developing your new tool by editing and completed the pom.xml file available at the root of the project.

Add this new project in SVN
Simulators are gathered in the Maven/simulators directory of our SCM. To add your simulator, follow the instructions given below
- Go to the "Browse SVN" view and select the Gazelle repository (at svn+ssh://yourlogin@scm.gforge.inria.fr/svn/gazelle)
- Right click on Maven/simulators folder and select New --> Project structure...
- Enter the name of your project (Shall be the same as your parent project, in the example DemoSimulator)
- Check the folder and its children (trunk, tags, branches) are correctly created in the good place
- Go back to the Java view and right-click on the parent folder of your project (DemoSimulator in the example) and select Team --> Share Project...
- In the dialog window, select SVN and click Next >
- On the next page, select the Gazelle repository and click Next >
- Then, select Simple mode and browse the repository to access the right location: Maven/simulators/DemoSimulator/trunk
- Make sure that the final folder is trunk (Eclipse might add your project name after trunk and that is not what we want)
- Finish the process. You might be asked to checkout the project available on the Forge, say YES.
Features included within simulator-common and the archetype
Application preferences
simulator-common contains an entity named ApplicationConfiguration which is used to manage the preferences of your application. This feature is used by the other functionalities of simulator-common, make sure to create the followig preferences within your database.
| Preference name (variable) | Description | Default/Example value |
| application_url | The URL used by any user to access the tool | |
| cas_url | URL of the CAS service | Default: https://gazelle.ihe.net |
| application_works_without_cas | Indicates whether or not authentication uses the CAS service | Default: false |
| ip_login | Indicates whether or not IP addresses are filted at login when CAS service is not used | Default : false |
| ip_login_admin | Regex used to filter IP addresses | |
| message_permanent_link | URL to access the messages exchanged with the tool | |
| time_zone | Time zone of the application | Default: Europe/Paris |
| svs_repository_url | URL of Gazelle Value Set repository | Default: http://gazelle.ihe.net |
| documentation_url | URL to get the user manual of the tool | |
| application_release_notes_url | URL to get the release notes of the tool |
A page is dedicated to the management of preferences, see /admin/configure.seam (only accessible by admin)
Messages storage
After having developed several simulators, we noticed that we always need an entity to store the messages exchanged between the simulator and the systems under test. In most of the case, we need to store the same informations (initiator, responder, message content ...) and we bind the simulator to a validator so we also store the result of the validation process.
Authentication
A simulator offers several authentication methods, the basic method, the one we use on our server uses the CAS service available at https://gazelle.ihe.net. Other methods are:
- no authentication required, everybody has administration rights
- authentication based on IP addresses: only the users who are connecting with an IP address matching the regex defined in the database are granted with admin permissions
The table below represents the boolean set in the database and the behaviour of the tool depending on their values
| application_works_without_cas | ip_login | behaviour |
| true | true | Only the users whose IP address matches the regex are granted as admin (ip_login_admin must be defined) |
| false | true | Authentication and rights are managed by the CAS service |
| true | false | Any user is granted as admin |
| false | false | Authentication and rights are managed by the CAS service |
Model-based validation service
If you have developed a model-based validation service to validate the messages exchanged in the context of the integration profiles implemented by your simulator, you can use this web service to allow other applications to call your validator. Using this class instead of creating a new one is easier for the clients since it's the same stub as for the other validation services.
Home
The home page can be configured through the user interface (by admin) and the content is locale dependant.
Simulator control (from Test Management)
Simulators can be driven by Test Management application. A web service is available that you must implement to allow Test Management to control your simulator.
Value Set Repository Consumer
To build the messages, your simulator may need values from a specific set of codes. We usually store those codes within the SVS Simulator and use the SVSConsumer utility class to retrieve the codes (based on OID).
XUA
Some messages must contain an XUA assertion in their header. Some mechanisms are implemented in simulator-common to help you with creating those assertions.
Test report
A REST webservice is available to retrieve information about a transaction instance.
System Under Test Configuration
If your simulator acts as an initiator, you will need to store the configuration of the system under test. An entity named SystemConfiguration is available to store those informations, it assumes that you need an URL to contact the system under test. If the system under test is HL7 based, you need to use HL7Common as a parent and not directly simulator-common.
HL7v2 based simulator
From HL7Common-2.2, the structure of the AbstractServer class has changed, some changes need to be done in classes extending this abstract class.
If you are about to implement a new simulator based on the HL7v2 standard, please read carefully those lines, it will help you to use the common component developed by IHE Development team and to avoid wasting time rewriting existing things. Moreover, this will help us to keep a consistency between all HL7v2 simulators.
First of all, in this page, we define a simulator as the emulation of an actor of a given IHE integration profile for a given transaction. Obviously, your application can gather several simulators. Regarding the HL7v2 standard and IHE specifications, we define two different roles:
- Initiator: a simulator acting as a initiator sends a message to a system under test (SUT) and waits for its response. It works as a client.
- Responder: a simulator acting as a responder is a server, listening on a given port and sending a response to all received messages, this response can be an ACK, a NACK or anything else.
We are aware that some actors can play both roles but regarding the implementation of your application, you will have to distinguish each parts since the implementations differ.
Project configuration to use HL7Common maven module
IHE Development team has developed a maven archetype which enable you to build the architecture of your simulator. This archetype is available on Gazelle Maven repository. The values you need to generate the project from the archetype are given below.
- archetypeArtifactId: simulator-archetype
- archetypeCatalog: http://gazelle.ihe.net:9080/nexus/content/groups/public/
- archetypeGroupId: net.ihe.gazelle.simulators
- archetypeVersion: 1.16
If everything works well, the generated project contains three modules: EJB, WAR and EAR.
More over a maven module called HL7Common which contains all the classes and xhtml files you may use to implement your simulator based on HL7v2 standard is available in Gazelle Maven repository. To use it, complete your pom.xml files with the follwing lines.
This documentation is currently based on HL7Common:2.2.
Configure the POM file of your parent project to make the HL7Common module the parent of your new project.
<parent>
<groupId>net.ihe.gazelle.simulator.hl7</groupId>
<artifactId>HL7Common</artifactId>
<version>2.2-SNAPSHOT</version>
</parent>
Then, in the pom.xml file of the EAR and EJB modules add
<dependency>
<groupId>net.ihe.gazelle.simulators</groupId>
<artifactId>simulator-common-ejb</artifactId>
<type>ejb</type>
</dependency>
<dependency>
<groupId>net.ihe.gazelle.simulator.hl7</groupId>
<artifactId>HL7Common-ejb</artifactId>
<type>ejb</type>
</dependency>
Also in the pom.xml file of the EAR project add the following lines in the configuration of the maven-ear-plugin
<ejbModule>
<groupId>net.ihe.gazelle.simulators</groupId>
<artifactId>simulator-common-ejb</artifactId>
<uri>simulator-common-ejb.jar</uri>
</ejbModule>
<ejbModule>
<groupId>net.ihe.gazelle.simulator.hl7</groupId>
<artifactId>HL7Common-ejb</artifactId>
<uri>HL7Common-ejb.jar</uri>
</ejbModule>
Then, in the pom.xml file of the WAR module add
<dependency>
<groupId>net.ihe.gazelle.simulators</groupId>
<artifactId>simulator-common-war</artifactId>
<type>war</type>
</dependency>
<dependency>
<groupId>net.ihe.gazelle.simulator.hl7</groupId>
<artifactId>HL7Common-war</artifactId>
<type>war</type>
</dependency>
Charset
If you take a look to the classes defined in this module, you will find out an entity named Charset. This class is used to defined the character set encoding used by the simulator in one hand and by the system under test in another hand. For each charset we give the HL7 code used in MSH-18 segment and the code as understood by the JVM to read and write messages. By making the simulator and the system under test using the same charset, we ensure that the messages are understandable for each part. A set of data is available as an sql script in the parent parent of HL7Common module. You can also find it here.
System Under Test configuration
If your simulator acts as an initiator, it will need to know to "who" (host, port) send messages. A seam entity has been created to enable the simulator to retrieve those information and the user to store his/her system under test configuration into the simulator's database. In this way, he/she can retrieve it easily when he/she need to test his/her system. The XHTML page to manage configurations is stored in the WAR module of HL7Common, please provide a link to this page ("/systemConfigurations.seam") into your GUI. Each configuration will be linked to an actor and a charset.
Simulator configuration
To increase the interoperability between the simulator and the systems under test, we have chosen to send messages with the appropriate charset (when acting as an initiator). In the same way, when the simulator acts as a responder, we open different ports using different character set encodings. The SimulatorResponderConfiguration class has been implemented with this goal in mind. The main attributes of this object are the port number (on which the server listen) and the character set encoding. The README file attached give you some examples of how to fill your database.
HL7 messages and message validation
The application is expected to keep a trace of all transactions initiated by itself or by a system under test. We have chosen to store in the database, the received message along with the sent message. The HL7Message class is dedicated to this task. Consequently, each time the simulator sends or receives a message, it is required to instanciate a new HL7Message object and to store both the request and the response inside.
The HL7Message object is linked to another entity named EVSCValidationResults. Actually, each HL7v2 simulator has to be linked to the HL7InriaValidator in order to provide to the user a way to validate messages against the message profiles. The XHTML pages created in the WAR part of HL7Common provides the button which called the validator by a webservice mechanism. To work properly, you will need to add a preference to your application database, the one is given in the README file attached.Morevoer, the validation service needs to know which message profile to use and this action must be transparent for the user. Consequently, another entity named ValidationParameters is defined. For each tuple (actor, transaction, affinity domain, message type) we give the OID of the message profile to use.
A page gathering all the HL7Message contained in the application's database can be added into your GUI by making a link to "/hl7Messages.seam".
Affinity domain
An application could implement a same actor in different affinity domains. In this case, some distinctions may be required, especially for the message validation. Consequently, an entity named AffinityDomain has been defined and a link is made to it from the HL7Message, the SimulatorResponderConfiguration and the ValidationParameters.
Creating HL7 messages
HL7 defines a set of segments, some of which are common to most of the messages. It is the case for example for the MSH segment. In order to save time and to avoid to build this segment in as much ways as simulators, a class SegmentBuilder has been created in HL7Common and can be extended by each simulator if needed. By now, this class contains methods to fill MSH, EVN, PV1 and MSA segments.
An HL7MessageDecoder class exists in the same package and by now contains only one method which extracts the message type from a message using the HAPI Terser.
Acting as an initiator
If your simulator acts as an initiator, you will need to
- Collect information from the user to build messages
- Collect information about the SUT to "contact"
- Send messages
The first two points require a user interface. In order to keep a consistency between all simulators, a XHTML page ("/configuration/initiatorFrame.xhtml) has been created which has to be included at the top of your page for each actor your application emulates. This page contains a drop-down menu with all the available SUT for the simulated actor, the sequence diagram of the transaction and the configuration of the simulator. Some parameters are expected to be given to the page in order to display properly all the informations.
- actorKeyword: keyword of the actor played by the SUT, so that the offered configurations are filtered
- diagramImg: path to the sequence diagram image to include in the page
- currentConfig: the attribute from the managed bean in which the selected SUT configuration has to be set
- simuFacility: the string reprensenting the sending facility used by the simulator
- simuApplication: the string reprensenting the sending application used by the simulator
- sectionsToReRender: the list of page sections to rerender when the user change the selected configuration.
- simulatorConfigurationName: the name you want to give to the simulator's configuration
See below an example of how to include it into your page and how it is rendered.
<ui:include src="/configuration/initiatorFrame.xhtml">
<ui:param name="actorKeyword" value="PDC" />
<ui:param name="diagramImg" value="/img/diag/ident_diag.png" />
<ui:param name="currentConfig" value="#{creationManager.selectedSystemConfig}" />
<ui:param name="simuFacility" value="#{creationManager.sendingFacility}" />
<ui:param name="simuApplication" value="#{creationManager.sendingApplication}" />
<ui:param name="sectionsToReRender" value="sendMessageButtonDiv" />
<ui:param name="simulatorConfigurationName" value="PAM PDS Simulator"/>
</ui:include>

HL7Common uses HAPI to build messages and to send and received them. A class named Initiator has been implemented into HL7Common in order to help you to send message and to instanciate the HL7Message object. The constructor of this class set all the parameters required for the sending of the message and a method sendMessage() sends the message, waits for the response, builds the HL7Message object, stores it in the database and returns an instance of HL7MessageDataModel containing the created message. So that you can displayed this message in the GUI using a rich:dataTable component and the columns defined in HL7Common WAR part ("/hl7MessagesTableColumns"). See below an example of how to use this class.
public void sendMergeMessage() {
Initiator hl7Initiator = new Initiator(selectedSystemConfiguration,
			sendingFacility,
			sendingApplication,
			Actor.findActorWithKeyword("PDS"),
			Transaction.GetTransactionByKeyword("ITI-30"),
			createMessage(),
			MESSAGE_TYPE, "IHE");
try{
	msgDataModel = hl7Initiator.sendMessage();
}catch(HL7Exception e){
	FacesMessages.instance().add(e.getMessage());
}
}
Acting as a responder
First of all, note that when your simulator is acting as a responder, this part of the application cannot access the EntityManager using the Component class of seam. You have to declare all the entities in a configuration file and create your entityManager using this file. The squeleton of this file, usually named hibernate.cfg.xml is attached to this page.
If your simulator acts as a responder, you will need to perform the following actions:
- Listen for incoming messages on different ports (one port per character set encoding)
- Process incoming messages and send response
- Display received and sent messages
Concerning the first point, HAPI library offers a mechanism to create a server linked to an handler; the latter is used to process messages (2). Starting the JVM used by Jboss with the proper option enable the developer to specifiy the character set encoding used by HAPI to read and write messages on the socket. To increase interoperability between the SUT and the simulator, we have chosen to let the user choosing the character set encoding to use for sending and receiving. Consequently, some changes have been brought to the basic classes. Using IHE classes (built from HAPI ones) you can easily declare the character set encoding to use. Instead of instanciating a MinLowerLayerProtocol object, create a new IHELowerLayerProtocol instance by using the constructor which need a charset as a parameter.
We use the SimpleServer class from HAPI library to create the server part; the one has to be started at deployment time. This can be easily done using the annotations @Startup and @Create in the managed-bean dedicated to the server.
Concerning the second point, you need to create a class implementing the Application interface from HAPI. This interface contains 3 methods, two of them are very important: processMessage and processException. They are the methods called when a message is caught by the SimpleServer.
In order to save your time, two abstract classes IHEDefaultHandler and AbstractServer have been implemented and both of them have to be extended in your simulator. The first one has to be extended by the handler, so you will have to implement processMessage and processException; for the second one, you only need to implement the abstract method startServers() as shown below. Obviously, the AbstractServer is based on the SimulatorResponderConfiguration that is to say that when you call the startServers(Actor, Transaction, AffinityDomain, IHEDefaultHandler) method, all the configurations matching the 3 first criteria are retrieved and a instance of SimpleServer is created and linked to the IHEDefaultHandler for each item of the list.
@Startup
@Name("myServerBean")
@Scope(ScopeType.APPLICATION)
public class Server extends AbstractServer<MyHandler>{
	private static final long serialVersionUID = 1L;

	@Override public void startServers() {
		entityManagerFactory = HibernateUtil.buildEntityManagerFactory("META-INF/hibernate.cfg.xml");
		entityManager = HibernateUtil.beginTransaction(entityManagerFactory);
		Actor simulatedActor = Actor.findActorWithKeyword("PDC", entityManager);
		AffinityDomain affinityDomain = AffinityDomain.getAffinityDomainByKeyword("IHE", entityManager);
		HibernateUtil.commitTransaction(entityManager);
		handler = new MyHandler(entityManagerFactory);
		startServers(simulatedActor, null, affinityDomain);
	}
}
Concerning the last point, an abstract class SimulatorResponderConfigurationDisplay is used to display the list of listening ports for a given (actor, transaction, affinity domain) tuple. This class is also used to display the list of messages which have been received by the simulator. For each responder your application implements, you have to extend this class and implement the two abstract methods. An XHTML file (/configuration/simulatorResponderConfigurationTemplate.xhtml) is related to this class and has to be included into your GUI in this way:
<rich:panel>
	<f:facet name="header">Patient Demographic Consumer</f:facet>
	<ui:include src="/configuration/simulatorResponderConfigurationTemplate.xhtml">
		<ui:param name="managedBean" value="#{pdcGUIManagerBean}"/>
		<ui:param name="diagramPath" value="/img/diag/pdcResponder.png"/>
	</ui:include>
</rich:panel>
Managing Simulator Responder Configuration
Has seen above, the responder part of the HL7 simulators is managed using an entity called SimulatorResponderConfiguration. This entity defines several attributes, among them
- the IP address (this one is not used to start the service but to inform the user of the IP address to communicate with.
- the port (on which the simulator will listen)
- the serverBeanName (this attribute must match the @Name value of the AbstractServer which starts it, otherwise you will not be able to start/stop the server from the GUI)
The menu item "Simulator responder configuration", shown when logged as admin, leads you to the page used to configure the responder part of the simulator. From this page, you can
- Create a new configuration that means declare a new port to listen on
- Start/Stop listening on a port
- Start/Stop listenning on all the declared ports
Display of HL7 messages
The part of the HL7v2.x simulator which displays received and sent HL7 messages has been developed in HL7Common module and, in most of the case, you are not expected to bring changes to it. But, as we may have specific needs in some simulators, we tried to develop this part in such a way that it is easy to bring enhancements.
Menu
In order to have uniform applications, the menu items common to all HL7v2 simulators are gathered in a xhtml page /layout/hl7CommonMenuBar.xhtml you have to include in the menu of your application. The HL7 menu bar looks like this

Add the following lines in your file /layout/menu.xhtml
<!-- HL7 menu -->
<ui:include src="/layout/hl7CommonMenuBar.xhtml">
<ui:param name="displaySUTMenu" value="true"/>
<ui:param name="displaySimulatorMenu" value="true"/>
</ui:include>
- displaySUTMenu is used to indicate whether the menu for reaching the SUT configuration part must be displayed or not.
- displaySimulatorMenu is used to indicate whether the menu for reaching the Simulator "responder" configuration part must be displayed or not.
Footer
In order to have uniform applications, it is necessary to use the same template for the "about" modal panel in the footer item.
See the screenshot below to have an example :

Test reports
HL7Common integrates a feature that enables the simulator to provide test logs to other applications using a REST web service. In order to make this functionnality available in your simulator, you need to update your WEB-INF/web.xml file of the war module of your project with the following lines:
<!-- REST web service (see also line 178)-->
<context-param>
	<param-name>resteasy.jndi.resources</param-name>
	<param-value>${contextRootOfYourSimulator}/HL7v2TestReport/local</param-value>
</context-param>
<context-param>
	<param-name>resteasy.servlet.mapping.prefix</param-name>
	<param-value>/rest</param-value>
</context-param>
<listener>
	<listener-class>org.jboss.resteasy.plugins.server.servlet.ResteasyBootstrap</listener-class>
</listener>
<servlet>
	<servlet-name>Resteasy</servlet-name>
	<servlet-class>org.jboss.resteasy.plugins.server.servlet.HttpServletDispatcher</servlet-class>
</servlet>
<servlet-mapping>
	<servlet-name>Resteasy</servlet-name>
	<url-pattern>/rest/*</url-pattern>
</servlet-mapping>
!!! Make sure the application_name and application_url entries are present and not empty in your app_configuration table.
PatientGeneration module
A common module has been developed to help developers with the patient generation part of their simulators. Indeed, some simulators require the creation and saving of patients. In order to save developers' time and to make this part of the simulators quite uniform, a small maven project named PatientGeneration has been developed.
This project is divided into two parts: a jar module and a war module.
- The jar module contains mainly the abstract class which represents the common properties of a patient and a bean with a method which calls DDS to obtain a new patient.
- The war module contains the patient generation page, the pages to edit and to view the patient's common informations. They can be included using <ui:include> tags.
Sources
EJB and WAR archives at available on Gazelle's Nexus release repository but if you need to check out the files, URL to use is https://scm.gforge.inria.fr/svn/gazelle/Maven/simulators/PatientGeneration/trunk
Import notice
The PatientGeneration module calls SVSSimulator tool to get the display names for sex, race etc. Make sure you have a class annotated @MetaInfServices(PreferenceProvider.class) to retrieve the preferences of your application ; in particular, PatientGeneration will look for svs_repository_url.
How to use this module in a simulator
Note that the given examples are extracted from PAMSimulator project that you can find on the INRIA's Forge at https://scm.gforge.inria.fr/svn/gazelle/Maven/simulators/PAMSimulator/trunk.
To use the PatientGeneration project, you first have to add the following Maven dependencies to your project.
pom parent:
<dependency>
<groupId>net.ihe.gazelle.maven</groupId>
<artifactId>PatientGeneration-ejb</artifactId>
<version>${patientGeneratorVersion}</version>
<type>ejb</type>
</dependency>
<dependency>
<groupId>net.ihe.gazelle.maven</groupId>
<artifactId>PatientGeneration-war</artifactId>
<version>${patientGeneratorVersion}</version>
<type>war</type>
</dependency>
pom.xml of the EJB module:
<dependency>
<groupId>net.ihe.gazelle.maven</groupId>
<artifactId>PatientGeneration-ejb</artifactId>
<type>ejb</type>
</dependency>
pom.xml of the WAR module:
<dependency>
<groupId>net.ihe.gazelle.maven</groupId>
<artifactId>PatientGeneration-war</artifactId>
<type>war</type>
</dependency>
The method which generate the patient by calling DDS returns an AbstractPatient object. The AbstractPatient class is annotated with @Entity and @Inheritance(strategy = InheritanceType.SINGLE_TABLE), so that when you create an entity which extends this abstract class, data will be stored in pat_patient table. Your new entity requires a constructor which takes the AbstractPatient returned by the PatientGenerator bean as parameter, and the attributes of the abstract patients have to be copied into the attributes of your patient.
@Entity
@DiscriminatorValue("my_app_patient")
public class Patient extends AbstractPatient {
public Patient() {
}
public Patient(AbstractPatient abPatient){
this.firstName = abPatient.getFirstName();
this.lastName = abPatient.getLastName();
this.motherMaidenName = abPatient.getMotherMaidenName();
this.city = abPatient.getCity();
this.state = abPatient.getState();
this.street = abPatient.getStreet();
this.countryCode = abPatient.getCountryCode();
this.zipCode = abPatient.getZipCode();
this.genderCode = abPatient.getGenderCode();
this.religionCode = abPatient.getReligionCode();
this.raceCode = abPatient.getRaceCode();
this.dateOfBirth = abPatient.getDateOfBirth();
this.creationDate = abPatient.getCreationDate();
this.nationalPatientIdentifier = abPatient.getNationalPatientIdentifier();
this.characterSet = abPatient.getCharacterSet();
this.ddsIdentifier = abPatient.getDdsIdentifier();
}
}
You can notice that only the code (and not the display name) is stored for the race, the religion, and the gender. Actually, we only need the code because using the repository part of SVSSimulator we can retrieve the display name according to the language selected by the user (when the translation exists in SVS). If you take a look into the edit(show)AbstractPatientDemographic.xhtml files, you will see that a method is called for those properties instead of only displaying it. Those methods calls the SVSRepository. Concerning the country, only the code is stored too and the display name is retrieved from the JVM thanks to the Locale instance. That means that, by now, when you change one of those attributes, you need to give the code and not the display name. In the future, the repository will be used to display the list of available codes.
Then, when you write the java parts of your code, the java beans in which you need to generate a patient have to extend the PatientGenerator class from net.ihe.gazelle.patient package. If your bean is stateful and implements an interface annotated @Local, this interface is expected to extends PatientGeneratorLocal interface. When you will write the presentation part of your application, you will have to include /patient/patientGenerator.xhtml and add a button which calls a method which makes a call to generatePatient() from PatientGenerator.java to retrieve the AbstractPatient object.
See below an abstract from PAMSimulator.
@Name("creationManager")
@Scope(ScopeType.PAGE)
public class CreationManager extends PatientGenerator implements Serializable{

private Patient selectedPatient;
public void generateAndSavePatient(){
AbstractPatient aPatient = generatePatient();
if (aPatient != null) {
selectedPatient = new Patient(aPatient);
}
}

}
Here is the presentation part.
<s:div id="ddsDiv">
<rich:panel id="ddsPanel" rendered="#{creationManager.displayDDSPanel}">
<f:facet name="header">Patient Generation with DDS</f:facet>
<ui:include src="/patient/patientGenerator.xhtml">
<ui:param name="patientGeneratorBean" value="#{creationManager}" />
</ui:include>
<a4j:commandButton
 id="generateButton"
 value="Generate patient"
 actionListener="#{creationManager.generateAndSavePatient()}"
 onclick="Richfaces.showModalPanel('panelLoading');"
 oncomplete="Richfaces.hideModalPanel('panelLoading');"
 styleClass="commandButton"
 reRender="selectedPatientDiv, ddsDiv, sendMessageButtonDiv"/>
</rich:panel>
</s:div>
When the patient is created, you can display or edit his/her informations using at least the XHTML files provided in the patient folder of PatientGeneration-war module. Those files need the patient object as a parameter, use <ui:param name="patient" value="#{yourPatient}"/>
- Log in to post comments
Update security check on simulators
simulator-common, version 2.5, was updated to support security check. To enable the security check on simulators you have to :
- login as admin
- go to : administration/configure.seam. This page is included on simulator-common, so accessible by any simulator
- if it is the first time you are enabling the security check,
- you have to click on the button : Set default http headers value. This will update all missing application preferences related to http security headers.
- update the application preference: security-policies, set its value to true
- you have then to click on the button : Update http header security policies
- to verify that the security headers are enabled, you can use firebug :
- open firebug tool
- enable "network" menu
- reupload the home page
- click on the GET request catched by firebug
- verify that the header of the GET response contains attributes : X-WebKit-CSP-Report-Only,
x-content-security-policy...
Use of codes in simulators
Sometimes, we need codes to build messages sent by our simulators. The Sharing Value Set profile defines two actors: the repository within which are stored the codes and the consumer which can perform HTTP or SOAP queries to obtain a list of codes from a given value set.
A value set is a set of codes named "concepts" and identified by a unique OID. This page (here) gathers all the value sets contained in the gazelle SVS Repository. Each concept is defined by three values:
- Code
- DisplayName
- CodeSystem
A SVS repository is under development, and by now it is able to reply to HTTP queries (ITI-48 case). This IHE transaction defines a mean to retrieve a value set by giving at least its id. The language and the version. Our implementation also enables the user to retrieve a concept at random from a given value set. You can also retrieve a concept thanks to its code attribute and the value set id.
Two classes have been implemented in simulator-common-ejb to help you with retrieving codes when you require ones. The first class represents the Concept (three attributes are declared: code, displayName, and codeSystem) and the second one, named SVSConsumer implements three static methods:
- getRandomConceptFromValueSet: returns a Concept object randomly extracted from the given value set
- getConceptsListFromValueSet: returns the list of Concept objects gathered in the given value set
- getDisplayNameForGivenCode: returns the displayName of a given code for a given value set
NB. Do not forget to add the application configuration value : svs_repository_url. If not, the system will create it with the default value http://gazelle.ihe.net
- Log in to post comments
Test Management (system testing - automated)
Tools
Gui Testing (on Test Management)
Sources can be found here : https://scm.gforge.inria.fr/anonscm/svn/gazelle/Maven/gazelle-gui-testing/Automated-Test-testNG/trunk (website link)
This project, based on Automated Testlink scenarios project do the same job : automates scenarios written in Testlink for Gazelle-TM. All the test classes have been updated, the XPaths library has been also updated to be compliant with new Gazelle Test Management interface.
The Development environment and Maintenance sections are only about the Gui Testing project.
Pages Testing (on Test Management)
Sources can be found here : https://scm.gforge.inria.fr/anonscm/svn/gazelle/Maven/gazelle-gui-testing/PagesTesting/branches/selenide_testing (website link)
This project, using Page Object like in Gui Testing project automates scenarios written in Testlink for Gazelle-TM. It is used to test the access rights on all pages for each existing user profile within Gazelle TM
Old Tools (no updated since 2014)
Menu checker
Sources can be found here : https://scm.gforge.inria.fr/svn/gazelle/Maven/gazelle-gui-testing/topmenu (website link)
This tool browses every menu item with every account and with every Gazelle mod (tm, gmm, etc.). The concerned menu is the main menu on the top of the page. The tool just visit the page and checks that it does not redirect to error.seam. Checks are performed on the title, the url of the page, or on the text contained in the page. Errors can be defined either directly in the class ErrorPages or in an external file errorPages.xml. Logs are put in the /log folder. They contains the list of errors found, a screenshot of before/after encoutering the error, and the pages error.seam themselves (debug info can be stored here). The tool can be run by calling mvn -test (which is useful for jenkins) or by building a jar. See the specific section for more details.
EJB dependency : an EJB is used by the menu checker to get the list of the menu items. This dependency is set in the pom.xml. It should be updated if the one used in the tested gazelle installation differs from the one set in pom.xml.
Monkey testing
Sources can be found here : https://scm.gforge.inria.fr/svn/gazelle/Maven/gazelle-gui-testing/monkey-testing (website link)
This tool works the same way as the menu checker, except it clicks on a random link in the page. A time is set for a given session in the config.properties file and the tool travels through gazelle for that given time, then switches to another profile, etc. Logs work the same way as menu checker. The latest version is still a bit old and can only be run with mvn -test.
Automated Testlink scenarios
Sources can be found here : https://scm.gforge.inria.fr/svn/gazelle/Maven/gazelle-gui-testing/Automated-Test-testNG (website link)
This project automates scenarios written in Testlink for Gazelle-TM. The purpose of this tool is to be run with Jenkins at a given rythme, to give a constant view of the state of Gazelle-TM. The can be run with mvn -test. It is possible to configure Jenkins in such a way that it logs all test results in Testlink. See the specific section for more details. It is possible to add more test pretty easily, this is explained here.
Development environment
Dependencies
Several dependency are required for the project to work. They are all included in the pom.xml :
- TestNG
- Selenium (only version 2.X)
- Gazelle-TM
TestNG eclipse plugin must be installed for test development. It can be found in the eclipse marketplace (TestNG for eclipse) or installed manually : Help > Install new software > fill in with "http://beust.com/eclipse". Further instruction on TestNG here.
Selenium and browsers configuration
Selenium requires a Mozilla Firefox installed in the developper's computer. To be able to run tests on Mozilla Firefox, you need 46.0.1 version or older, after 47, Selenium is not able to driver the browser.
NEVER UPDATE MOZILLA FIREFOX VERSION, WEBDRIVER IS NO MORE MANAGED BY SELENIUM BY UPDATE 47
The project allow you to choose if you want to use Mozilla Firefox browser or Google Chrome. To do this, you will need to install chromedriver binary on the developper's computer.
You can find what you want on this page. If you choose to use Google Chrome instead of Mozilla Firefox, just edit Maven's pom.xml browser property, on concerned profile. (firefox, chrome are accepted).
Test Development
When developping a test, it is possible to run it by pressing Shift + Alt + X then N (or by clicking Run > Run as > TestNG test) when you're using Eclipse. If you're using Intellij IDEA you can run the current test by pressing Shift + F10 (or by clicking Run > Run 'CLASS_NAME').
Make sure that the "headless" property in pom.xml current used profile is set to false, otherwise the test will be run with xvfb (which can be useful, though). It can run in debug mode, like any other program.
Maintenance
The issue that is most likely to happen is xPath deprecation. Some changes won't affect the ability of xpaths to select the right object, but some will. The most vulnerable xpaths are those with a "nth" constraint, as "//table/tr/td[2]". This one for example select the second cell of a line (on the second column). If a column is added at the begining of this table, the xpath will stop selecting what it should. There are two kind of xpath deprecation :
- The xpath selects nothing
- The xpath selects another object
The first case is not that hard to fix. Because all xpath are named and all their call encapsulated in "getWebElement()", all exception will be caught. If, for example, I use the xpath "Button.Login", that has deprecated because the webpage changed, the method getWebElement() will display a console message of this kind : "[Button.Login] can't be found. Called by [ThisPageObject]". In this case my xpath stopped working but I know exactly which one and in which page. Half of the job is already done, I just now have to find a new xpath for Button.Login.
The second case can be tricky. Suppose the xpath "Td.Name" select the first column of a table with two columns : name and age. Suppose now that a new column is added at the first position : Surname. The xpath will still select something without error, but it won't be what we want to select. No direct error message will be displayed. The most likely outcome is that an assertion will fail. It is possible that this problem will require some more debugging just to find the erroneous xpath.
Another kind of problem is a webpage whose behavior changes. In this case, not only the xpaths, but the PageObject and the test classes are deprecated and have to be remake.
The most dangerous change (by far) is an update of seam. The way seam converts java component into html/css/javascript ones is decisive. PageObject class relies a lot on how the page is implemented : if one xpath says "I want the link inside this cell of this table", it won't work if the link is placed inside a div. But that change could happen, seam wraps its components inside a lot of invisible containers (div, span). It is completely possible that, for example, seam changes the way it renders its table in html, and that all cells of tables (td) become wrapped inside a div. When this happen, a lot of tests will suffer. It is a risk and will maybe never happen (given the last update of the seam website, it is indeed no very likely) but it is important to know this weakness.
Build and use the menu checker (deprecated)
The purpose of this page is to explain how to run the menu checker. It also contains information about how to create a standalone version, and how to configure it.
Sources
SVN link : https://scm.gforge.inria.fr/svn/gazelle/Maven/gazelle-gui-testing/topmenu/trunk
GForge link : https://gforge.inria.fr/scm/viewvc.php/Maven/gazelle-gui-testing/topmenu/?root=gazelle
Configuration
config.properties
This (internal) file contains several configuration properties and also some xpath.
| base.url=http://ovh3.ihe-europe.net:8080/gazelle/ | Url of the gazelle to test |
| base.page.url=home.seam | Filename of the home page |
| admin.login=sballuais | Username of an admin account, for mode switching |
| admin.password=azerty | Password of this admin account |
| gazelle.version.url=rest/version | Relative url of the version xml (rest) |
| administration.preference.url=administration/preferences.seam | Relative url of the preference page (administration) |
| crowdin.default.language=en | Default language |
| war.base.path=/home/sbs/workspace/Gazelle/gazelle-tm-war/ | Local absolute path of a version-equivalent Gazelle |
| headless=false | If true, tries to run with an xvfb session |
| run.span.check=true | Turns on or off the check of span (inner text). It is possible to turn if off because it can be slow (it waits for a timeout at each check) |
| logfile.url=log/ | Relative url that will be used to store log |
| firefox.download.directory=log/download/ | Relative url that will be used to store downloads |
| login.attempts.max=10 | The tool tries to log-in several times before giving up. This is this amout of time. |
| language.change.attempt.max=10 | The tool tries several times to change the language before giving up. This is this amount of time |
| slash.replacement.in.filename=__ | The character used to replace the slash when taking a screenshot or saving an error.seam page. If the page where an error is detected is /foo/bar.seam and this properties is "__", the filename of the screenshot will be "foo__bar.seam.png" |
errorPages.xml
This file can be used to override the errors that are defined in the class ErrorPages. Is the program find this file in its root, it will use it instead of the class ErrorPages. If not it will use the default values of ErrorPages.
Its functionning is pretty simple. There a three groups of error : pageName, pageTitles and pageSpans. The first one defines what page file-name are considered as errorneous (exactly), the second what title are considered erroneous (exactly) and the third is the list of text samples that make a page erroneous : if a page contains at least one occurence of this test, it is considered as erroneous.
LoginProfiles.xml
Contains all profiles that are used in the test. Note that all profiles must be valid and created in Gazelle.
Use with maven test
Use the command 'mvn test' when you are in the project root. This is how the project should be run by jenkins.
Build a jar
It is possible to build a fat jar (~80MB) that can be run anywhere. To do this, place yourself in the project root with a terminal. use the command 'mvn clean compile assembly:single'. The jar is created in the /target folder. It is advised to add configuration files next to it to allow it to run properly. Those are :
- config.properties : works the same way as when inside the jar. Overrides the internal config.properties.
- errorPages.xml : see above
Usage of the jar
To run the tool, just use the command 'java -jar the-jar-name.jar'. Logs and screenshots are created in the /log folder, where the jar is located.
Create a java automated test
The purpose of this document is to explain how to create a new test class in an existing test project. It contains technical explanation about how automated tests work.
Project in the forge : https://scm.gforge.inria.fr/svn/gazelle/Maven/gazelle-gui-testing/Automated-Test-testNG/branches/idr_testing
The project has three important parts :
- Test classes
- PageObject classes
- XPath catalog
Tests and PageObject classes
The project uses the design pattern page object. Test classes do not interact with webpage directly. All page interactions are factored in PageObject classes. This way if an action is required by several tests, it is written only once in one PageOblect class. PageObject classes are "interfaces" between webpages and test classes.
Test classes overview
All test classes extends BaseTest. Two methods must be defined : run() and testScenario(Object dataSet). The skeleton of a test class looks like this :
public class TM123 extends BaseTest {
	@Override
	@Test
	public void run() {
		// Dataset initialization.
		// Usually the 1st one is a LoginProfile
		Object[][] dataSets = new Object[][] {
			{ new LoginProfile("login", "password",
			           Languages.ENGLISH, "Some TestingSession"),
			  "Some Text" },
			{ /* Other dataSet */ }
		};
	withDataSets(dataSets);
	super.run();
	}

	@Override
	public void testScenario(Object[] ds) {
		LoginProfile loginProfile = (LoginProfile)ds[0];
		String someText = (String)ds[1];

		// Most of the tests start like this :
		// Open the main page, log-in and set the default testing session
		MainPage mp = new MainPage(getDriver(), loginProfile);
		mp.go();
		// Page command.
		// Notice that there should be only PageObject requests
		MiscPageObject mpo = mp.clickOnSomeLink();
		mpo.fillInSomeText(someText);
		// Assertions. Again, they are about PageObject method,
		// not about the page directly

		mp.logout();
	}
run() is the entry point for TestNG. It must always be annoted @Test. The class must not be annoted @Test.
Why are there 2 methods for one single test ?
There was initially only one method, run(). After some work it appeared that the test sometime failed for reasons that could not be considered as a "tested functionnality malfunction" (e.g. internet connection problem, etc.). The solution to this was to run the test method several times until it finished without encountering "external" failures. There was another constraints : having the entry point of a test in each class. It is important to have the entry point in the test class, without it we would have to write an other file whose function would be to reference all test class. We would then have to maintain this file, etc. The design pattern "template" was used.
BaseTest does one big thing : its run() method does some initialization (required by every test) and calls testScenario() until it ends successfully or with a decisive assertion. The method testScenario is the one which is implemented in every test class. Also, every test class' run() has to call super.run(). The overall functionning works like this :
- TestNG find a class with a method annoted @Test. In our case this method is always (and only) run()
- The run() of a concrete test class is called
- Some data sets initializations are made
- super.run() is called, the same for every test class : the one of BaseTest
- BaseTest.run() does some 'universal' initialization
- BaseTest.run() calls testScenario() until it returns properly and the testScenario() of the concrete test class is called
XPath catalog and PageObject functionning
All webpage query are made using xPath and not component Ids. This is because, the way GazelleTM is developped, Ids are redefined randomly everytime jboss restarts (and are thus uselss for identification). XPaths can be viewed as a description of a web component. If the component change in a non-essential way, the xPath still selects the same component, which is good; but the component can change too much, or a new component can be added to the page, making the xPath ambigous between the old and the new component (the xPath selects them both). To (partly) solve this problem, all xPath are stored in a single file and most of them have a part that is dynamically loaded.
The file xpath.properties contains all xPaths that are used in PageObject classes. All used xPath should be placed in this file. If possible, all "essential" text of a component used in an xPath should not be written directly in this file and should be loaded dynamically in the PageObject (e.g. the name of a button). Before an xPath can be used by a PageObject class, it should be loaded in its xPath hasmap. BasePage, whose every PageObject inherits, does one important things : it encapsulates all xPath queries. BasePage has a hasmap <String, String> of xPath. The key is the name of the xPath, close to the key of the xPath in the xpath.properties. The value is the xPath found xpath.properties filled with data. All xPath should be loaded and stored in the hasmap at the construction of the PageObject. Then, all xPath query should be done by calling the getWebElement() method of BasePage. Here is a skeleton shared by all PageObject class :
public class MiscPageObject extends BasePage{
	public PreConnectathonResults(WebDriver driver, LoginProfile lp) {
		super(driver, Loader.instance().config("base.url")
			Pages.CAT_PRECAT_VALIDATION_RESULT.getLink()
			.replace(".xhtml", ".seam"), lp);
	}

	@Override
	protected void loadXPaths() {
		// BasePage.loadXPaths() loads some xpath used by everything
		super.loadXPaths();

		// xPaths is the hashMap of all used xPath in this class
		xPaths.put("TextBox.Status",
			MessageFormat.format(
				Loader.instance().xpath("MiscPageObject.TextBox.Status.XPath"),
				Loader.instance().crowdin("gazelle.tf.table.Status")));
		xPaths.put("Span.Name",
				Loader.instance().xpath("MiscPageObject.Span.Name.XPath"));

	}

	/**
	 * Enters a status in the textbox. Presses enter
	 */
	public void fillInTextbox(String text) {
		// Notice how we get the WebElement only through getWebElement
		getWebElement("TextBox.Status").clear();
		sleep(1);
		getWebElement("TextBox.Status").sendKeys(text);
		getWebElement("TextBox.Status").sendKeys(Keys.RETURN);
	}

	/**
	 * Gets the content of the textbox
	 */
	public String getTestStatus(String testNumber, String keyword) {
		return getWebElement("Span.Name", keyword, testNumber).getText();
	}
}
All WebElement query is fetched only getWebElement(). This allows one thing : if the xPaths is unable to select an element, we can track immediatly the error and display the name of the xPath that failed. It is important to have the name instead of the value of the xPath, because the value of the xPath can be long and tough to read.
Step-by-step tutorial
We will take a simple example : the test we want to write checks a login feature. We login and we check that the displayed name is properly our.
The test to automate
Our two pages have this html code :
Login page :
<html>
 <h1>Login</h1>
 <table>
  <tr>
   <td>Username</td>
   <td><input type="textbox" /></td>
  </tr>
  <tr>
   <td>Password</td>
   <td><input type="textbox" /></td>
  </tr>
  <tr>
   <td><input type="button" value="Login" /></td>
  </tr>
 </table>

 <!-- some other content ... -->

</html>
Profile page :
<html>
 <h1>User Page</h1>
 <table>
  <tr>
   <td>Username</td>
   <td><span>Teemo</span></td>
  </tr>
  <tr>
   <td>Address</td>
   <td><span>blablabla</span></td>
  </tr>
  <tr>
   <td>City</td>
   <td><span>bla</span></td>
  </tr>
 </table>

 <!-- some other content ... -->

</html>
Let's write down exactly what our test has to do :
- Fill in the "Username" textbox
- Fill in the "Password" textbox
- Click the "Login" button
- Check that the displayed username is "Teemo"
The first step is to list every component that will be used. Here :
- The Username textbox
- The Password textbox
- The login button
- AND the username span
XPath catalog
The second step is to create the xPaths. This part is kind of tricky. The goal is to have an xPath flexible enough to handle some changes but rigid enough to select only the one component we want. Here is one solution :
For the Username textbox : //table//tr[td[text()='Username']]/td/input[@type='textbox']
This xPath means : "The first textbox you find (input[@type='textbox']) in the row (tr) that contains a cell (td) that has the text "Username ([text()='Username']).
For the Password textbox we can use the same, given we change "Username" into "Password" : //table//tr[td[text()='Password']]/td/input[@type='textbox']
Notice the "//" before table and tr. It means that the table can be anywhere in the page and that the line (tr) can be anyone. This is a change resistance.
For the login button, we can take this simple one : //input[@type='button' and @value='Login']
This one selects the button whose text is "Login". It is very unlikely that another button labelled "Login" will be put in the page in the future, so we can keep this wide xPath : the button can now move anywhere in the page, we will still get it.
For the Name span we can use pretty much the same as for the previous texboxes : //table//tr[td[text()='Name']]/td[2]/span
It means "The span of the second cell (/td[2]/span) of the row that contains a cell whose text is "Name" (//tr[td[text()='Name']])
We now have our xPath, but we have important text in them ("Username", "Login"). This is something we can extract and load dynamically, this way if the text is changed by Gazelle's developper, it will be instantly changed in our xPaths (change resistance).
So, let's replace every text by a {x} so we can fill them in later in our PageObject classes :
- Username textbox : //table//tr[td[text()=''{0}'']]/td/input[@type=''textbox'']
- Password textbox : //table//tr[td[text()=''{0}'']]/td/input[@type=''textbox'']
- Login button : //input[@type=''button'' and @value=''{0}'']
- Name span : //table//tr[td[text()=''{0}'']]/td[2]/span
Note how all quotes became quoted. This is because every curly bracket is used by MessageFormat. To display a bracket we have to escape it. We, here, don't need to display any bracket .. but the escape character is the quote ' so we have to escape every quote.
We can also notice that the Username and Password textbox are exactly the same once we have extracted their particular text. We can, in the xpath.properties, use only one xpath for the two (here it would be named simply "textbox" or something) but we can keep the two like this. It create a duplication, but if we chose to merge the two into one, maybe one day only one element will change. We will then need to split the xpath into two (for example if "Username" is displayed in bold and not "Login"), which is as anoying as keeping a code duplication. There is no one answer here, sometimes it is good to keep two separate xpath, sometimes it is good to have only one. In this case we will merge the two.
What we have to write in our xpath.properties is thus :
LoginPage.TextBox.XPath=//table//tr[td[text()=''{0}'']]/td/input[@type=''textbox'']
LoginPage.Button.Login.XPath=//input[@type=''button'' and @value=''{0}'']
UserPage.Span.Username.XPath=//table//tr[td[text()=''{0}'']]/td[2]/span
Note how we name our properties : [PageConcerned].[TypeOfComponent].[DetailAboutTheComponent].XPath
At this point we are done with the xpath catalog. Let's work on the PageObject classes.
PageObject classes
We have two different page. We will thus make two PageObject classes. Note that it is arbitraty : it can be adequate to make one class for just a part of a page. The goal is to have a functionnal separation between files.
Let's create our file Login.java. It will contain the skeleton shown above :
public class MiscPageObject extends BasePage{
	public LoginPage(WebDriver driver, LoginProfile lp) {
		super(driver, Loader.instance().config("base.url")
			Pages.LOGIN_FOR_OUR_EXAMPLE.getLink()
			.replace(".xhtml", ".seam"), lp);
	}

	@Override
	protected void loadXPaths() {
		// BasePage.loadXPaths() loads some xpath used by everything
		super.loadXPaths();
	}
}
The first thing to do is to set the default url for the page. We usually want to use a value found in the Page.class enum of the Gazelle project.
Then, we have to load the xPaths we defined above :
@Override
protected void loadXPaths() {
	super.loadXPaths();

	xPaths.put("TextBox.Username",
		MessageFormat.format(
			Loader.instance().xpath("LoginPage.TextBox.XPath"),
			Loader.instance().crowdin("properties.for.username"));
	xPaths.put("TextBox.Password",
		MessageFormat.format(
			Loader.instance().xpath("LoginPage.TextBox.XPath")
			Loader.instance().crowdin("properties.for.password"));
	xPaths.put("Button.Login",
		MessageFormat.format(
			Loader.instance().xpath("LoginPage.Button.Login.XPath")
			Loader.instance().crowdin("properties.for.login"));
}
Note how we fill the xPath with data found with the Gazelle crowdin properties.
Once this is done, we have to create the methods that will be used in our test. We will need :
- A method to fill in Username
- A method to fill in Password
- A method to click on Login
There is no a priori good level of granularity. We can either have on single method for the three action or one for each. In this case one big method is fine : it is not currently likely that we will need to fill in the Username and not the password. But this could be the case, for other tests. Anyway, the goal is to anticipate which solution will last longer. In our case, we groupe the three tasks into one.
It gives us :
public UserPage login(String username, String password) {
	getWebElement("TextBox.Login").clear();
	getWebElement("TextBox.Password").clear();
	getWebElement("TextBox.Login").sendKeys(username);
	getWebElement("TextBox.Password").sendKeys(password);
	getWebElement("Button.Login").click();

	return new UserPage(getDriver(), getLoginProfile());
}
Note that we return a UserPage. This is because we know that we are supposed to be redirected to a user page : it allows method chaining in the test classes.
We won't need anything more with that page for now (fot this test). We are done with this page, but if we need, for another test, new things in this page, we will add the new methods here.
The class UserPage.class, meanwhile, will look like this :
public class UserPage extends BasePage{
	public PreConnectathonResults(WebDriver driver, LoginProfile lp) {
		super(driver, Loader.instance().config("base.url")
			Pages.USERPAGE_FOR_OUR_EXAMPLE.getLink()
			.replace(".xhtml", ".seam"), lp);
	}

	@Override
	protected void loadXPaths() {
		super.loadXPaths();

		xPaths.put("Span.Username",
			MessageFormat.format(
				Loader.instance().xpath("UserPage.Span.Username.XPath"),
				Loader.instance().crowdin("properties.for.username")));
	}

	public String getDisplayedName() {
		return getWebElement("Span.Username").getText();
	}
}
We are now done with PageObject, our pages should be able to initialize themselves and to query webpages.
Test classes
The shortest part remains : writing the tests. The result is the skeleton shown above plus methods call corresponding to the steps we identified above :
public class TMEXAMPLE extends BaseTest {
	@Override
	@Test
	public void run() {
		Object[][] dataSets = new Object[][] {
			{ "Teemo", "ThePassword" }
		};
	withDataSets(dataSets);
	super.run();
	}

	@Override
	public void testScenario(Object[] ds) {
		String username = (String)ds[0];
		String password = (String)ds[1];

		UserPage up = new LoginPage(getDriver())
		  .login(username, password);

		Assert.assertequals(up.getDisplayedName(), username,
			"The displayed name should be : " + username);
	}
}
Note how we use the dataset to center the data at the same place. At the begining of testScenario() we extract the data from the array, for more readability, then we call the righ methods. At the end we perform an assert.
Our test is now ready. For debugging, it can be run with Alt+Shit+X then N (or in Run > Run as > TestNG test) when you're using Eclipse. If you're using Intellij IDEA you can run the current test by pressing Shift + F10 (or by clicking Run > Run 'CLASS_NAME'). Just commit it and it will automatically be run at the next test session. For automatic result logging, see this section.
Create a pipeline job
The purpose of this page is to explain how to create a Jenkins pipeline job to execute every job by launch only one build.
Prerequisites
- A jenkins server
- Gazelle-TM-GuiTesting project job (configuration link)
- Gazelle-TM-EU-CAT project job to be able to build EU-CAT application
Step 1 : Check Jenkins version
To be able to use pipeline jobs, you need to have a Jenkins server which is running on version 2 at least. It's because Pipeline plugin's suite is natively installed on this version.
Step 2 : Create pipeline job
First go to Jenkins's homepage. Now click on "New job" and choose "Pipeline" and don't forget to fill-in the name ("Gazelle-TM-Pipeline").
In "Pipeline" section, choose "Pipeline script" in Definition.
In Script textbox, you now need to script everything to create a pipeline. You need to specify every step of the pipeline : Building Gazelle-TM-EU-CAT application, launch Gazelle-TM-Deployment to deploy application on Gazelle's server, launch GuiTesting job, launch PagesTesting job.
To do this, we used stage() groovy syntax. Stage is used to separate every step of the pipeline. In each stage, you have to use build() method to trigger build on each job concerned. You can pass parameters if you have make some modifications on GuiTesting or PagesTesting projects configurations to pass some parameters.
//Job parameters to be used in other jobs builded
def browser =  BROWSER;
def xml_file =  XML_FILE;
//First step
stage("Build new Gazelle-TM V7 application"){
    build 'gazelle-tm-eucat-v7-SNAPSHOT'
}
//Second step : Deploy new application and restore last database on Gazelle's server
stage("Kujira environnment preparation"){
    build 'Kujira-Gazelle-Deployment'
}
//Third step
stage("Running interface tests job : Kujira-GuiTesting"){
   //Launch GuiTesting job build with passed parameters
    build job: 'Kujira-GuiTesting', propagate: false, parameters: [string(name: 'selenide.browser', value: browser), string(name: 'XML_FILE', value: xml_file)]
}

stage("Running interface tests job : Kujira-PagesTesting"){
       //Launch PagesTesting job build with passed parameters
    build job: 'Kujira-PagesTesting', propagate: false, parameters: [string(name: 'selenide.browser', value: browser)]
}
Gui Testing (Automated system testing)
Known errors and problems : How to resolve them
Known errors and problems : How to resolve them
Fatal server error:
(EE) Cannot establish any listening sockets - Make sure an X server isn't already running(EE)
To correct this Fatal server error, connect to the server who run job, then type following command : sudo htop
If htop is not installed, just type : sudo apt-get install htop.
Then, press F3 key and type : "xvfb". If Search find something press F9 and select SIGTERM.
Check another time if there's no more xvfb phantom process.
Problem should now be solved.
Fatal server error:
(EE) Server is already active for display 1
	If this server is no longer running, remove /tmp/.X1-lock
	and start again.
To correct this Fatal server error, connect to sthe erver who run job, then type following command : sudo rm /tmp/.X1-lock
Problem should now be solved.
Use TestLink and Jenkins to automate tests results logging
The purpose of this page is to explain how to create a Jenkins job that will run an automated test project an save test results in Testlink.
Prerequisite
Three things are required :
- A Jenkins server
- A TestLink server
- A maven java project with automated tests
Step 1 : Configure TestLink
We start by configuring Testlink. The goal is to add some informations and configuration that will be used by Jenkins. We consider that we starts with an already existing Testlink project that contains the tests that are automated in the java project.
Add custom fields
We add a custom field to every test scenario. Those fields will be used to bind one test to one java class.
Select the right Project ("Test Management") and Test Plan ("System testing (Automated)"). From the main page, go to the "Define custom fields" section at the left of the screen". Click on "Create". Fill in informations :
- Name : "java_class"
- Label : "TestNG class name"
- Available for : "Test Case"
- Type : "string"
- Enable on : "Test Spec Design
- Display on test execution : "No"
Fill in custom fields and configuring test scenarios
Go to the "Test Specifications" section. The list of every test case is displayed. For every test case for whom you have an automated test :
- Click on this test in the list
- On the right part of the screen, click on "Add to test plan".
- Tick "System testing (Automated)" and click on "Add"
- For every step of the scenario, click on the line on the table, then select "Automated" in the "Execution" column then click on "Save"
- Click on "Save & exit"
- On the right part of the screen, click on the Edit button
- Fill in the field "java_class" with the complete class name, including packages. For example : "net.ihe.gazelle.test.test_case.TM321".
- Check that the Execution Type select box is at "Automated". Chose Automated if it's not.
- Click on the Save button.
Create a developper key
Teslink has a special user which corresponds to the automated tester. He is called "Jenkins tester". To identify as this user, Jenkins uses its developper key. Currently it is "3f216bbb9926913a3373274d33c04242". If the key changed, it is accessible in the "My setting" menu when logged-in as the Jenkins tester user in Testlink.
At the home page of testlink, with an admin account, click on "Test project management". Clik on our project ("Test Management") and make sure that "Enable Test Automation (API key)" and "Enable inventory" are properly checked.
We are now done with TestLink. Every test case is considered as automated and is able to tell which java class should run it.
Step 2 : Configure Jenkins
Install the TestLink plugin
Click on "Administrate Jenkins" > "Plugins Management" > "Available" tab > at the "TestLink Plugin" line, check the box. At the bottom of the page, click on "Download now and install after restart". Wait a few seconds.
Go back to jenkins' homepage. Click on "Administrate Jenkins" > "Configure System".
At the TestLink section, fill in informations :
- Name : the name of the installation
- URL : the url of the xmlrpc.php page of the TestLink installation. In our case "http://gazelle.ihe.net/testlink/lib/api/xmlrpc/v1/xmlrpc.php"
- Developper key : the key generated at the end of the TestLink section above
- Click on "Save" at the bottom of the page
Installing the Extensible Choice plugin
Click on "Administrate Jenkins" > "Plugins Management" > "Available" tab > at the "Extensible Choice" line, check the box. At the bottom of the page, click on "Download now and install after restart". Wait a few seconds.
Installing the Xvfb plugin
Click on "Administrate Jenkins" > "Plugins Management" > "Available" tab > at the "Xvfb" line, check the box. At the bottom of the page, click on "Download now and install after restart". Wait a few seconds.
This plugin is used to create a temporaty virtual frame buffer for the job.
Installing the SSH plugin
Click on "Administrate Jenkins" > "Plugins Management" > "Available" tab > at the "SSH Plugin" line, check the box. At the bottom of the page, click on "Download now and install after restart". Wait a few seconds.
Go back to jenkins' homepage. Click on "Administrate Jenkins" > "Configure System".
At the "SSH Remote Hosts" section, Fill in information for the ssh access to the server that host the tested Gazelle-TM.
- Hostname : GAZELLE_APPLICATION_SERVER_IP_ADDRESS
- Port : 22
- User name : gazelle
- Keyfile : /home/jenkins/.ssh/id_rsa (A pair of key must be generated for the jenkins user and the server must be configured to accept him)
This way jenkins can perform some initialization commands in the Gazelle-TM server.
Configure global choice parameters
Go to "Manage Jenkins" menu then click on "Configure Jenkins".
Then scroll to :
|
Extensible Choice: Available Choice Providers
|
In this section, make sure that Global Choice Parameter is ticked. Then click on "Add New Choice List" button.
Fill-in the new container like this :
- Name : BROWSERS
- Choices : List every browser you want to use. (firefox, chrome, ie choices only are supported)
Then click on "Add New Choice List" button.Fill-in the new container like this :
- Name : XML_FILES
- Choices :
- testng
- institutionmanagement
- invoicemanagement
- testingsessionmanagement
- systemmanagement
- useraccountmanagement
- preconnectathonworkflow
- testng-failed
Then click on "Add New Choice List" button.Fill-in the new container like this :
- Name : SERVERS
- Choices :
- Ip adress or domain name of Gazelle-TM server
Create the job
Go back to Jenkins' home page. Click on "New Job", select "Free Style Project" and fill-in the name ("Gazelle-TM-GuiTesting").
In "source code management" select how your test project will be fetched by Jenkins. If it is on a SVN repository, select "Subversion" and fill-in repository informations. If the project is locally stored select "none".
The currend location is : "https://scm.gforge.inria.fr/anonscm/svn/gazelle/Maven/gazelle-gui-testing/Automated-Test-testNG/branches/idr_testing"
In the "General" section, tick "This build has parameters" then select "Add parameter" and chose "Extensible Choice". Fill-in informations :
- Name : selenide.browser (Don't worry about selenide word, it's for future updates)
- Choice Provider : Global Choice Parameter
- Name : BROWSERS (Global choice parameter defined previously)
- Default choice : As your convenience
Click another time on "Add parameter" and chose "Extensible Choice" again. Fill-in like this :
- Name : XML_FILE
- Choice Provider : Global Choice Parameter
- Name : XML_FILES (Global choice parameter defined previously)
- Default choice : testng.xml or as your convenience
Click another time on "Add parameter" and chose "Extensible Choice" again. Fill-in like this :
- Name : server.ip
- Choice Provider : Global Choice Parameter
- Name : SERVERS (Global choice parameter defined previously)
- Default choice : As your convenience
In the "build" section, select "Add a step" and chose "Invoke TestLink". Fill-in informations :
- TestLink Version : select the one that has the name defined above
- Test Project Name : the TestLink project name
- Test Plan Name : the TestLink Plan name
- Build name : the name of every test execution in testlink. You can use variables to have dynamic naming. Here :"build-$BUILD_NUMBER"
- Custom field : the custome field we defined above : "java_class"
In the "Test execution subsection", for "single build test", select "Add action". Then fill-in :
- Maven Target : "-P jenkins clean test"
In the "Result seeking strategy" select Add Strategy > TestNG class name. Fill-in :
- Include pattern : "target/surefire-reports/testng-results.xml". It is the path of the xml containing the test results.
- Key custom field : "java_class", same as above
- Select "Attach TestNG xml"
Click on save at the bottom of the page
Create restore database and application job
Go back to Jenkins' home page. Click on "New Job", select "Free Style Project" and fill-in the name ("Gazelle-Deployment").
In the "build" section, select "Add a step" and choose "Execute shell script on remote host using ssh". Fill-in informations :
- SSH Site : select the one that has been defined in Administrate Jenkins above
- Command :
cd /home/gazelle/unit_tests_selenium/
./restore_database_J7.sh
In the "Actions after build" section, select "Add a step" and choose "Trigger parametrized build on other projects".
Fiil-in informations :
- Project to build : Gazelle-TM-GuiTesting
- Trigger when build is : Stable
Click on save at the bottom of the page
Step 3 : Execute the tests
The jenkins jobs are now completely configured and should work properly.
A sum up of an execution would be :
- Run a new build of Gazelle-Deployment
- He execute restore_database.sh to reset the database
- After build Success, trigger build on Gazelle-TM-GuiTesting
- Jenkins gather the sources
- He starts the xvfb instance
- He asks Testlink to know which test are automated
- He build the project and start the maven target test
- TestNG checks the testng.xml file in the java project
- This file indicates him to run every class in the net.ihe.gazelle.test.test_case package
- The run() method of all class are executed
- An xml file cointaining test results is generated by TestNG
- Jenkins parses this file and logs the result in TestLink. He knows which class corresponds to which test with the java_class field.