Development support tools (tips for Drupal, Eclipse, Jboss, Linux and so on)
Gazelle team members use various tools for different purposes, here are the links to those tools and what they stand for.
Tools available online
Jenkins: Continous integration systems. The trunk of each project is built every night, if changes have been committed during the last 24 hours
Jira: Bug Tracking System. Each Gazelle tool has its own Jira project (link is available in the footer of the application). The team also uses Tempo and Greenhoper (Agile methodology) plug-ins to respectively log working time and manage Agile sprints.
Nexus: Gazelle projects are built using Maven. Nexus is both a proxy for third-party dependencies and a repository for the releases and snapshots produced in the context of the Gazelle project
Crowdin: Gazelle applications are designed to be displayed in several languagues. Crowdin is an online translation management service. Users and developers work together to translate the applications into several languagues (Engligh, French, Japanese, German, Suomi...)
Sonar: Static analysis of the Java code. Analysis is run each time a job runs in Jenkins.
Testlink: Tests and Requirements management tool used by the Gazelle project
Tools that you may want to install on your computer
Eclipse: Prefered IDE for Java. You may also want to use the following plug-ins
- CodePro
- Maven
- SVN
- Sonar
Oxygen: Edit XML, XSL, XSD, perform validation using Saxon, etc...
PgAdmin III: Access your postgresQL database
plantUML: Develop sequence diagram, class diagram
jEdit: good text editor with advanced features
HL7 Inspector: Send and receive HL7 messages
SoapUI: SOAP webservice client
Virtual Box: Container for virtual machines
Set up your development environment
Execute :
wget http://gazelle.ihe.net/jenkins/job/gazelle-public-RELEASE/ws/gazelle-tm-ear/src/main/scripts/setup.sh
chmod +x setup.sh
./setup.sh
install mvn svn
sudo apt-get install maven subversion
Configure Maven
edit ~/.m2/settings.xml file, configure your username and password
<?xml version="1.0"?>
<settings xmlns="http://maven.apache.org/SETTINGS/1.0.0" xmlns:xsi="http://www.w3.org/2001/XMLSchema-instance" xsi:schemaLocation="http://maven.apache.org/SETTINGS/1.0.0 http://maven.apache.org/xsd/settings-1.0.0.xsd">

  <mirrors>
    <mirror>
      <id>nexus</id>
      <mirrorOf>*</mirrorOf>
      <url>http://gazelle.ihe.net/nexus/content/groups/public</url>
    </mirror>
  </mirrors>
</settings>
Fetch Sources
You can browse project on: https://gforge.inria.fr/scm/viewvc.php/Maven/?root=gazelle
It is strongly recommended to work from a tagged version of the application.
Gazelle-tm: https://scm.gforge.inria.fr/svn/gazelle/Maven/gazelle-tm/tag
Pickup-up the tagged version of gazelle-tm you would like to build. Then select run the maven build command
mvn -Ppublic clean package
In case you would also like to compile the dependencies, find in the master pom.xml file the tagged version used for each of the dependencies. You can then pick up that version to recompile it.
Gazelle-tm-tools: https://scm.gforge.inria.fr/svn/gazelle/Maven/gazelle-tm-tools/tag
Gazelle-model: https://scm.gforge.inria.fr/svn/gazelle/Maven/gazelle-model/tag
Gazelle-tools: https://scm.gforge.inria.fr/svn/gazelle/Maven/gazelle-tools/tag
Install your favorite IDE (Eclipse or Intellij Idea)
Adding content in Drupal
Gazelle website is now running on Drupal 7. This page describes how the content is organized and how to add a new page (right content type in the right place)
Menus
Menus can be configured from Structure > Menus. Four menus are used in this web site
- Quick links which is displayed on the left side bar
- Main menu which is displayed at the top of the page (Home, Blog...)
- Kereval team menu is available only to the users from the team based at Kereval
- epSOS menu is available only to the users involved in the epSOS project
Books
Switching to the new website, we have restricted the number of books, each new page you create must be part of one of the following books. Otherwise, you may want to create a blog entry.
- Gazelle developers guide is mained to contain all the informations a developer of Gazelle may need
- IHE Connectathon gatheres the general information about the connectathon process
- Gazelle user guides is the entry point for all the pages which teach the user how to use the Gazelle tools. This book is organized in different chapters matching the type of tool: Core, External Validation Services, Simulators
- Installation guides gathers all the tutorials to install such or such tool
- Product Registry is the documentation of the tool Product Registry
- Quality Manual is maintained by Quality insurance body of the Gazelle platform
- [ARCHIVES] Deprecated projects is used to store all the pages relative to tools which have been deprecated or replaced
- [ARCHIVES] European connectathons is used to store all the pages relative to the past connectathons in Europe
- Pre-connectathon tests contains the description of the pre-connectathon tests which are run "against" Gazelle tools; those tests are referenced within GMM and sorted by tool.
Each time you want to create a new content which aim to be added to one of those books, use the book page (new) content type. Then, in edit mode, at the bottom of the page, go to the Book outline section and select first the book in which you want to add the page and then its parent item (it may be the root of the book).Once it's done, the fastest way to put the page where you want in the book is to go to Content and then under the Book tab. A quicker manner is to go on the parent of the new page and hit the "Add child page" link.
Blog post
The blog content type must be used to publish a news in the blog section of the website. When you create a new blog entry, you can tick the Announce this post on Twitter checkbox so that a new tweet containing the link to this new blog entry will be posted by @IHE_Gazelle account
Archives
The archives section is used to stored the pages which are no more relevant but that we want to keep as an history of your work. Select the page you want to archive, edit it and, in the book outline section, select one of the [ARCHIVES] book. If the page you move has children, they will be moved also.
Home page
The home page is automatically built. All the contents of type "frontpage-block" which is set as "published" and "sticky to front page" is used to build the page, organized in two columns and sorted by ascending "order in home page" (a field available in edition mode).
Page for Kereval only
This type of content is configured to be accessible only by the users which are in the group "Kereval". When you create such a page, to not forget to tick the "Provide a menu link" check box. In this way, the link to this new page will be displayed under the Kereval team menu displayed in the left-hand column
Page for epSOS only
This type of content is configured to be accessible by users which are in the group "epSOS" (and others since not all epSOS staff may be registered in Gazelle and known as an epSOS user). If you tick the "Provide a menu link" check box, a link to this page will be created under the epSOS menu.
Configure Chrome for Nagios monitoring
This short tutorial presents how to configure the chrome web browser in order to monitor the services deployed for the gazelle test bed.
- You first need to install the nagios checker plugin in your chrome browser. The plugin can be obtained from the following URL : https://chrome.google.com/webstore/detail/nagios-checker/oghnfiojdffbaihbdlcjkcefiblbdmch?hl=en
- Configure the plugin to access the nagios server : MAKE SURE that the status.cgi path is set to : /nagios3/cgi-bin/status.cgi?host=all&limit=1000
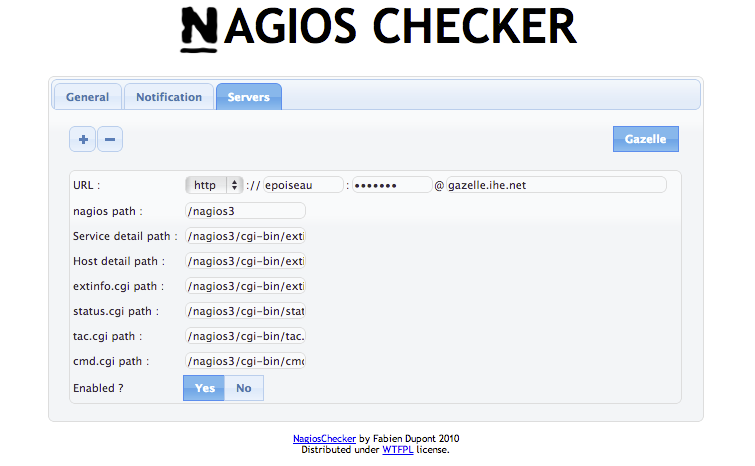
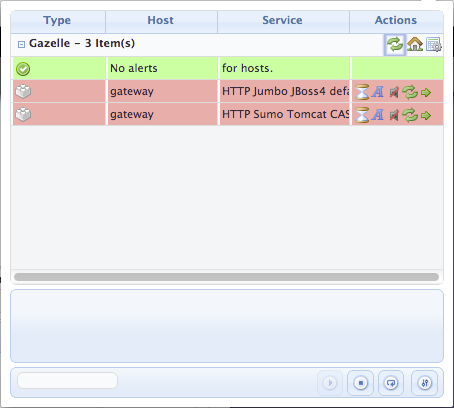
- Then you will be able to view the services that are giving problem directly from your chrome browser.
Configure Eclipse
Configure Eclipse to view Sonar reports
- Install sonar plug-in:
- marketplace
- site update: http://dist.sonar-ide.codehaus.org/eclipse/
- Configure the connection to sonar:
- Go to Window -> Preferences -> Sonar -> Servers
- Add new server:
- url= http://gazelle.ihe.net/sonar
- Then, for each project you need to activate the sonar plug-in:
- Right-click on project -> configure -> Associate with sonar...
- (Optional) Add a Sonar view
- Window -> Show view -> sonar -> violations
Java code formatting in Eclipse
Download the formatting file available here and add it to your Eclipse configuration. Go to Window --> Preferences. Then select Java --> Code Style --> Formatter and click on the Import... button.
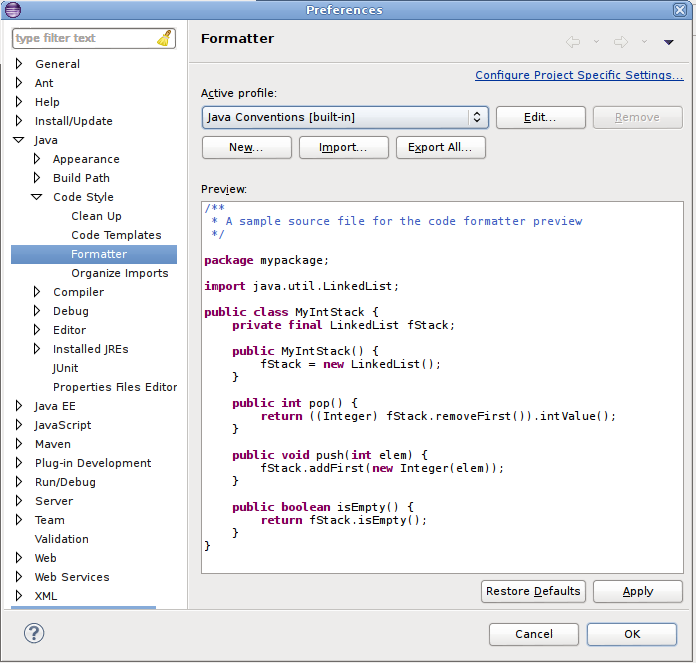
To format all the sources of a given project, right-click on the src/main/java directory and select Sources --> Format
Auto-completion of XHTML tags
If you want Eclipse to auto-complete the tags of your XHTML files and to give you the list of available attributes for a tag, read this tutorial. In addition, to have the rich and a4j tags listed, you can create a user library and add richfaces-api, richfaces-impl et richfaces-ui. You will find those binaries in your .m2 repository in /org/richfaces/framework and /org/richfaces/ui folders.
Template for loggers
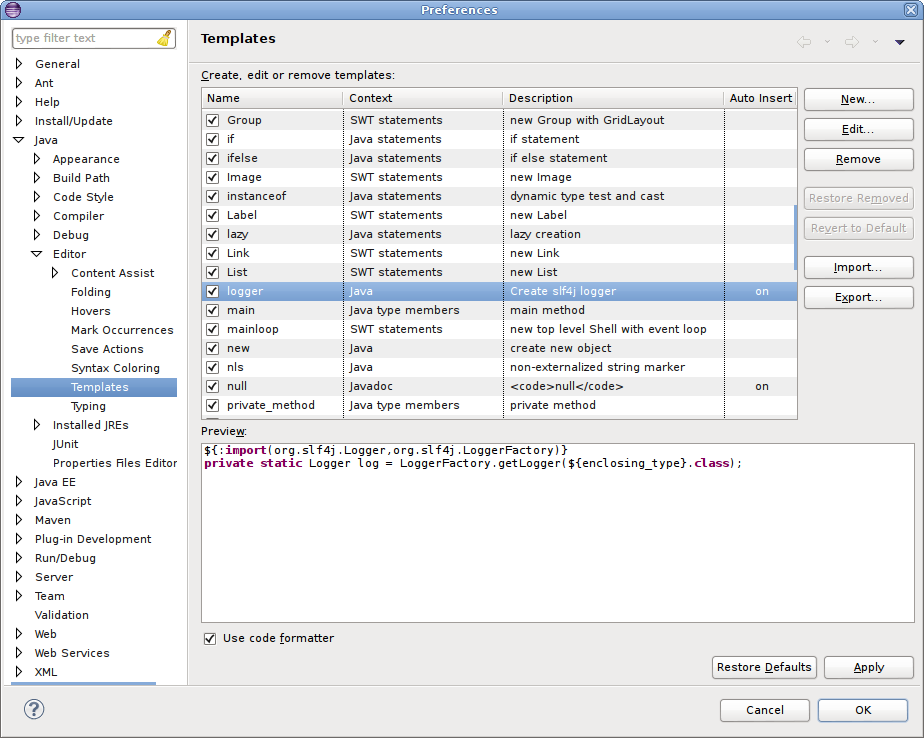
We recommand to use sl4j for logging information in JBoss logs. Download the file available here and add it as a template in Eclipse (see the screenshot below). Then, each time you want to insert a logger in your Java class, type "logg" and ctrl-space for completion. A static field will be created and the logs will be redirected to log4j in JBoss.
Crowdin and Gazelle integration
Crowdin is a complete solution to make your website or software universally accessible through translation. Crowdin advanced editor helps translators to work faster and more efficiently with our innovative translation approach." https://crowdin.com/
A Maven plugin allows crowdin integration into our projects (https://github.com/ValentinLorand/crowdin-plugin). You can use it by adding the latest gazelle-seam version (from 2.1.0) in your pom.xml.
Global setup
To authenticate yourself to Crowdin, you need to configure your ~/.m2/settings.xml.
Your personal API key need to be generated from Crowdin server interface (https://crowdin.com/settings#api-key).
Once you have your API key, you can add the following in the settings.xml file :
<settings>
 <servers>
	<server>
		<id>crowdin-gazelle</id>
		<username>4960</username>  <!-- The crowdin project id -->
		<password><!-- insert here you personal API key --></password>
	</server>
 </servers>
 <!-- ... -->
 <pluginGroups>
	<pluginGroup>com.googlecode.crowdin-maven</pluginGroup>
 </pluginGroups>
</settings>
Managing and adding translations to a project. Ex : gazelle-tm-war
1. The pom.xml of the war module must contains the following plugin. It is provided by default by gazelle-tools or simulator-common :
<plugin>
  <groupId>org.codehaus.mojo</groupId>
  <artifactId>gazelle-plugins</artifactId>
</plugin>
2. Open the pom.xml of your project, under the <properties></properties> section, add
<messages.mode>crowdin</messages.mode>
3.Keep your project updated with crowdin server :
mvn crowdin:pull
4. Edit the XHTML files with untranslated messages.
5. Build your project,
mvn clean package
And look for messages in logs such as:
[WARNING] Missing translation in list.xhtml (line:20,col:51) : New simulator
If there is parameters that must not be translated, add their name in the gazelle-plugins configuration (pom.xml)
<plugin>
   <groupId>org.codehaus.mojo</groupId>
   <artifactId>gazelle-plugins</artifactId>
   <configuration>
      <ignoredParamNames>
          <ignoredParamName>displayActorFilter</ignoredParamName>
      </ignoredParamNames>
   </configuration>
</plugin>
6. When you are ready to extract new messages from xhtml, run the following command. You need to add the keyPrefix argument to the maven command. As an example you might want to run :
mvn gazelle:xhtml-messages -DkeyPrefix=net.ihe.gazelle.tm
7. A new .properties file has been added to the src/main/messages folder. This file is temporary and contains only new elements. Copy the content into the existing properties file. Then delete the temporary .properties file.
Usage of crowdin plugin
1. Push new messages on Crowdin server with :
mvn crowdin:push
2. If you pushed a new file on Crowdin server (new project), the encoding may be broken on translated file (later pull). See Jira issue MCA-27 on how to fix it.
3. Translate messages in Crowdin GUI. Messages that are not translated into another language will keep the original message value (english).
4. Then, you can retrieve the translations executing the command :
mvn crowdin:pull
If there are new translation, the server will need to rebuild the packge of translations. This can takes 1 minutes and after it will download the translations that your project need depending on the depencencies declared in your project poms.
Detailed informations
src/main/messages contains properties that you want to be translated. Translations are used there only for initialization.
When new files/keys have been added to src/main/messages, you can push them to crowdin using mvn crowdin:push . It is Maven first, all elements in crowdin not in src/main/messages will be deleted from crowdin.
When translations are done on crowdin, it is needed to update package on crowdin. It can be done using mvn crowdin:export but it doesn't look to export it everytime (API throttle). So you can also update the package using "Build fresh package" on https://crowdin.com/project/gazelle/settings , "Downloads" tab.
Finally, you will have to pull new translations into your project by executing mvn crowdin:pull . It creates src/main/crowdin folder, storing used translations. Files in this folder should not be edited, it is just there for being able to build project without connecting to crowdin.
When the project is packaged, messages are aggregated and made available to the application as before (automatically done via gazelle-seam profiles).
Project migration from xml files to crowdin
- Use latest gazelle-seam as parent (>= 2.1.0).
- Package your application.
- For each module, store properties from target/generated-resources/messages-generated in a temporary folder.
- Copy english version (en.properties) into src/main/messages, and rename it with a meaningful name.
- Delete old xml file.
- From project root, execute mvn crowdin:push .
- For each already translated langage, go to translation pages (https://crowdin.com/project/gazelle/fr for french). Click on upload matching the new file, and select the backuped file. Translated elements will be added to crowdin.
- Log in to post comments
How to configure Eclipse to run with a proxy connection
First you have to
configure eclipse :
go to menu --> windows --> preferences
select General --> network connection
configure the proxy manally on this preference.
configure maven
go to .m2/settings.xml.
Add the following:
<proxies>
   <proxy>
      <active>true</active>
      <protocol>http</protocol>
      <host>192.168.235.40</host>
      <port>80</port>
    </proxy>
  </proxies>
Network configuration
you may also, under Windows, configure the LAN network (http://answers.oreilly.com/topic/675-how-to-configure-proxy-settings-in-windows-7/ )
How to create an HL7 message profile with Messaging Workbench (MWB)
Pre-Requisites
- Install MWB (see section of this tutorial named "How install Messaging Workbench" for further details about the MWB installation.)
- To correctly use Messaging Workbench, you should have good knowledge of the HL7 standard.
- This tutorial will help you to generate your own HL7 message profiles according to IHE. Please read the IHE Technical Framework first of all.
- It is very important to follow this tutorial without skip steps.
Notes: This tutorial can help you to create new HL7 Message Profile. This is not a tutorial to understand all functionalities of Messaging Workbench.
How to install Messaging Workbench.
First at all, MWB runs only on Windows.
MWB installation:
- First at all, you will need to install the Messaging Workbench software. You will find it at this location: http://www.hl7.org/participate/toolsandresources.cfm, in the "V2 Tools" section.
- Get our MWB librairies and pojects at this location: http://sumo.irisa.fr/~epoiseau/IHE_Messaging_Workbench_Lib_And_Project.zip. It will present to you as a zip file.
- Unzip the file named “IHE_Messaging_Workbench_Lib_And_Project.zip”. In the unzipped folder, you should find :
- The IHE Libraries folder, named "IHE_Lib_2012".
- The IHE Projects folder, named "IHE_Projects_2012".
- The IHE XSLT files, in the "xslTransformTools" folder. See the last part of this tutorial for further details about theses files.
- Enter in the "IHE_Lib_2012" folder, move all files and folders to the Lib folder of MWB (default "C:\program files\Messaging Workbench\Lib"). (Windows will ask you if you desire replace files and folders, say YES).
- Enter in the "IHE_Projects_2012" folder, move all files to the Projects folder of MWB (default "C:\program files\Messaging Workbench\Projects").
- When it is finished, you can begin to use Messaging Workbench.
Create DataType specific to your profile
If for the IHE domain there is specific data type, you should create a specific data type file from the default data type files defined by MWB.
If not, you can use the default data type file defined by MWB.
To create your own data type file :
On MWB choose on the Menu the tab:
Maint --> Datatypes --> Add/Edit datatype File

In the frame open, choose the tab:
File --> Open
Choose the data type default file chich is stored in the directory: MessagingWorkbench_Home/lib/

Open the data type file specific to your HL7 version, then choose the tab :
Datatype --> Edit

Select the specific data type you want to change, make the changes and save the new data type file with another Name (By convention, the name should indicate which domain changes is stored in the data type file: for example «LTW-DT-2.5.mdf »).
Attention, try to not modify the source data type file.
Create library with the previous DataType file
On MWB choose on the Menu the tab:
Maint --> Libraries --> Edit library File
You can choose for example « HL7 2-5.mcf » in the directory “MessagingWorkbench_Home/lib/“. You must choose an existing library to construct your own.

In the frame, change the current Data type with your own (for example « LTW-DT-2.5.mdf »). To do that, hit the “Attach DT” button and choose the corresponding DT file.
Then, press the “Compile” button and “Save as” the compile file as a new library in a file called for example «LTW-HL7 2-5.mcf ».

At least, close the library configuration window by hitting the “Done” button.
This library represents the base of the creation of your profile. If the IHE Technical Framework doesn’t define specific Data Types, you can use the IHE libraries present in the “PHARMA”, “ITI_LIB”, “LTF_LIB” or “PCD-LIB” folders in the “MessagingWorkbench_Home/lib” folder.
Set the specific library which will be used
On MWB choose on the Menu the tab:
Maint --> Options...
- Go to the “General” tab.
- You can set the library you want to use by default. To do that, at the bottom of the page, hit the “…” button corresponding to the “Select Default Conformance File” section and choose your desire library.
- You can also set the HL7 Table file to use. To do that, at the bottom of the page, hit the “…” button corresponding to the “HL7 Table file” section and choose your desire HL7 table file. Try to choose an HL7 table file according your HL7 version. Find these file in the “MessagingWorkbench_Home/Lib” folder.
- Now, Go to the “Directories” tab.
- Just verify that the “Current Projects directory” is set, for example to “Messaging Workbench_HOME\Projects” and that the “Current library directory” is set to “MessagingWorkbench_HOME\Lib”.
- At least, hit the “OK” button.

On MWB choose on the Menu the tab:
Maint --> Librairies --> Select Conformance Files
- The “Prioritized Conformance” panel references all selected libraries. Your library must appears in this panel. To do that, select the library in the “Msg Library Files” panel and hit the “>” button. Attention, this panel only shows the libraries which have been saved in the directory “MessagingWorkbench_HOME\Lib”.
- When you have finished, press “OK”.

Create the HL7 message profile from the library
If you have some segments which are defined commonly in the TF for the all domain, you may create a specific library which have this definition for the segment.
To construct your HL7 message profile :
- Go to the Menu: File --> New
- Fill the header of the file. See the example below :
- Specification: “RGV_O15”
- Msg Type: “RGV”
- Event Type: “O15”
- Ord Cntrl: “”
- StructID: “RGV_O15”
- Organization: “IHE”
- Event Description: “RGV - Pharmacy/treatment give”
- HL7 version: “2.6”
- Structure: See the section below to get further information on this field.
- Status: “DRAFT”
- Spec Version: “TRIAL”
- Role: “Sender”
- Conformance Type: “Constrain”
In the “Structure” field, you must write the structure of your HL7 message. See the example below :
MSH,{[SFT]},[UAC],{[NTE]}[(PATIENT),PID,{[NTE]},{[AL1]}[(PATIENT_VISIT),PV1,[PV2]]]{(ORDER),ORC[{(TIMING),TQ1,{[TQ2]}}][(ORDER_DETAIL),RXO[(ORDER_DETAIL_SUPPLEMENT),{NTE},{RXR}[{(COMPONENTS),RXC,{[NTE]}}]]][(ENCODING),RXE{(TIMING_ENCODED),TQ1,{[TQ2]}},{RXR},{[RXC]}]{(GIVE),RXG{(TIMING_GIVE),TQ1,{[TQ2]}},{RXR},{[RXC]}{(OBSERVATION),[OBX],{[NTE]}}}}

Then press the COMPILE MESSAGE button (represented by a yellow wheel) which is between the “save file” button and the “+F” button in MWB tool bar.
A message panel should open at the end of the compilation.
You may select all the items and select the “Not Supported” Option. Then hit the “Make Change” button.
This will change in the profile all “Backward” usage by “Not Supported”.
Close the panel.

Finally, hit the “Save” button to save your project in “MessagingWorkbench_HOME\Projects\Your_Message_Name.mwb”
Now, click on the Menu : Tools --> Select Conformance Lib
- The “Prioritized Conformance” panel references all selected libraries. Your library must appears in this panel. To do that, select the library in the “Msg Library Files” panel and hit the “>” button. Attention, this panel only shows the libraries which have been saved in the directory “MessagingWorkbench_HOME\Lib”.
- When you have finished, press “OK”.
Then choose the tab : Display/Reports
- In the bar tool menu, on the right of the printer button, select “Spec XML” in the list.
- The generation will run automatically.
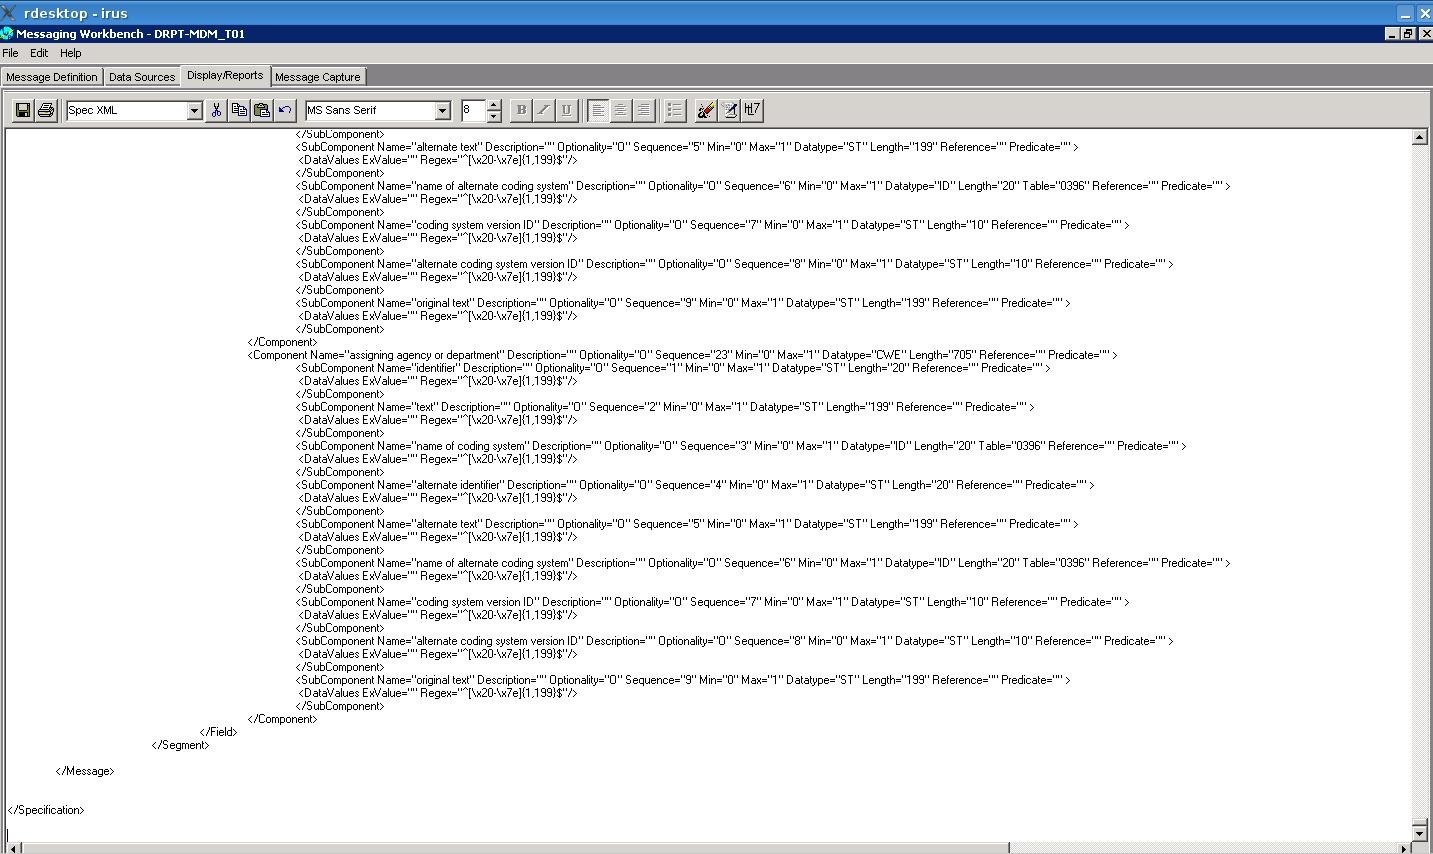
At the end of the generation, on the “HL7” button (on the right). A message panel will be appear. Say “NO” and hit the “save” button (on the left). Your HL7 message profile will be saved as an XML file.
If some of the segment used are empty you should add a segment and set the previous library you create for the domain or the default one by HL7 version for example : “MessagingWorkbench_Home/lib/IHE-HL7 2.5.mcf “
Make the XSL transform to get a correct profile
The XML file generates by MWB is not correct, and it is necessary to do some transformations. Return to the unzipped folder (See the step 2 of the section "How install Messaging Workbench.") You shoud find a folder named "xslTransformTools".
First at all, you will need to download the Xalan parser at this location: http://xalan.apache.org/index.html
Xalan is an XSLT processor for transforming XML documents into HTML, text, or other XML document types.
We will use Xalan to apply the XSL style sheets to our HL7 message profile.
To copy the xmlfile to his specific profile directory in“Data/Hl7MessageProfiles”, you may:
- CREATE all the PATH directories conform to this structure for the message: Actor/Transaction/Message_Profile/profile, table, result, sample, work, done
- COPY the file C:\Data\HL7\Message_Profiles\2.3\Transaction\Specification_msgType_eventType.xml in the directory “Data_HOME/Hl7MessageProfiles/Actor/Transaction/Message_Profile/profile”
Now check you should execute this xsl transform:
- xsltproc Data_HOME/outils/XsltProfileTransformer.xsl Data_HOME\HL7\Message_Profiles\2.3\Transaction\Specification_msgType_eventType.xml > Data_HOME\HL7\Message_Profiles\2.3\Transaction\Specification_msgType_eventType-CorrectGenericError.xml
- xsltproc Data_HOME/outils/predicate_transform.xsl Data_HOME\HL7\Message_Profiles\2.3\Transaction\Specification_msgType_eventType-CorrectGenericError.xml > Data_HOME\HL7\Message_Profiles\2.3\Transaction\Specification_msgType_eventType-PredicateTransform.xml
- xsltproc Data_HOME/outils/correction_schema.xsl Data_HOME\HL7\Message_Profiles\2.3\Transaction\Specification_msgType_eventType-PredicateTransform.xml > Data_HOME\HL7\Message_Profiles\2.3\Transaction\Specification_msgType_eventType-SchemaError.xml
- xsltproc Data_HOME/outils/correct_table.xsl Data_HOME\HL7\Message_Profiles\2.3\Transaction\Specification_msgType_eventType-SchemaError..xml > Data_HOME\HL7\Message_Profiles\2.3\Transaction\Specification_msgType_eventType-CorrectTable.xml
At least, replace all “Usage="B"” in the corrected HL7 message profile by “Usage="X"”.
Nexus (update, configuration)
Nexus is used to manage the Maven artifacts both the third-part ones required by our applications and the ones developed by the team. Our repository is available at http://gazelle.ihe.net/nexus and is currently installed on Sumo and owned by user nexus.
Updating Nexus
- Download the lastest version of the tool (tgz archive named Nexus OSS) and uncompress it in /opt/nexus
- In the new directory, change the configuration. Depending on the various releases, some properties have changed, but by now, we only need to change the port :
- nexus-2.3.1-01/conf/nexus.properties : application-port=9080
- Then, stop nexus as root
/etc/init.d/nexus stop
- and execute the following commands:
su nexus
cd /opt/nexus
rm nexus-oss-webapp
ln -s nexus-2.3.1-01 nexus-oss-webapp
exit
/etc/init.d/nexus start
Creating a new proxy in Nexus
- Logged onto the tool
- Go to Repositories, click on the "add' button and select "Proxy repository"
- Fill out the form; the provider of the artifact must provide the "Remote storage location" to specify. Basically, it's the root of the maven repository.
- Click on the save button
- Then, select "Public repositories" and go to the "Configuration tab"
- The repository you have created shall be displayed in the "Available repositories" column, move it to the "Ordered Group Repositories" column
Add a jar in nexus
- Logged on to http://gazelle.ihe.net/nexus/index.html#view-repositories;thirdparty~browseindex
- Create a pom like this :
<dependency>
  <groupId>com.pixelmed</groupId>
  <artifactId>dicom</artifactId>
  <version>20140326</version>
</dependency>
- Click on "Artifact upload"
- Select GAV definition : From POM
- Select your new pom to upload it
- Add artificats : sourceFiles.jar and executable.jar
- To finish click on upload artifacts
Source repository
TestLink user guide
Testlink is an open source tool the purpose of which is to manage requirements, test specifications, test plans and test execution results. It is used by the Gazelle development team for quality insurance of our tools.
We are currently using TestLink 1.9.7, available here. If you do not have an account and you need one, please contact Anne-Gaëlle Bergé.
The following pages give you some tips for writing assertions, configuring the tools, specifying your tests and so on.
TestLink - Configuring an issue tracker
How to configure an issue tracker
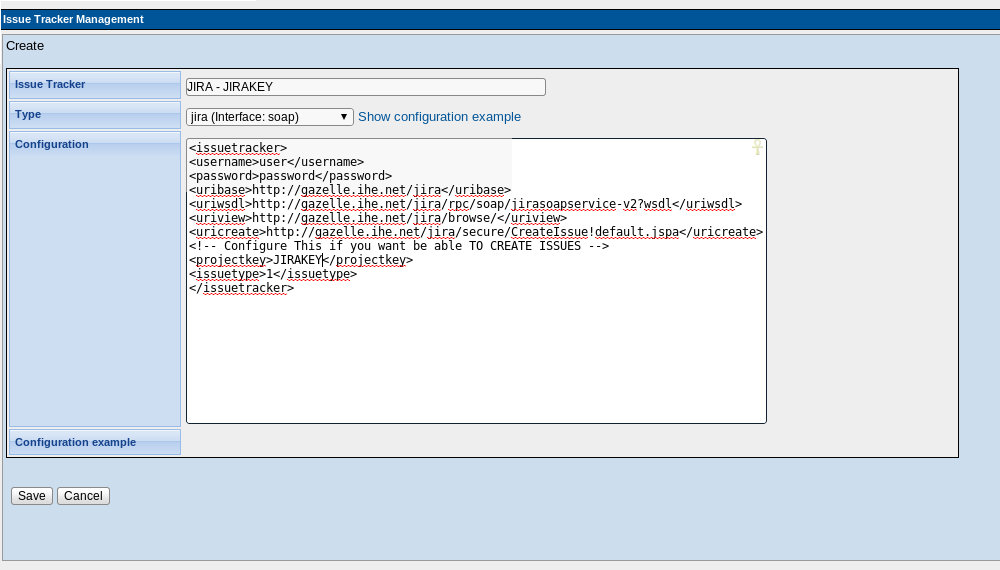
As we maintain a JIRA project and a Testlink project by Gazelle application, we need to configure a new Issue Tracker in Testlink for each new Testlink project. In this way, when executing the tests, we will be able to report the bugs directly from Testlink with a reference to the test case.
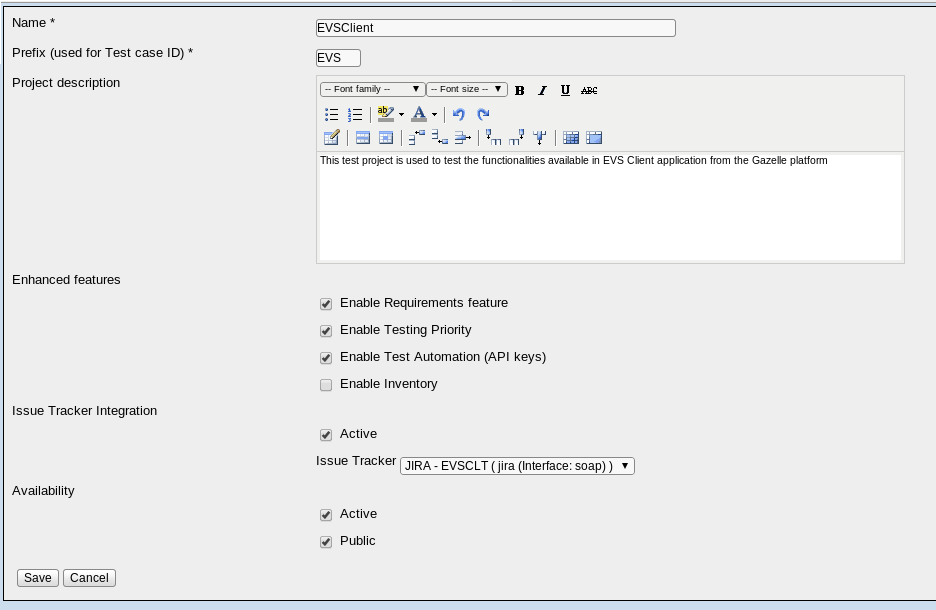
In the Desktop part of Testlink, click on "Issue Tracker Management" in the System panel (top-left corner). Then it the "create" button and configure the tool as shown in the screenshot below. For security reason, we have hidden the username and password parameters. Refer to another Issuer Tracker definition or ask the Gazelle administrator to get them. The JIRAKEY refers to key which uniquely identified a project in JIRA. Then, to link the Issue Tracker to your Testlink project, edit your project configuration
The screenshot below shows the basic definition of a test project in TestLink.
TestLink - Requirements management
Requirements quality criterias
Quality of requirement
- A requirement must be :
- Valid,correct
- Feasible, realizable
- Useful, necessary
- Prioritized
- Not ambiguous
- Verifiable, testable
- Atomic, unique
- Independent from the implementation
Quality of requirements specification
- A requirement specification must be
- Complete
- Coherent
- Editable
- Traceable
- In compliance with standards
How to write requirements
Requirement workflow

Requirement writing guideline
- IDs
- The id of the requirement is the prefix of the project followed by 4 digits.
- The id of the requirement must be coded independently of the section it belongs to.
- Roles
- The roles concerned by the requirement shall be defined in a specific field.
- If the requirement is concerned only by one role, it can appear in the scope and the title.
- If the requirement is concerned by several roles, they must not appear in the title and the scope.
- Priority
- The priority must be defined in a specific field accordingly to the following 4 levels :
- High
- Medium
- Low
- Optional
- The priority must be reflected in the scope and the title of the requirement using the muscow verb method :
- MUST
- SHOULD
- COULD
- WOULD
- Tests
- The number of required test must be 1 at least.
- If the requirement does not need at least 1 test, it means the requirement is unusefull or poorly draft.
Requirements specification building guideline
- Nesting
- Requirements must be grouped by sections.
- A requirement must NOT have child requirements. Only sections can have child requirements.
- Sections can have child sections.
- More than three level of nested sections should be avoided.
- ID
- The ID of the section must reflect its hierarchical location.
- Obsolete section
- As a requirement must not be deleted, the specification must have an section dedicated to receive obsolete requirements.
- Other attributes
- Priority and Roles must NOT be defined for sections.
TestLink - Test specification design
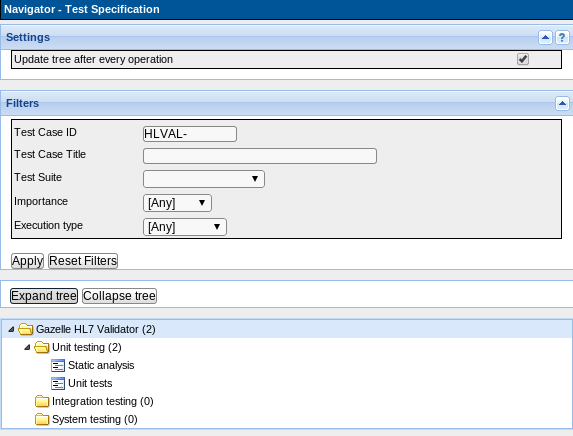
In accordance with the quality assurance team, we have chosen to use the same test specification design for all the projects manage within our instance of TestLink. This design matches the level of tests defined by ISTQB.
When you write your test specifications, please follow the principals enounced below:
- Three main test suites shall be created
- unit testing
- integration testing
- system testing
- Unit testing shall contains at least the two test cases:
- Static analysis (might ask to consult sonar analysis available at http://gazelle.ihe.net/sonar)
- Unit tests (might ask to consult the JUnit test results available in Sonar)
- Integration testing might be application dependant, there isn't a unique pattern which can be applied but you may need something like
- Web service interface (client side)
- Web service interface (server side)
- IHE interface (responder side)
- IHE interface (initiator side)
- ... other integration stuff
- System testing test suite shall be built based on the requirement specifications:
- On child test suite per requirement specification section
Below is an example taken from Gazelle HL7 Validator test project.
Attached is an XML export of the basic test specifications that you can import into your project as a basis for your test specification writing. Also available here.
For the "System testing" test suite you can save time by using a feature from TestLink. In the Requirements page, for each section, you have a button named "Create Test Cases". You will be asked to select the requirements for which you want to generate test cases and then a new test suite will be created in your Test Specification. You only have to drag and drop the newly created test suite to the "System testing" test suite and complete the test cases.
Upgrading jboss-ws-native
By default, when you install JBoss 5.1.0, Jboss WS native 3.1.2 is embedded. Unfortunately, this version of the module contains some bugs and we have been forced to update this framework to a more recent version: jbossws-native-3.4.0.GA. This is the most recent version of this module which is compatible with JBoss 5.1.0.GA. To upgrade JBoss WS native in your JBoss, please refer to the documentation available on Jboss’s web site:https://community.jboss.org/wiki/JBossWS-Installation. The archive to download is available here: http://download.jboss.org/jbossws/jbossws-native-3.4.0.GA.zip
Here is a summary of the steps to follow:
- Download and unzip the jbossws-native-3.4.0.GA.zip archive
- Make sure Ant is install on your system
- Open a terminal and go to the unzip archive jbossws-native-bin-dist
- Copy and paste the file ant.properties.example to ant.properties
- Edit this file and
- Update the location of your Jboss-5.1.0.GA instance to upgrade, might be /usr/local/jboss-5.1.0.GA
- Comment all the lines not relative to Jboss 5.1.0
- Set property jbossws.integration.target to jboss510
- Set property jboss.server.instance to gazelle
- Save this file
- Run "sudo ant -Djboss.server.instance=gazelle deploy-jboss510"
Note that this update will change the location of the SOAP endpoints deployed in your JBoss. Go to http://localhost:8080/jbossws/services to get the list of services deployed within your instance of JBoss.
- Log in to post comments
Using Webex under Linux
Some of us have experienced troubles with having webex working fully and perfectly in our Linux environment. Thanks to several tutorials found on the Internet we managed to fix the various issues we encountered. Below is an "how to" for setting up your environment. We are using Ubuntu 14.04, 64-bit arch.
Webex is freezing / I can't see shared screens / I can't chat
Firstly, it seems that Webex is more willing to fully work and to be stable when starting a webex session from Firefox instead of Chrome. If you were using Chrome, give a try with Firefox before going deeper in this tutorial.
We started from this point : http://askubuntu.com/questions/368270/how-to-i-make-cisco-webex-work-with-13-10-64bit
As a summary :
Execute the following command lines
$> sudo apt-get install libmux6:i386
$> sudo apt-get install libgcj14-awt:i386
This will fix a first set of issues. Then to check that all the required librairies are available on your computer, execute the following:
$> ldd $HOME/.webex/1324/*.so | grep 'not found'
This will give you the list of the missing libraries. Find the packages in which they are available using apt-file (if it is not yet installed, run $> sudo apt-get install apt-file)
$> apt-file search libraryName
For each library, install the i386 package, you might need libpangox-1.0-0:i386 and/or libpangoxft-1.0-0:i386. You can then try to attend a webex meeting.
I have no sound
Typically, if you try to use your headset you might see a message like this : "Audio device is unaccessible now". This section will help you with using your PC for voice. The solution we found is to use the 32-bits version of Firefox.
Download jre7 32-bits here
$> sudo apt-get remove firefox #uninstall the 64-bit version of firefox
$> sudo apt-get install firefox:i386 #install the 32-bit version of firefox
#Download java jre 32 bit, use the tar for 32-bit from the official website
$> mkdir -p $HOME/opt/java32/
$> mv Download/jre-7u60-linux-i586.tar.gz  $HOME/opt/java32/
$> cd  $HOME/opt/java32/
$> tar -xzvf jre-7u60-linux-i586.tar.gz
$> cd ~/opt/java32/jre1.7.0_60
$> mkdir -p ~/.mozilla/plugins/
$>ln -sf $PWD/lib/i386/libnpjp2.so ~/.mozilla/plugins/
You can know try again to join a webex meeting and to use your computer for audio.
Subversion (SVN)
Branches
Creation of a branch
From a working copy you can directly copy the trunk to the branch and switch on it:
svn copy ^/Maven/gazelle-tm/trunk ^/Maven/gazelle-tm/branches/my-branch -m "Create my branch"
svn switch ^/Maven/gazelle-tm/branches/my-branch
If you had previous modification on your working copy they will be keeped locally during the switch. Your are now ready to commit on the branch.
svn commit -m "new feature"
It is important to give a clear log message when you create the branch to easily find its revision number.
Know your branching revision number
Inria's forge does not support the auto detection of branching points, so you have to know the revision number of the branch creation for all merge commands. To do so, display the history:
svn log
You can limit the number of the history to avoid getting all the history of the project
svn log -l 20
And you can also get all the history of your branch directly with
svn log --stop-on-copy
The last line will be the branch creation revision.
Keep your branch synchronized with the trunk
All along your work on the branch, to avoid a final painful merge, it is well advise to regularly getting modification from the trunk into your branch.
First commit your work to get a clean working copy. Then merge the trunk into your local working copy of the branch:
svn merge -r 57456:HEAD ^/Maven/gazelle-tm/trunk
57456 is the branch creation revision number.
Resolve the confilcts if so, verify compilation and test your project before committing on the branch.
Merging
When your work is finally done on the branch, commited and ready to be share, you will need to reintegrate all modifications back in the trunk.
First, perform a last trunk synchronization (see above paragraph) and commit on the branch.
Then get a clean working copy of the trunk, by performing a checkout in another directory
svn checkout https://.../Maven/gazelle-tm/trunk tm-trunk
or performing an svn switch
svn switch ^/Maven/gazelle-tm/trunk
Make sure your working copy is up to date
svn update
And merge your branch into the local copy of the trunk
svn merge -r 57456:HEAD ^/Maven/gazelle-tm/my-branch
Resolve the confilcts if so, verify compilation and test your project before committing on the trunk.
svn commit -m "merge new feature"
Once the merge is finished and you have verified it is completely integrated, you can delete the old branch
svn delete ^/Maven/gazelle-tm/my-branch -m "Delete merged branch"
Troubleshouting
Error E160013: '/svn/xxx/!svn/xxx' path not found*
Perform a checkout in a new directory to get clean working copies. If you're merging two branches, do it for both branches.
Go fetch a coffee
Congratulation you've masterized svn branching !