TestLink user guide
Testlink is an open source tool the purpose of which is to manage requirements, test specifications, test plans and test execution results. It is used by the Gazelle development team for quality insurance of our tools.
We are currently using TestLink 1.9.7, available here. If you do not have an account and you need one, please contact Anne-Gaëlle Bergé.
The following pages give you some tips for writing assertions, configuring the tools, specifying your tests and so on.
TestLink - Configuring an issue tracker
How to configure an issue tracker
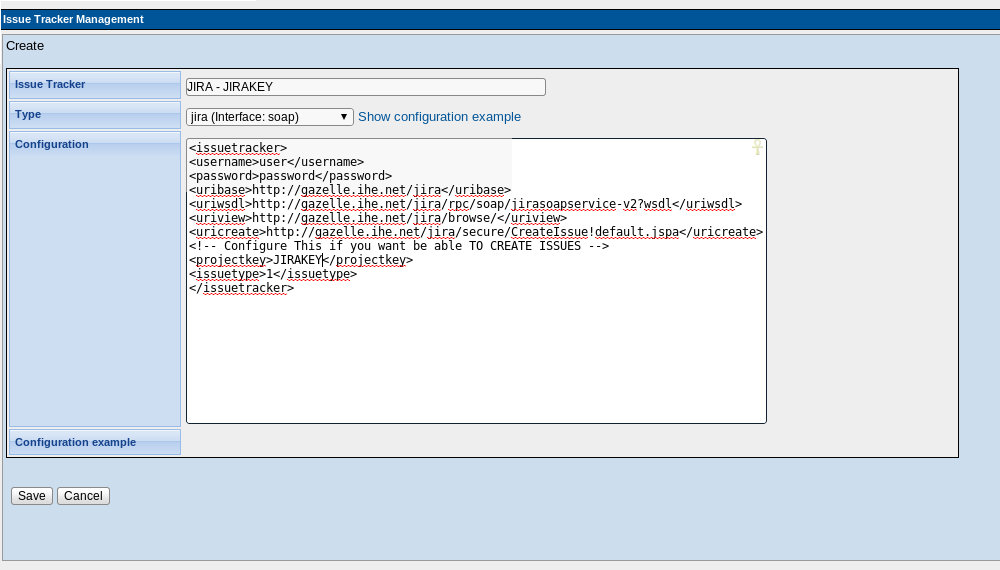
As we maintain a JIRA project and a Testlink project by Gazelle application, we need to configure a new Issue Tracker in Testlink for each new Testlink project. In this way, when executing the tests, we will be able to report the bugs directly from Testlink with a reference to the test case.
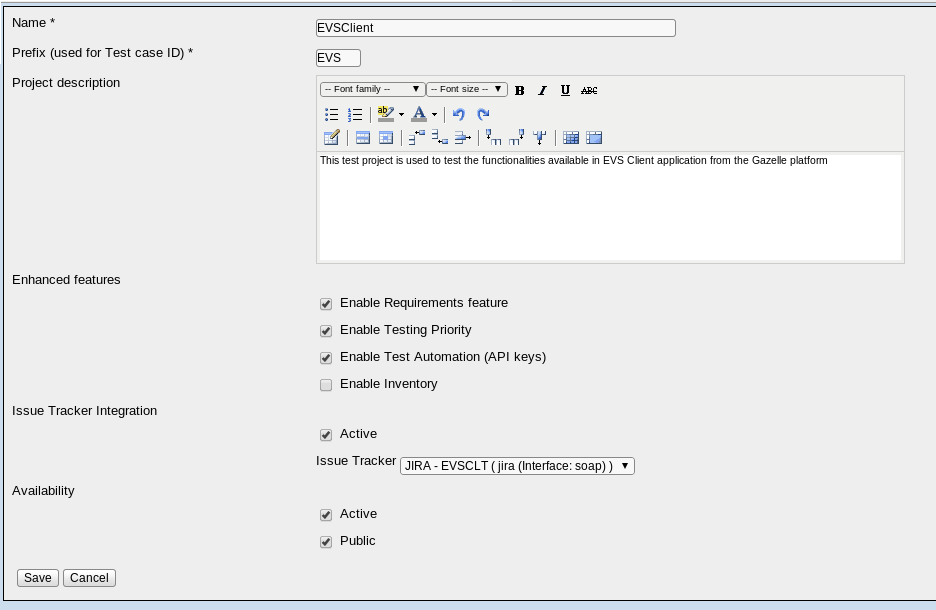
In the Desktop part of Testlink, click on "Issue Tracker Management" in the System panel (top-left corner). Then it the "create" button and configure the tool as shown in the screenshot below. For security reason, we have hidden the username and password parameters. Refer to another Issuer Tracker definition or ask the Gazelle administrator to get them. The JIRAKEY refers to key which uniquely identified a project in JIRA. Then, to link the Issue Tracker to your Testlink project, edit your project configuration

The screenshot below shows the basic definition of a test project in TestLink.

TestLink - Requirements management
Requirements quality criterias
Quality of requirement
- A requirement must be :
- Valid,correct
- Feasible, realizable
- Useful, necessary
- Prioritized
- Not ambiguous
- Verifiable, testable
- Atomic, unique
- Independent from the implementation
Quality of requirements specification
- A requirement specification must be
- Complete
- Coherent
- Editable
- Traceable
- In compliance with standards
How to write requirements
Requirement workflow

Requirement writing guideline
- IDs
- The id of the requirement is the prefix of the project followed by 4 digits.
- The id of the requirement must be coded independently of the section it belongs to.
- Roles
- The roles concerned by the requirement shall be defined in a specific field.
- If the requirement is concerned only by one role, it can appear in the scope and the title.
- If the requirement is concerned by several roles, they must not appear in the title and the scope.
- Priority
- The priority must be defined in a specific field accordingly to the following 4 levels :
- High
- Medium
- Low
- Optional
- The priority must be reflected in the scope and the title of the requirement using the muscow verb method :
- MUST
- SHOULD
- COULD
- WOULD
- Tests
- The number of required test must be 1 at least.
- If the requirement does not need at least 1 test, it means the requirement is unusefull or poorly draft.
Requirements specification building guideline
- Nesting
- Requirements must be grouped by sections.
- A requirement must NOT have child requirements. Only sections can have child requirements.
- Sections can have child sections.
- More than three level of nested sections should be avoided.
- ID
- The ID of the section must reflect its hierarchical location.
- Obsolete section
- As a requirement must not be deleted, the specification must have an section dedicated to receive obsolete requirements.
- Other attributes
- Priority and Roles must NOT be defined for sections.
TestLink - Test specification design
In accordance with the quality assurance team, we have chosen to use the same test specification design for all the projects manage within our instance of TestLink. This design matches the level of tests defined by ISTQB.
When you write your test specifications, please follow the principals enounced below:
- Three main test suites shall be created
- unit testing
- integration testing
- system testing
- Unit testing shall contains at least the two test cases:
- Static analysis (might ask to consult sonar analysis available at http://gazelle.ihe.net/sonar)
- Unit tests (might ask to consult the JUnit test results available in Sonar)
- Integration testing might be application dependant, there isn't a unique pattern which can be applied but you may need something like
- Web service interface (client side)
- Web service interface (server side)
- IHE interface (responder side)
- IHE interface (initiator side)
- ... other integration stuff
- System testing test suite shall be built based on the requirement specifications:
- On child test suite per requirement specification section
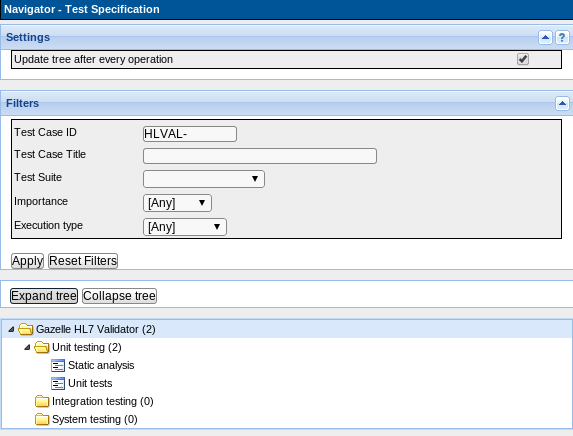
Below is an example taken from Gazelle HL7 Validator test project.

Attached is an XML export of the basic test specifications that you can import into your project as a basis for your test specification writing. Also available here.
For the "System testing" test suite you can save time by using a feature from TestLink. In the Requirements page, for each section, you have a button named "Create Test Cases". You will be asked to select the requirements for which you want to generate test cases and then a new test suite will be created in your Test Specification. You only have to drag and drop the newly created test suite to the "System testing" test suite and complete the test cases.