[Deprecated] Gazelle Test Management User Manual
Warning: This documentation is out-dated, newest version of the documentation is available at https://gazelle.ihe.net/gazelle-documentation/Test-Management/user.html
This page indexes the different links to the user manual for the Gazelle Test Management application.
Basic Terminology
Test Types
No Peer
- Test run by your self. There is no need of a test partner to run this type of test
- Used for conformance testing of artefacts (document, messages) that the SUT can produce.
- No peer tests are usualy pre-requisite to Peer to Peer tests.
Peer to Peer
- Test run with one or two partners SUT.
- Test scheduled by SUT manager.
Group Test
- Test run with a larger group of SUT
- Test scheduled by management
Thorough / Supportive
See more information there. The Thorough / Supportive testing mode is defined at registration time.
Thorough Testing
- For those who do not qualify for Supportive Testing. The default testing mode.
Supportive Testing
- For profiles in Final Text
- For Actor / Integration Profile / Option that have been tested by the vendor in a past connectathon
- There must be a published integration statement
- Used for participants who would like to help partners
Test / Test Instance
Test
A definition of a test involving one or more IHE actors in one or more profile.
Test Instance
One instance of a test with specific test partners
Registration Process
During the Registration process, the Gazelle Test Management Application gathers information needed in order for an organization to participate in an upcoming testing session.
To complete registration for a testing session, an organization uses Gazelle to enter:
- User account(s) in Gazelle
- Organization details
- Contact persons in your orgainzation
- System information - the profiles/actors/options that you will test
- Participant information - people who will attend the testing session
When this information is complete, you may be asked to generate a contract in Gazelle for the testing session.
"How to" details for these tasks follow in the pages below.
- Log in to post comments
Registration concepts
Organization
In Gazelle, an organization is the entity that is presenting test systems at the Connectathon.
IHE publishes Connectathon results are per organization, thus, the organization name, address, and finanical contact you enter in gazelle is important.
Users and Contacts
A “User” has a login and password to access the gazelle webtool
A “Contact” is a person in your organization who will interact with us in preparation for the connectathon:
- Financial Contact (only 1)
- Marketing Contact (1 or more)
- Technical Contact (1 or more)
A user may, or may not, be a contact
Users and Contacts belong to an Organization
Users Roles
Two levels of users :
- Vendor admin role
- Approves new user accounts for your organization
- Can edit user and contact information
- Can edit organization info (eg address)
- Can edit all test system & testing details
- Vendor role
- Can edit all test system & testing details
System
In Gazelle, a ‘system’ represents
- a set of IHE profiles, actors and options an organization wants to test.
- Participate in the testing session as the SUT
Testing Session
Gazelle Test Management can manages multiple testing session. A testing sessions may represent:
- Connectathons
- Internet Testing
- Projectathons
When a user logs in to Gazelle, the user is viewing information for a single testing session. Gazelle always "remembers" the last testing session a user was working in. A user may switch between testing sessions. How-to instructions are here.
Creating and managing user accounts for an organization
A "user" is person with a login and password to access the Gazelle Test Management tool. A user in Gazelle is always linked to an organization. A user can only view/modify information for that organization.
Creating a new user account
To create a new user, go to the home page of Gazelle Test Management and click on the link "Create an account"

Then you need to fill the form with valid information.
If your organization is already entered in gazelle, select it from the "Organization Name" dropdown list; otherwise select "New company" as the "Organization Name" in to create a new organization in Gazelle.

Whn you complete the user information, an email is then sent to you to confirm your registration.
The user account is not activated until a user in your organization with admin privileges in Gazelle activates your account.
User privileges in Gazelle
If you are registered as a user with 'vendor' privileges in Gazelle (the default), you can manage the tests and configurations for your organization's test systems.
If you are registered as user with 'admin' privileges in Gazelle, you are able to :
- manage users related to your organization (activate/de-activate accounts)
- manage contacts to your organization
- manage the testing session participants
- manage contracts and invoice
Managing your organization's user account as a "vendor_admin" user
As an admin user you can manage the users in your organization from Gazelle menu Registration -> Manage users
You can use this form to activate or de-activate user accounts, or update email or password for a user.

Registering an organization
Gazelle gathers information about organizations participating in a testing session. This enables managers of the testing session to contact you about invoicing and other testing session logistics. The organization information is also used when publishing the successful results of a testing session.
Organization information is entered in two scenarios
- If an organization is registering in Gazelle for the first time, a user creating an account in Gazelle is asked to link the account to an organization and enter organization details.
- You can edit the information for your organization through the Gazelle menu Registration --> Manage organization information. The organization information is as follows:


Contacts Management
A "Contact" is a person in your organization who will interact with managers helping you to prepare for the testing session.
An organization must identify:
- Financial Contact (only 1)
- Marketing Contact (1 or more)
- Technical Contact (1 or more)
Note: a "contact" may, or may not, be a person with a "user" account in gazelle
A user with vendor_admin privileges can enter contact information in Gazelle with menu Registration --> Manage Contacts
The page looks like this.
Selec the "Add a contact" button to enter name, email and phone information for the contacts in your organization.

Entering system information -- profile/actor/options to be tested
In Gazelle Test Management, the term "system" refers to a set of application functionaity expressd in terms of IHE profiles, actors, and options. An organization may register one or more systems in a testing session.
The "system" participates in the testing session with peer "systems" from other organizations.
"System registration" is an important step because the profiles/actors/options you select drive much of what happens during the test session. It determines:
- what test tools you will use
- what test you will be required to perform
- who your test partners will be
Starting system registration
First, ensure that you are logged into the Testing Session that you want to register for. The name of the testing session is displayed at the top of the page whenever you are logged into gazelle. You can learn more about testing sessions here.
Next, the system registration page is accessed through Gazelle menu : Registration -> Manage Systems.
On that page you can :
- Add a system : This will create a new system in the Gazelle tool.
- Import systems from another testing session : A click on that button enables you to copy a system from a previous testing session into this new testing session. The new systems contains all of the profiles/actors/options that you registered in the previous session. You will be able to modify them if you wish. The name and the keyword of the system are appended with the string "_COPY" in order to distinguish the new system from the old one.
The instructions below assume you select Add a system.
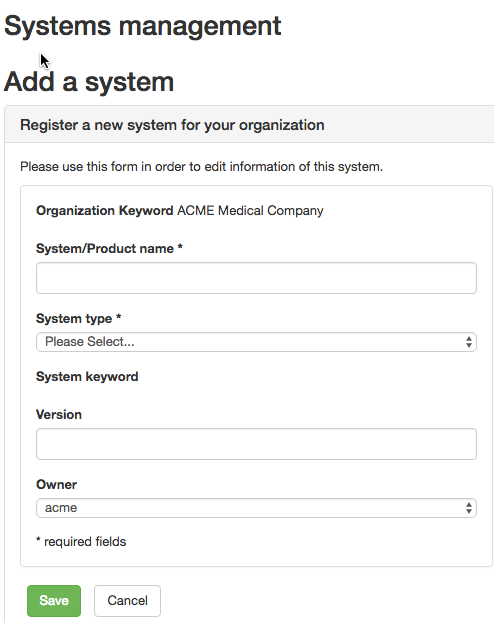
Completing the System Summary
You will be prompted for general information to identify your system:
- System/Product Name - this is how you refer to your system within your organization
- System type - you will select from a drop-down list of labels that are general categorizations of systems under test (eg "PACS", "EHR", "GATEWAY"). There is no right or wrong selection here.
- System keyword - this is how we will refer to your test system during the testing session. This field is auto-filled by Gazelle. It is a combination of the system type you selected and your organization's acronym (eg "EHR_ACME"). You can append a suffix to the gazelle-generated value.
- Version - an optional field that enables you to identify the version of your product
- Owner - this is a user within your organization who will have primary responsibility for managing this system during the test session
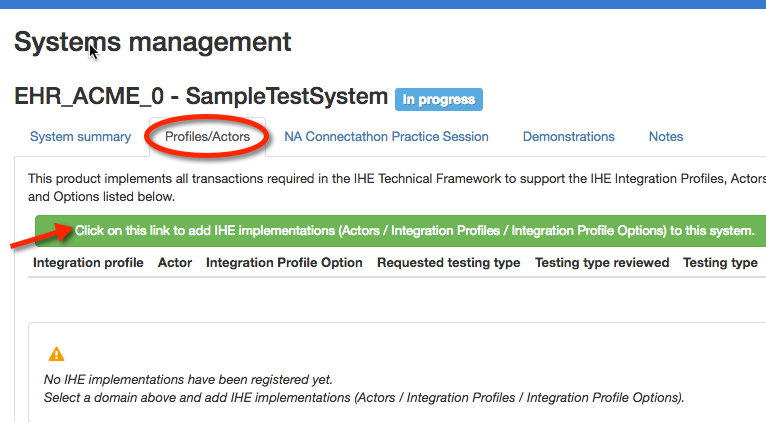
Completing the Profiles/Actors tab
After saving the system summary information, Gazelle creates a System Management page to collet information about your tests system.
The next step is toProfiles/Actors tab and Edit.
Select "Click on this link to add IHE Implementations..."
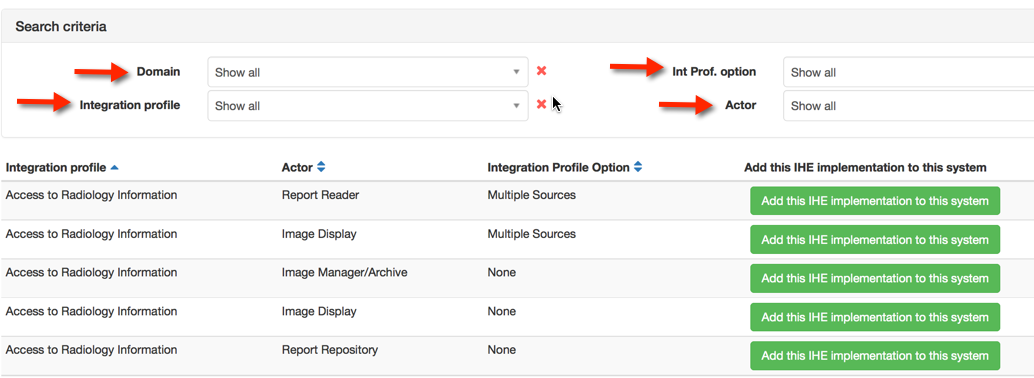
Next, you will use the dropdown lists to select the Domain, Profile, Actor, Option supported by your system. After making your selection, click on "Add this IHE Implementation to this system." You will repeat this procedure for each profile, actor, and option your system supports. Note that the "None" option represents the baseline requirements for that profile/actor without any option.
When you have selected the profile, actor, and options for your test system, they will appear on the Profile/Actors tab of your system's registration as follows:
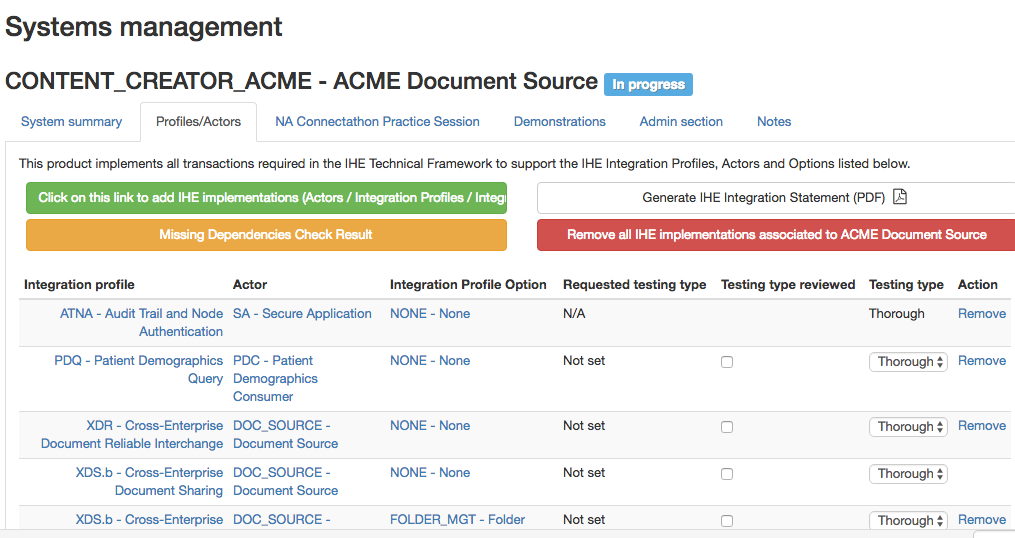
Finishing System Registration
To finish your system registration:
- On the "Profile/Actors" tab, look for the yellow "Missing Depenendencies" button. If it appears, it means that you have registered for a profile/actor that has a dependency on another profile. Select the button to complete registration for those dependencies.
- On the "Profile/Actors" tab, some of the profile/actor pairs you selected may be eligible for "Supportive" testing. "Thorough vs Supportive testing" is explained here.
- On the "System Summary" tab, change the Registration Status from "In progress" to "Completed". This is a signal to the technical manager of your testing session that you have completed your registration for this system
Generating a contract in Gazelle
Introduction to contract generation
The Gazelle Test Management tool is used to generate a contract for some testing sessions.
The contract includes the information you have entered into gazelle during the registration process:
- Organization details
- Contacts in your organization - financial, marketing, and technical
- One or more systems to be tested and several contacts .
If any of these is missing, Gazelle will not let you generate a contract.
To generate your contract
A gazelle user with "vendor_admin" privileges is able to generate a contract. Select Gazelle menu Registration --> Financial Summary
First Level Registration Errors
This section contains common error messages that occur when generating a contract. The error messages in red are generated by Gazelle. The numbers in ( ) are pasted onto the screen capture and refer to notes below the figure.
- The mailing address is missing for the company
- This is for general correspondence with your company.
- Select Registration -> Manage company information
- Under Mailing address, add an address for your company. This is on the right half of the form. Select Click here to add a new address. If you already have entered an address but you were presented with the error message, you need the next step that associates the address as your company mailing address. This first step adds an address to our database, but does not make it your mailing address.
- The address that you entered is presented in a table with the rightmost column an action column. If you have added a second address, you will see a table with two lines. To associate an address as your mailing address, click on the Select link in the appropriate row.
- You will now see the address copied from the right part of the form to the left side of the form, including the country flag. Scroll down and select Save. That should get rid of error (1).
- Missing address for Financial Contact
- This address is for the person in your organization responsible for processing our requests for payment.
- Select Registration -> Manage company information
- Scroll down to the Billing address section. Add an address on the right side of the form; Select Click here to add a new address.
- i) You might already have an address for your company that is the same for thisperson. Great; skip down to iii.
- ii) If you don’t have an address registered for this financial contact or the address of the financial contact differs from the main address, add it now.
- iii) In the table of addresses on the right side of the form, under the Billing address section, click on the Select link in the appropriate row.
- iv) You will now see the address copied from the right part of the form to the left side of the form.
- Scroll down and select the Save button.
- Missing Technical Contacts
- We need to verify that there are one or more staff members in your organization we can contact for testing and other technical details.
- Select Registration -> Manage contacts
- You will see a table of contact points in your organization. That table might be empty or already have members. You can add a contact person with the Add a contact button in the upper right corner. For this error (Missing Technical Contacts), make sure you select the checkbox for Technical.
- If the Technical Contact was already listed in the table but is not indicated as a Technical Contact in the Professional functions column, edit the row for that person (right most column of the table, edit button). Select the checkbox for Technical and do not forget to hit Save.
- We require at least one contact entered in the system for the generation of the contract. You are welcome to enter more technical contacts. This will be useful for organizations that have multiple systems, each with a separate technical contact.
- If you are bringing one system and three engineers, please enter one candidate as your technical contact. That person would be able to answer most technical questions or delegate to someone else. Please do not enter a person who is merely going to contact your engineers and pass along the questions.
- Missing Marketing Contacts
- We need to verify that there are one or more staff members we can contact if we have marketing questions (is there a logo we can use in documentation? What is the exact name to use for your company?).
- Refer to (3) above. Rather than selecting the checkbox for Technical, select the checkbox for Marketing/Commercial.
- The same person can fill the roles for Billing, Technical and Marketing/Commercial. We split them out for those organizations that have separate duties.
- Missing System Information
- If there is missing system information, you have registered zero systems for testing. The purpose of the contract is to explicitly list what you will test and include a computation for fees. You will need to register the system or systems you wish to test and all profile/actor pairs to be tested.
- Select Registration -> Manage systems
- Enter one or more systems.
- Make sure you save the systems.
- Make sure you select the Profile/Actors tab and enter what you want to test. Check for missing dependencies (ATNA requires CT).
- Fill in information if you plan to participate in a Showcase/Demonstration
- Missing Domain Information
- This means you have either entered zero systems, or you have entered systems but included no profile/actor pairs.
- Refer back to (5) for details.
Second Level Errors: Dependencies
Many IHE Integration Profiles have dependencies defined in the documentation. One example is that an ATNA Secure Node is always required to implement the Time Client actor in the Consistent Time profile. When you enter registration information, there is a button available to you labeled Check for Missing Dependencies. Rather than automatically register you, the system gives you this button to let you check when you feel it is appropriate. A box will pop up, list the missing dependencies, and give you the option to click a link to add them on the spot.
When you return to the financial page, one section will list all of your registered systems. The grid will give the system name, domains tested and fee information. One column will also indicate if all dependencies have been resolved. A green icon indicates sufficient registration; a red icon means that a dependency needs to be satisfied.
You cannot generate a contract if there are dependencies to be resolved, so you need to return to the page for managing systems.
- The rules defining dependencies are written in the Technical Frameworks. We transcribe those rules into Gazelle.
- The rules defining dependencies do not identify all combinations that you will find important. For example, the XDS.b profile requires the Document Source and Document Consumer to obtain a consistent patient identifier for an Affinity Domain but does not specify the mechanism. We support that with the PIX and PDQ profiles for Connectathon testing, but do not require that. Participants fail to register for PIX or PDQ and are then surprised to realize they do not have a mechanism to obtain the patient identifier in the Affinity Domain.
Register Participants to Testing Session
This page describe how to register the participants to a Testing Session. Participants to the testing session are the person who will get a badge an will be able to enter the floor where the testing in taking place.
Registration of the participants to the Testing Session can only take place when the registration of the systems is over.
Only the users with the role "vendor_admin" can register participants to the testing session.
One accesses the participants registration page through the menu Registration -> Testing Session Participants
See the illustration below :

There are 3 means to register a participant to a testing session :
- import from users
- import from contacts
- add participant
Import from Users
By selecting the button import from users, one can select the participants to add from the list of registered users for the organization.
Import from Contacts
By selecting the button import from contacts, one can select the participants to add from the list of contacts already declared in Gazelle Test Management tool. Contacts do not need to have a login.
Add Participants
When selecting the button add participants, the users can enter manually all the information about the participant to register.

User Preferences
User preferences are mainly used the GazelleTest Management application to customize some views according to the user's wishes. The main preferences you may want to update are
- The number of results (rows) in table
- Whether or not you want the diagram sequence of a test to be displayed on the Test Instance page. If not, you may save some space in the page, the one will be lighter to load.
User preferences can also be used to communicate some useful pieces of information to monitors and other connectathon participants, such as your photo, the languages you speak...
To configure your own user preferences, you must first log in to Gazelle. Then, on the top right corner of Gazelle, click your username and then select User Preferences (shown below).

This link leads you to your preferences management page. If you never change anything, the page may look something like this.

Preferences on this page:
Change your password
Skype account During the connectathon week, it can be useful to communicate using Skype. Such a field already exists for the system but a monitor for example, who does not own systems may want to "publish" his/her Skype name to speak with other monitors or participants.
Table Label During the connectathon week, you will sit at a table, the one will be localized by everybody thanks to a table label, typically A1, J10... When you sit the first day of the connectathon, fill this value so that other attendees will find you more easily.
Spoken languages The languages you are able to speak.
Hit the Edit button to update those fields. The following panel will be displayed.

When you hit the "plus" icon, a menu is displayed and you can pick up your language(s). If need, hit the "red cross" button in front of a language to remove it from the list. When finish, hit the "finish" button.

When you hit the "add/change photo" button, a panel like the one below is displayed. Clicking on "add" will open your file repository. Select your photo, only PNG and JPG files are allowed. Be careful to do not choose a too large image, all images with a height greater than 150px will be proportionately resized up to 150px (height).

Do not forget to save your changes before leaving this page.
- Log in to post comments
Testing Session
Concept of the Testing Session
Gazelle Test Management can manages multiple testing session. A testing sessions may represent:
- Connectathons
- Internet Testing
- Projectathons
Testing sessions are created by Gazelle Test Management administrators.
When a user logs in to Gazelle, the user is viewing information for a single testing session. Gazelle always "remembers" the last testing session a user was working in. A user may switch between testing sessions.
Selecting a Testing Session
In order to change testing session, log in to Gazelle. The name of your current testing session is displayed at the top of the screen.
To change testing sessions, select the "Switch" button.

Then select the session of your choice by clicking on the check-mark in the right column and press the "Continue" button on the bottom right of the page

The top of the screen displays the name of the testing session that you have selected.
- Log in to post comments
Pre-Connectathon Testing
Testing before IHE Connectathons is a requirement and is achieved using software written by several different organizations
An index to all available tools for testing IHE profiles is provided at the following URL: http://wiki.ihe.net/index.php?title=IHE_Test_Tool_Information
Gazelle helps Connectathon participants manage the pre-connectathon test.
- Based on the system declared list of actors and profiles, Gazelle will identify the list of test that needs to be executed.
- Gazelle provides information about the location of the documentation of the tests
- Gazelle provides a mechanism for a participant to return the test logs and for a connectathon manager to grade the returned logs.
Getting the list of test to be performed
This screen capture presents the Pre-connectathon test overview page in gazelle. The page is accessed through the menu : Connectathon->Pre-Connectathon Testing.

It shows the list of systems registered by the Organization, and for each system :
- the number of tests to do
- the number of tests to complete
- the number of tests verified
Click on the link in the: "Number of tests to do" column in order to view the detailled list of test to be executed for each system:

If you have a long list of tests, use the filters at the top.
Each row in the table represents one pre-Connectathon test and contains:
- a test identifier, usually a number. Hover your mouse over the test number to see a tooltip containing the test name
- a globe icon which is a link to the detailed description for the test. These test descriptions exist on several different websites, depending on the tool used.
- the profile, actor, and option the test applies to
- Optionality. R=the pre-Connectathon test is required. O=the pre-Connectathon test is optional.
- Status of the test
- Running--you are still working on it
- Verified by vendor--you have run the test, confirmed that the results are good, and uploaded evidence of that result (eg a log file, screen shot)
- Completed, with errors--you have run the test, but some problems occurred--either with the tool or with your implementation. You have made a comment in the test explaining the error.
- Supportive--you have registered for supportive testing. Selecting this status is a signal to connectathon management that you are choosing to skip this test (but you could perform it if you wish).
- A link to enable you to "Return a log file"
To learn how to submit results for a pre-Connectathon test, click on "Return logs for performed tests" below.
Return logs for performed tests
The general process for performing a pre-Connectathon test instance is:
- Read the Test Description (test steps). This is found by clicking the globe icon in the test.
- Access the tool used for this test (if applicable). An index to all IHE tools is here: http://wiki.ihe.net/index.php?title=IHE_Test_Tool_Information
- Perform the test.
- Capture evidence of your success; this may be a log file output by the tool, a screen capture showing success, or a text file you create that describes your successful result.
- Upload the result file into gazelle using the 'Upload a file' button. You can 'drag and drop' a file onto the button, or use your file browser to select the file.
- Change the status of the test
- Running: you are still working on it
- Verified by vendor: you have run the test, confirmed that the results are good, and uploaded evidence of that result (eg a log file, screen shot)
- Completed, with errors: you have run the test, but some problems occurred--either with the tool or with your implementation. You have made a comment in the test explaining the error.
- Supportive: you have registered for supportive testing. Selecting this status is a signal to connectathon management that you are choosing to skip this test (but you could perform it if you wish).
This screen capture presents an example pre-Connectathon test instance in gazelle:

Sample Sharing
The following sections describe how to use the Gazelle Test Management application to share samples (DICOM images, CDA documents...) and to verify the content of those samples.
Concepts -- sample sharing
Gazelle has a feature that allows participants in a testing session to share sample objects with other participants.
In Gazelle a "sample" is any object or message that an application creates and is used by another application. Typical samples include:
- DICOM object
- ISO image of DICOM CD-ROM or DVD
- CDA documents
- XDW documents
- HL7 messages
- ...others...
Gazelle Test Management uses the profiles and actors selected during Connectathon System Registration to determine which systems are 'creators' of samples and which system are 'consumers' of samples
Creators upload a file containing their sample into Gazelle.
Creators may use the Gazelle EVSClient tool to perform validation of the sample.
Consumers find samples uploaded by their Creator peers. Consumers download the samples and are able to test them with their application.
The following pages in this section detail how to upload, validate and access samples in gazelle.
Uploading a new sample
Creators of samples include DICOM Modalities, Content Creators of CDA documents, and other actors. These systems upload samples into Gazelle so that they are available to their test partners.
To upload a new sample, select Gazelle menu Connectathon-->Connectathon-->List of samples

When you select your system from the dropdown list, the "Samples to share" tab shows a list of samples for which your system is a creator. The list is based the profiles/actors in your system registration.
To add a new sample, for click the green "+" button next to the sample type.

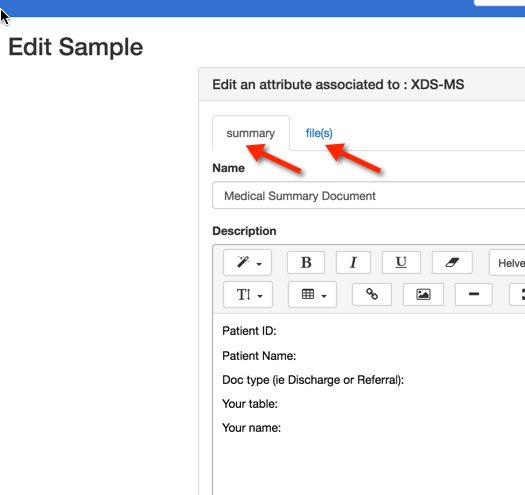
Give your sample a name as follows:

Next complete the "summary" tab, and on the "file(s)" tab, upload a file containing your sample.
When you have finished uploading your file and saving your sample, the sample entry in Gazelle will look like this:

Verifying samples using Gazelle EVSClient
After creators upload their sample file(s) into gazelle, it is possible to validate that content using the Gazelle EVSClient tool. (Note that Gazelle has validators many sample types, but not all.)
On the "Samples to Share" tab, find the entry for the file uploaded. Clicking on the green arrow will call the Gazelle EVSClient application:

In the EVSClient application, select the proper validator from the dropdown list. In this example, we are validating a DICOM image:

Depending on the type of sample you are validating, you may need to choose the tool and execute the validation. The results will appear at the bottom of the page:

And, here is a screen shot of a the validation result for a CDA document. The gazelle EVSClient shows a "permanent link to the sample". You may be asked to provide that link as evidence for a test case. The validation status and details appear at the bottom.

Finally, note that you can use the EVSClient application directly. See these EVSClient tests: https://gazelle.ihe.net/content/evs-client-tests
Accessing shared samples
If your systems is a Consumer of objects (documents, images...), to access samples that have been uploaded by Creators, select Gazelle menu Connectathon-->Connectathon-->List of Samples
After selecting your system from the dropdown list, find the "Samples available for rendering" tab as follows:

When you select a sample from the list, you will have access to sample details and can download the sample file(s):

System Configuration
Default configurations are assigned to the systems participating to a testing session. Once the Testing Session manager has assigned the configurations, participants can edit them and approve them.
This section describe how to edit and approve the configuations in Gazelle Test Management
The configurations are accessed through the menu "Configurations" as shown on the follwoing screen capture

HL7v2
This page present the form to edit the HL7v2 configurations :

HL7v3
DICOM
Webservices
Extract Configs from Gazelle
This page explains how to export the configuration information from Gazelle in a format the SUT can use to configure themselves.
There are 2 methods to get the configurations from test partners :
For the moment the only export format is CSV (Comma Separated Values) files generation.
Export Peers configuration parameters from the GUI
When searching for peers configurations in Gazelle (menu Configurations-> All Configurations)

In the configurations page, when available, click on the link "URL for downloading configurations as CSV" :

This URL is accessing the parametric service for downloading configurations.
testingSessionId, configurationType and systemKeyword are parameters that can be set by accessing the URL directly :
Europe : http://gazelle.ihe.net/EU-CAT/systemConfigurations.seam
North America : http://ihe.wustl.edu/gazelle-na/systemConfigurations.seam
System keyword is given if you use the GUI.
You can build the url that matches your need and have periodic query to the tool in order to feed your SUT with the most up to date information from the database.
Here are examples on how to use it :
- http://gazelle.ihe.net/EU-CAT/systemConfigurations.seam?testingSessionId=25&configurationType=HL7V2InitiatorConfiguration
- http://gazelle.ihe.net/EU-CAT/systemConfigurations.seam?testingSessionId=25&systemKeyword=ADT_AGFA_ORBIS_8.4
The response is a CSV file like this one :
"Configuration Type", "Company",  "System" , "Host" , "Actor" , "is secured", "is approved" , "comment" , "aeTitle", "sopClass","transferRole","port" ,"port proxy" ,"port secured"
"DICOM SCU","AGFA","WS_AGFA_0","agfa13","IMG_DOC_CONSUMER","false","false","For optional DICOM Q/R","WS_AGFA_0","QR","SCU","","",""
"DICOM SCU","AKGUN","PACS_AKGUN_2012","akgun10","PPSM","false","false","","PACS_AKGUN_2012","MPPS","SCU","","",""
Export peers configuration parameter using SOAP webservices
The wsdl of the webservice to access the peers configuration parameter is located there :
For Europe :
For North America :
http://ihe.wustl.edu:8080/gazelle-tm-gazelle-tm-ejb/ConfigurationsWS?wsdl
OID Management
This page explains how to access the OID values assigned to the systems participating to a testing session.
There are 3 methods for that purpose :
Export OIDs from GUI
You can get the list of OIDs from the GUI : configurations --> "OIDs for current session". On this page, you can do a search for a specific OID by filtering on the institution, the systemKeyword, the testing session, the integration profile, the actor, the option, and the label of the OID (homeCommunityId, organization OID, etc).
You can then use the link "Export as Excel file" to get an xls file containing all OIDs looking for.
Export OIDs using Rest webservices
You can generate directly a CSV file containing the oid, the label and the system keyword, by using REST webservice. The URL of the webservice is :
http://131.254.209.16:8080/EU-CAT/oidSystems.seam?systemKeyword=XXX&testingSessionId=YYY&requirement=ZZZ
where arguments used are :
| Argument | Opt | Type | List of Possible Values |
| systemKeyword | O | String | |
| testingSessionId | R | Integer | |
| requirement | O | String |
|
Export OIDs using SOAP webservices
The wsdl of the webservice to access the OIDs of systems is located there :
http://131.254.209.16:8080/EU-CAT-prod-TestManagement-ejb/ConfigurationsWS?wsdl
The concerned methods are :
- getListOIDBySystemByRequirementAsCSV : return a csv string which contains all OIDs searched by systemKeyword, testingSessionId and oidRequirementLabel
- getOIDBySystemByRequirement : return exactly the first OID searched by systemKeyword, testingSessionId and oidRequirementLabel

Network Configuration
The page Network Configuration Overview provides the users with the necessary information for the current testing session.
The information provided in that page is of 2 kind.
A blob where the administrator of the current testing session can provide to the participants a list of usefull an relevant information. This can be the networking parameters:
- Default gateway
- DNS
- Netmask
- ...
But it may also contain the information for the printer that is on site.
The page also provides a button to download a hosts file for the configuration of the systems that do not support DNS.
THe preferred method is for the participants to the testing session to use DNS in order to resolv hostnames. However we have encountered some systems in some past session that could not use DNS. So we have provided a mean to give the participants the access to a hosts file that can be installed on their SUT for name resolution.
Note that hosts file is NOT dynamic and the hosts file will have to be reloaded and reconfigured by the participants who have chosen not to use DNS after each test partner IP or name change.
Once the hosts file is downloaded it can be used to configure the SUT. Please refer to the operating system of the SUT for the set up of that file. Below is a list of pointer for 3 OSes
Connectathon Testing
Different category of tests
There are 3 types of test :
- No peer tests
- Peer to peer tests
- Group tests
Starting a Test Instance
Connectathon Dashboard
Gazelle Test Management users access the connectathon dashboard through the menu "Connectathon -> Connectathon " as shown on the following screen capture.

The dashboard offer advance filtering capabilities and allows the user to have an overview of the testing progress from different angles.

Monitor Workflow
Test validation workflow
- Find test in the monitor worklist
- Claim test (release it if necessary)
- Review test requirements
- Visit participants, look for evidence
- Grade the test
- Verified -> Done
- Failed -> Enter comments, done
- Partially Verified -> Enter comments, done
Gazelle Monitor App
The Gazelle Monitor application has been developed to help monitors validating tests without spending their time running from their desk to the participants' table. If the monitor own a smart phone with a WiFi connection, they will be able to claim and validate tests from their smart phone.
The GazelleMonitorApp is a tomcat application designed for mobile screens. It requires the installation of an application on the mobile devide that scans a QR code (for example http://en.wikipedia.org/wiki/QR_code).
The application you choose will depend on your device. You can download Barcode scanner, Google or other free applications from your market places. The use of MobileTag is discouraged since it accesses the links through an external server, and that will not work from most connectathon floor.
We have successfully tested the application with Android phones, iPhones and Windows phones.
In Europe, you will access the application at the following URL : http://gazelle.ihe.net/GazelleMonitorApp , the QR code leading to this application is given below:
How to proceed
After you have installed the QR scanner, connect your mobile device to GazelleMonitorApp application and sign in using your login and password; they are the same as what you use to connect to Gazelle (Test Management). Once the application has identified you, a cookie is stored in your (mobile) browser for 7 days (connect-a-thon duration) so that you will not have to sign in again even if your session expires. If it does not work, check that cookies are enabled in your browser. To remove this cookie, go to the application home page and use the "logout" button.
|
Home page |
|

 login page, use your Gazelle account
This workflow assumes that you have claimed one or more tests from the Gazelle Monitor Worklist, most likely using a laptop/PC. Once you are logged in with your mobile device, hit the "View claimed tests" button. If you are monitor at a Connectathon that is currently in progress, you will see the list of available testing sessions, as shown below. Selecting one of the testing sessions will lead you to the list of test instances you have claimed for that testing session. To select another testing session use the "Sessions" button of the navigation bar.
|
Choose your testing session |
Here is the list of test instance you have claimed and which still need work |
summary of a test instance. Click on update to see details and verify it, click on unclaim to release it |


A second workflow allows you to claim a test directly with your mobile device. You can do this at the participant table or using Gazelle at your laptop/PC. At your laptop/PC, go to Connectathon --> Monitor Worklist, you will see the list of test instances you can verify and claim them. Select a test instance by its identifier (id). When that brings up the Test Instance page, a QR code is displayed beside the metadata of each test instance (see the photo below). By scanning this QR code, for instance, you will be lead to the home page of GazelleMonitorApp; hit the "I've flahed a code" button, the test instance will appear (if you have access rights !)
|
Run a QR code scanner and flash the code |
Click on "I've flashed a code" to confirm and display the test informations |
Update informations and submit the result ("submit" button at the bottom of the page) |


By clicking the "View selected test instance" you confirm that you want to claim this instance. Nevertheless, the application may not be able to assign you this test for one of the following reasons:
- No test instance with the given id has been found within Gazelle
- You are not logged in or not a monitor for the testing session in which the test instance has been performed
- The test instance has already been claimed by someone else
- The test instance status is not either "to be verified", or "critical", or "partially verified"
- The connect-a-thon in which the test instance has been performed is over
When you get the screen with the test instance information, change the test status to failed, passed or patially verified. You may optionally change the status of individual test steps or leave a comment before submitting the result. If you want to add a long comment or if you prefer to change the step status using Gazelle Test Management, submit only the test status using the mobile app and then go to GazelleTest Management for further work. You can easily retrieve a test instance by its id using the search bar at the top of the home page of Gazelle Test Management on your laptop or PC.
Test Instance Workflow
Test Instances Statuses
A test instance can have the following statuses :
- Running : this is the initial state of a test instance, once the user press on the "Start" button.
- Paused : A test instance can be paused, and the restarted by the user.
- Aborted : If the test instance was started per mistake, or is a duplicate of an existing test instance. Then one can abort it. Aborted test instances are not checked by monitors.
- To be verified : Once a test instance is completed, the user can set it status to "to be verified". Monitors work list contains test instances with that status.
- Failed : Based on the evidences and the observation of the logs or the actual run of the test by vendors, a monitor may fail a test.
- Verified : A monitor once convinced that the test is successful can mark it as verified
- Partially verified : If a monitor thinks that a test is incomplete but that their is a chance that the vendor may fix the problem during the test session, then he/she can mark the test as partially verified.
- Critical : Sometime toward the end of the connectathon, the project manager activates the "critical" status mode in Gazelle. Monitors verify then the Test instances with the status critical first.
Test Instances Transitions states
From the Vendor perspective

From the Monitor perspective
Monitors work on test instances that have one of the 3 following status:
- To be verified,
- Critical or
- Partially Verified.
The output status are :
- Failed
- Verified
- Partially Verified
")
Complete state diagram for Test Instances

Validation of test steps logs within test instance
The aim of this page is to explain how the validation result displayed on a test instance page are retrieved from the EVSClient tool.
When a test instance is created, the page looks like:

The are different possibilities, like the next sequence diagram shows :

If we choose the first case, which is to add the permanent link from the proxy in a step message :

When it 'is added :

The file is to be validated in Proxy to EVSClient, the test instance page looks like (use the refresh button is not) :

We can see in data column the last validation status from EVSClient.
We can see in EVSClient status column :
-A color button (green=passed, blue=unknown or not performed, red=failed)
-The last date when the status was verified
-The refresh button
If the user clickon color button, then he is redirected towards the last result of validation.
If the user click on refresh button, then TM reloads the last validation status.
The button's color evolves according to the result and the date is update.
Generate and Share patient data
One of the numerous functionnalities of Test Management is called "Patient Generation and Sharing". This feature, available under the "Connectathon" menu, enables testers to generate patient demographics and to share them among systems registered within Gazelle for the same testing session. In this way, systems involved in a same test can be pre-filled with the same patients, the ones will be used during the test process.
List of patients
The first tab available in the "Patient Generation and Sharing" page is entitled "Existing patients". It list all the patients registered in Test Management, you can restrain the list of patients using the filters available in the table column headers. If you need to find a patient created by yourself, select your username in the "Select creator" drop-down list.
For some of the patients, the "test keyword" column is filled, it matches the test keyword in which you have to use this patient. For instance, if you want to pre-fill your system for testing PIX, enter "PIX" in the filter box of the "Test keyword" column, you will get the list of patients to use for this set of tests.
Update patient data
Test Management enables you to edit a patient in order to update his/her demographic data. Actually, instead of updated the information in the database, a new patient is created with the new demographics and the original patient cannot be updated anymore. For the new patient, a link to the "original patient" is made. To access this feature, use the edit button displayed on each row of the table ![]() (except for patients already updated once).
(except for patients already updated once).
Share a list of patients
Using the "Export as CSV file" link, below the table, you will get a CSV file gathering all the demographics data for all the patients displayed in the page. If you need patients displayed on several pages, please, before clicking on that link, increase the number of "results per page" in a manner that you will see all the patients you want to export.
In the same way, the ![]() button at the bottom of the page enables you to share those same patients using an ADT message. See below for explanations about how to set the sending options.
button at the bottom of the page enables you to share those same patients using an ADT message. See below for explanations about how to set the sending options.
Share a patient
The tab entitled "Share patient" is available only if at least one patient is selected. The purpose of this page is to send HL7 messages to the CAT participants in order to help them with sharing the same patients demographics. You will first have to select the message to send and then to select the systems to which send those messages.
Four HL7 message types are available in this section:
- ADT^A01^ADT_A01 (HL7v2.3.1)
- ADT^A04^ADT_A01 (HL7v2.3.1)
- ADT^A28^ADT_A05 (HL7v2.5)
- PRPA_IN201301UV02 (HL7v3)
Depending if you select a message with a version equals to HL7v2.x or HL7v3, the list of available systems will gather systems registered with respectively an HL7v2 Responder or HL7v3 Responder configuration approved within Gazelle. Those systems are listed by HL7 Responder actors. Select all the systems you need (by double-clicking on a system, it will pass from a box to the other). Once the systems, for a given actor, are selected, click on the "Add selection" button. The systems and their configurations will appear in the table below.
If the system you are looking for is not available in the displayed list or if you are using this functionality out of a connectathon period, you may want to manually enter the configuration of the system (IP address, port, receiving application/facility ...). To do this, use the form available in the right hand part of the screen.
You can use at the same time Gazelle and manual configurations. When all of them are selected, click on the "Send Message" button.
A table will then appears which gathers all the logs of the event. For each selected systems, the message sent by Gazelle and the acknowledgment received are stored there; so that you can see which systems received and integrated the message.
Generate a patient
This part of the tool is available under the "Generate patient" tab. The generation of patients' demographics and addresses is done calling the webservice offered by the Gazelle tool named Demographics Data Server (DDS). The generator can be configured to return or not such or such data. For instance, you might not want your patient to have a religion or a race but you want it to be called MY_COMPANY MY_SYSTEM. You can do that. Select the "random" option for the generation of names and fill out the first name and last name; also select the gender of the patient. Then, select the other criteria you want and click on the "Generate patient" button. After a while, the patient demographics will show up.
If you want to immediate share the just generated patient, click on the "Share patient" button, available under the patient's demographics.
Permanent link
Each patient can be accessed using a permanent link. This one is available in the page gathering the data of a particular patient.
Quick search
Using the quick search box available beside your username at the top of the tool, you can search the patient by its name, first name (criteria: Patient by name) or by id (criteria: Patient by id).
For learning more about this functionality and seeing annotated screen shots, refers to the attached pdf file.
- Log in to post comments
Internet Testing
The purpose of this chapter is to explain how to use gazelle test management in order to perform testing over the internet.
Using Gazelle Test Management for Internet testing provides testers with the following functionalities.
- Registration
- Sharing of configurations
- Partner discovery
- Test execution and logging
Specificity of Internet testing
Internet testing using Gazelle Test Management is very similar to testing during the connectathon. The major difference between connectathon testing and Internet testing is an increased difficulty to achieve the communication between the different test partners.
- Test Partners are not located in the same room.
- Communication between the SUT needs to go through corporate firewalls
Registration
Usage of Connectathon and PreConnectathon presets
The purpose of this chapter is to explain how to use presets in Gazelle pages where they are available.
Presets are available for the following page :
- Connectathon page
- Pre-Connectathon page
The aim of the preset is to allow the user to save some filtering configuration and directly load the page with the filtering value set with the saved ones. The intent is double : speed up navigation for the user and reduce the load on the server by avoiding loading all the tests when only a few of them needs to be loaded.
First of all, a preset use cookies,you need to activate them! Normally if you are able to log into the application your brower is already configured to accept cookies
Let's take the PreConnectathon result page for instance, it is ver y similar to the Connectathon page.

You can see in red rectangle the new feature.
Select an organization, add a name to your preset and clic on save. Your preset is added !

Two fonctions are available:
- You can check a box to replace your main PreConnectathon result page. By default, it's none.
- You have a list of all of your presets with the name, the possibility to remove it, the current and default page.
You can save up to 4 presets. Once they are all created, you need to remove one before creating a new one.

Now you can click on PreConnectathon results page and the loaded page is your default page :

Systems Management
- Log in to post comments
Permanent link to system
For each system, there are a permanent link from gazelle to go directly to the summary of the system on the specified session. The link contains the description of the system, implemented IHE actors/profiles, system information summary, and the list of demonstrations that the system is registered for.
This permanent link has this form :
http://gazelle.ihe.net/EU-CAT/systemInSession.seam?system=XXXX&testingSessionId=XX
- system : the keyword of the system
- testingSessionId : the id of the testing session (15 for pisa, 8 for Bordeaux, etc).
Test Specification
- Log in to post comments