
Simulator Developer Guide (use of modules shared by simulators)
Introduction
This section is aimed at developers who'd like to contribute to the Gazelle Project and develop new simulators.
What is a simulator ?
A simulator is a stand alone application that mimics one (or more) IHE actors for a given set of IHE profiles. The simulator may implement a web service interface that it used for the communication between Gazelle and the Simulator. The simulator shall also implement the functionality specific to the actors it is simulating. The simulator must to store the messages exchanged with the system under test and it's strongly recommend that it is bound to a validation service to check the conformity of the messages exchanged.
How to create a new simulator project ?
All the simulators of the Gazelle platform are built on the same model using a Maven archetype. This ensures that the layout will remain the same and it avoids wasting time in developing a new template and classes which can be common to several tools.
If the simulator you are about to create will implement HL7v2 based transaction, please read the HL7v2 based simulator section of this guide.
Below, we explain how to create a new Maven project using Eclipse new project configuration feature. Before starting this tutorial, make sure that you have the Maven plug-in installed (see Development support tools section of the developer guide for the list of plug-ins to install)
- Start Eclipse and create a new Maven Project: File --> New --> Project ... The New project pop-up will appear.
- Select the wizard entitled Maven Project (under the Maven folder) and click on the Next > button.

- On the New Maven Project page, verify that "Create a simple project (skip archetype selection)" is not checked and click on the Next > button

- Then, you are asked to select an archetype. Select the Nexus Indexer catalog and then Filter with net.ihe.gazelle. You should see an archetype named simulator-archetype. Make sure you have the latest version by checking the Nexus repository of Gazelle. If the latest version does not match the one displayed by Eclipse, you will be able to change it during the next step. Click on the Next > button.

- On the next page, enter the following informations
- Group Id: net.ihe.gazelle.simulators
- Artifact Id: the name of your simulator
- Version: might be 1.0-SNAPSHOT
- Package: net.ihe.gazelle.yoursimulatorpackage (prefer lower case)
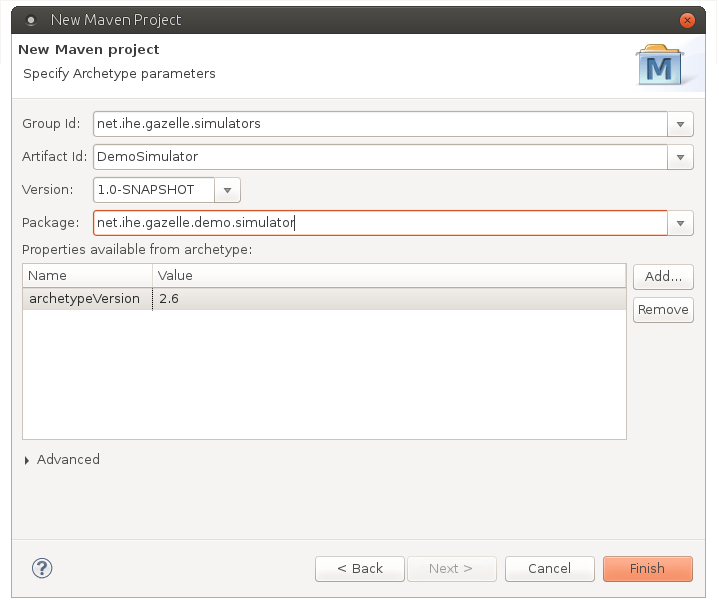
- Finally, click on the Finish button
- Creating the simulator might take a while, once the project is build, it will appear in your list of projects under the Java view. You can now start developing your new tool by editing and completed the pom.xml file available at the root of the project.

Add this new project in SVN
Simulators are gathered in the Maven/simulators directory of our SCM. To add your simulator, follow the instructions given below
- Go to the "Browse SVN" view and select the Gazelle repository (at svn+ssh://yourlogin@scm.gforge.inria.fr/svn/gazelle)
- Right click on Maven/simulators folder and select New --> Project structure...
- Enter the name of your project (Shall be the same as your parent project, in the example DemoSimulator)
- Check the folder and its children (trunk, tags, branches) are correctly created in the good place
- Go back to the Java view and right-click on the parent folder of your project (DemoSimulator in the example) and select Team --> Share Project...
- In the dialog window, select SVN and click Next >
- On the next page, select the Gazelle repository and click Next >
- Then, select Simple mode and browse the repository to access the right location: Maven/simulators/DemoSimulator/trunk
- Make sure that the final folder is trunk (Eclipse might add your project name after trunk and that is not what we want)
- Finish the process. You might be asked to checkout the project available on the Forge, say YES.