[Deprecated] User Manual
Warning: This documentation is out-dated, newest version of the documentation is available at https://gazelle.ihe.net/gazelle-documentation
The application External Validation Service Front-End can be used for validating the following objects:
- HL7 CDA files
- HL7v2.x and HL7v3 messages
- HPD messages
- SVS messages
- DSUB metadata
- SAML assertions
- Audit messages
- Certificates
- DICOM objects
- PDF files
- XD* messages (metadata)
- XDW documents
Note about the privacy of validation results
If the user is not log on the application, his/her validation requests and results (that means the document/message submitted to the tool and the validation outcome) are available to everybody. We say that the result is "public"; it will be listed in the list of validation requests and everybody will be able to access and download both the validated file and the validation report.
If the user is logged on the application, by default, his/her validation requests and results will be set as "private". That means that he/she will be the only one to see the validation requests in the list and to access it. A permanent link is created for each validation request, the ones leading to a private request have restricted permissions; only the owner of the validation requests (the one who performed the validation) will be able to access this page.
A logged on user can choose to have a given validation request available to everybody. In this case, everybody will be able to list the request and to access both the validated file and the validation report. To do so, once the validation is performed (or at any moment from the result page), click on the "Make this result public" button. At any time, the owner of the request (and only him/her) will be able to change back the visibility of the result to private.
A logged on user can choose to keep his/her validation request (file + result) private but to allow certain users to access it also. In this case, clicking on the "share this result" button will generate a random key which, added to the URL will ensure that only the persons who know the permanent link (including the key) will be able to access the content of the validation request. The owner of the validation request will still be the only one to see the result in the list gathering all results but everyone knowing the link will be allowed to display the page.
Note that the admin and monitor users are able to access all the validation requests. It's obvious that they were use them only for verification purposes and will not publish neither use them for other purposes.
Validate an XML file
By XML file we mean all messages or documents based on XML (CDA, HL7v3 messages, XD* metadata ...) All those kinds of files can be validating using a schematron and/or a model-based validator. Once you have selected (in the top bar menu) the kind of XML object you want to validate, you will reach a page which ask you to upload the XML file to validate (be careful, the application allows only files with .xml extension) and to select the schematron and/or model-based validator to use.
Below is an example of the different steps for validating an XD-LAB report.
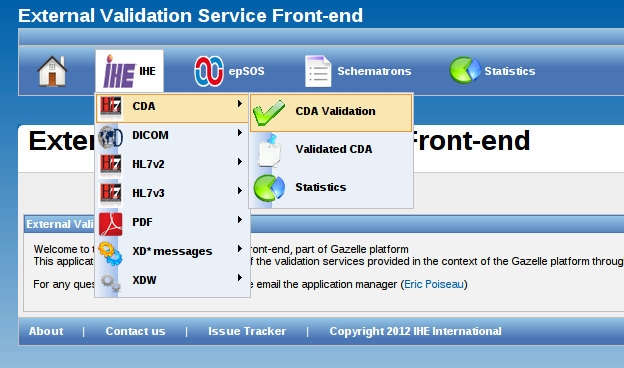
1. Select the menu CDA Validation in the IHE drop-down menu

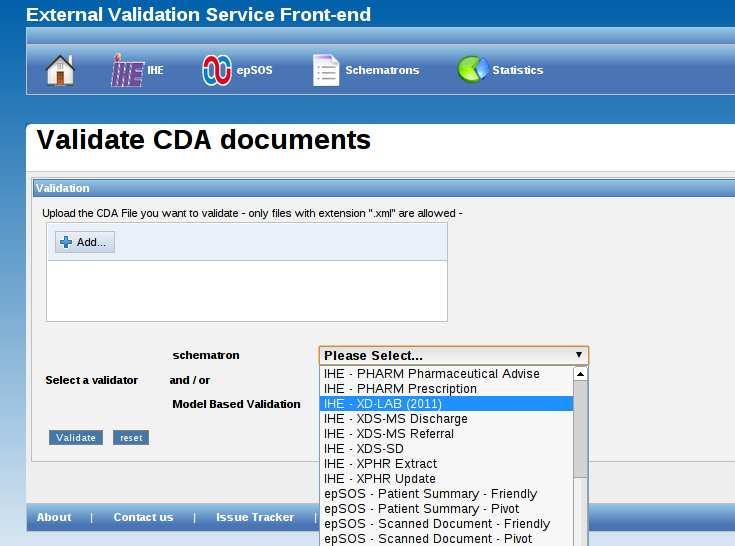
2. Hit the "Add" button and select the XML file to validate in your system explorer

3. Select the schematron and/or a model-based validator to use in the drop-down list(s)

4. Finally, hit the "validate" button. After a while, the validation result will be displayed below the selection area.
The validation result panel is divided into differents panels :
"Download result" button enables you to download an XML file gathering the validation result. The relative stylesheet is provided here.
"Information" gives information about the validated file, the validation date, the schematron used and the result of the validation. In this part, you will also find a permanent link to the current validation result. If you have asked for both schematron and model-based validation, two tabs will be displayed, one by validation result.
Validate an HL7v2.x message
1. Select the menu HL7v2 menu in the IHE drop-down menu

2. Upload or paste your message
Enter your message in the box (paste your message, ER7 format) OR upload the file containing your message (be careful, the application allows only files with .hl7 or .txt extension).

Then, you must choose the HL7 message profile to use to validate your HL7 message. The "Guess profile" button, just below the box, can be used to guess automatically the HL7 message profile to use, it extracts fields MSH-9 and MSH-12 and filter on those values.
Finally, to launch the validation process, hit the ![]() on the right side of the line corresponding to the message profile to use.
on the right side of the line corresponding to the message profile to use.


