LBL Simulator : Label Information Provider
In order to access to the Label Information Provider simulator, go to the "Simulators" menu and hit "LIP".

Once on the LIP Simulator page, the user will choose wich transaction to test, LAB-61, LAB-62 and LAB-63.
LAB-61 : Label Delivery Request.
To get more information about the role of the LB and LIP actors in this transaction, see the IHE Laboratory Technical Framework, Volume 2.
To send a request to the LB SUT with the LIP Simulator, go to the LAB-61 tab. First at all, choose the LB SUT Configuration to use. (Please go to the LBL Simulator : How to get started section for more information about the SUT configuration.)
Once the user has choosen the SUT configuration, a summary of the configuration will be appear on the top of the page.
Then, in the Request Parameters panel, the user can see the Patient Information to use for the request. This is the only information to choose, the labelling information will be automatically generated by the LIP Simulator.
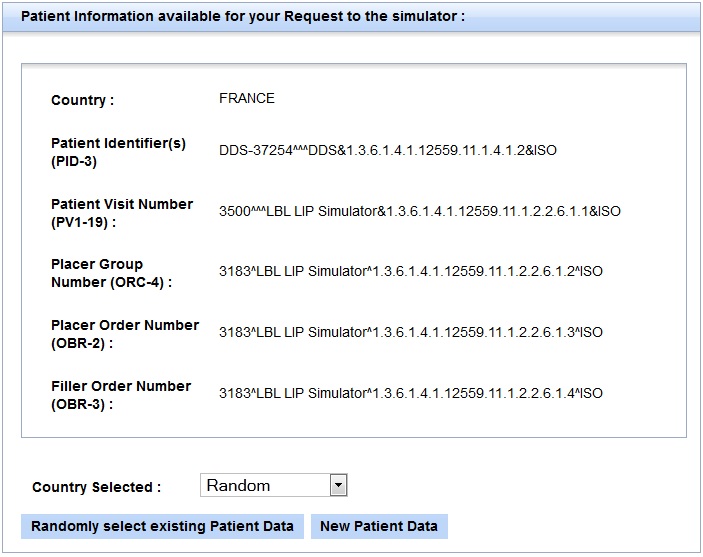
In the Patient Information table, the user can find information about the patient data saved in the LBL Simulator data base. To get new patient data, select the country of the patient in the country list, then hit the ![]() button. The
button. The![]() button can be used to get the existing patient data. All data about the patient are generated with the DDS (Demographic Data Server) project. See this link for further information : DDS.
button can be used to get the existing patient data. All data about the patient are generated with the DDS (Demographic Data Server) project. See this link for further information : DDS.

Finally, hit the Send button to send the request to the LB SUT.
At the bottom of the page, an HL7 message table will show all HL7 messages send by the LB Simulator to the selected LIP SUT. See the last section of this tutorial for further information on the HL7 message validation.
LAB-62 : Query for labeling instruction
To get more information about the role of the LB and LIP actors in this transaction, see the IHE Laboratory Technical Framework, Volume 2.
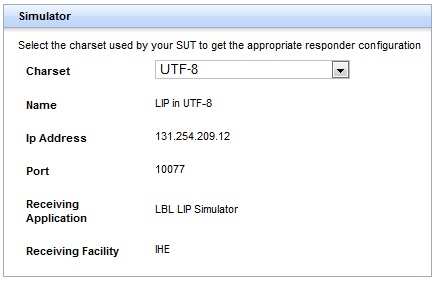
In the LAB-62 tab, the user will find a sequence diagram which resume the interaction of the transaction. At the left of this diagram, a panel shows all information about the configuration of the LIP Simulator. The configuration is linked to a charset. Change the charset to get the appropriate configuration, using the charset list. See the example below, for the selected UTF-8 charset.

In the Patient Information table, the user can find information about the patient data saved in the LBL Simulator data base. Patient information are essential to query the LIP Simulator. To get new patient data, select the country of the patient in the country list, then hit the  button. The
 ![]() button can be used to get the existing patient data. All data about the patient are generated with the DDS (Demographic Data Server) project. See this link for further information : DDS.
button can be used to get the existing patient data. All data about the patient are generated with the DDS (Demographic Data Server) project. See this link for further information : DDS.

The LIP Simulator is a responder and is able to respond to the LB SUT with the appropriate Acknowledgment message. If the message receives by the LIP Simulator is not consistent with the IHE technical framework, the LIP Simulator will respond with an error Acknowledgment.
Once the LB SUT has sent the labeling instructions to the LIP Simulator, the user must hit the ![]() button in order to refresh the HL7 messages table. This table shows all HL7 messages received by the LIP Simulator. See the last section of this tutorial for further information on the HL7 message validation.
button in order to refresh the HL7 messages table. This table shows all HL7 messages received by the LIP Simulator. See the last section of this tutorial for further information on the HL7 message validation.
LAB-63 : Labels and Containers Delivered
To get more information about the role of the LB and LIP actors in this transaction, see the IHE Laboratory Technical Framework, Volume 2.
In the LAB-63 tab, the user will find a sequence diagram which resume the interaction of the transaction. At the left of this diagram, a panel shows all information about the configuration of the LIP Simulator. The configuration is linked to a charset. Change the charset to get the appropriate configuration, using the charset list. See the example below, for the selected UTF-8 charset.

The LIP Simulator is a responder and is able to respond to the LB SUT with the appropriate Acknowledgment message. If the message receives by the LIP Simulator is not consistent with the IHE technical framework, the LIP Simulator will respond with an error Acknowledgment.
Once the LB SUT has sent the labeling instructions to the LIP Simulator, the user must hit the ![]() button in order to refresh the HL7 messages table. This table shows all HL7 messages received by the LIP Simulator. See the last section of this tutorial for further information on the HL7 message validation.
button in order to refresh the HL7 messages table. This table shows all HL7 messages received by the LIP Simulator. See the last section of this tutorial for further information on the HL7 message validation.

